
Related Manuals for Husky 41004


Summary of Contents for Husky 41004
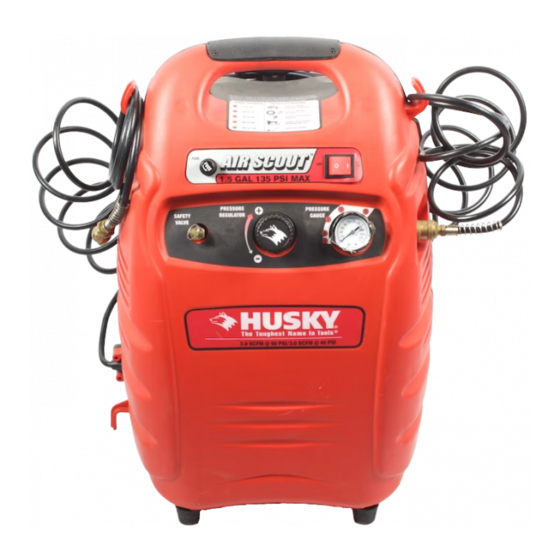
- Page 1 1.5 GALLON AIR COMPRESSOR Operator's Manual Model: Model 41004 3091488 TOLL FREE HELPLINE: 1-877-888-3872 FOR SAFE OPERATION, READ AND UNDERSTAND ALL CONTENTS OF THE INSTRUCTION MANUAL...
-
Page 2: Important Safety Instructions
SAFETY GUIDELINES - DEFINITIONS This manual contains information that is important for you to know and understand. This information relates to protecting YOUR SAFETY and PREVENTING EQUIPMENT PROBLEMS. To help you recognize this information, we use the symbols below. Please read the manual and pay attention to these symbols. - Page 3 IMPORTANT SAFETY INSTRUCTIONS Save these instructions Improper operation or maintenance of this product could result in serious injury and property damage. Read and understand all warnings and operation instructions before using this equipment. HAZARD WARNING: Risk of explosion or fire What Could Happen How To Prevent It Always operate the compressor in a well...
- Page 4 HAZARD WARNING: Risk of Bursting Air Tank: The following conditions could lead to a weakening of the tank, and result in a violent tank explosion and could cause property damage or serious injury. What Could Happen How To Prevent It Drain tank daily or after each use.
- Page 5 HAZARD WARNING: Risk of Electric Shock WHAT CAN HAPPEN HOW TO PREVENT IT Your air compressor is powered by Never operate the compressor outdoors when it is raining or in wet conditions. electricity. Like any other electrically powered device, If it is not used properly Never operate compressor with it may cause electric shock.
- Page 6 HAZARD WARNING: RISK OF BURNS WHAT CAN HAPPEN HOW TO PREVENT IT Touching exposed metal such as the Never touch any exposed metal parts on compressor during or immediately compressor head or outlet tubes, can after operation. Compressor will remain result in serious burns.
- Page 7 HAZARD WARNING: RISK OF SERIOUS INJURY OR PROPERTY DAMAGE WHEN TRANSPORTING COMPRESSOR (Fire, Inhalation, Damage to Vehicle Surfaces) WHAT CAN HAPPEN HOW TO PREVENT IT Oil can leak or spill and could result in Always place COMPRESSOR on a fire or breathing hazard; serious injury or protective mat when transporting to death can result.
-
Page 8: Duty Cycle
50% of one hour is considered misuse, because the air compressor is undersized for the required air demand. Maximum compressor pumping time per hour is 30 minutes. SPECIFICATIONS Model No. 41004 Motor: 120V 60Hz, 8-amp Running Horsepower: 1 Hp Tank Size: 1.5 -gallon... - Page 9 Unpacking Remove unit from carton and discard all packaging. NOTE: Save all Safety Nozzle parts bags Assemble Hose Assemble the safety nozzle (d), rubber blow gun tip (h), or blow gun Slide the quick connector towards adapter (e) to blow gun. NOTE: To the compressor body and insert the use the inflating needle (f) or the hose to the quick connector.
- Page 10 INSTALLATION Inspect the plug and cord before HOW TO SET UP YOUR each use. Do not use if there are COMPRESSOR. signs of damage. Location of the Air Compressor Locate the air compressor in a clean, dry and well ventilated area. The air compressor should be located at least 12"...
-
Page 11: Extension Cords
Extension Cords conditions are met. NOTE: USE EXTRA AIR HOSE INSTEAD OF Voltage supply to circuit must AN EXTENSION CORD TO AVOID VOLTAGE comply with the National DROP AND POWER LOSS TO THE MOTOR. Electrical Code. IF AN EXTENSION CORD MUST BE USED, Circuit is not used to supply any BE SURE IT IS: other electrical needs. - Page 12 OPERATION Know Your Air Compressor READ THIS OWNER'S MANUAL AND SAFETY RULES BEFORE OPERATING YOUR UNIT. Compare the illustrations with your unit to familiarize yourself with the location of various controls and adjustments. Save this manual for future reference Telescopic handle Auto/On Fuse...
-
Page 13: How To Use Your Unit
Cooling System (not shown): This Regulator: Controls the air pressure compressor contains an advanced shown on the outlet pressure gauge. design cooling system. At the heart of Turn knob clockwise to increase this cooling system is an engineered pressure and counterclockwise to fan. - Page 14 number. 4. Open the drain valve fully (counterclockwise) to permit air to escape and prevent air pressure build up in the air tank during the break-in period. 5. Move the Off/Auto-On switch to "Auto-On" position. The compressor will start. 6. Run the compressor for 15 minutes.
- Page 15 How to use High Flow Insert nozzle into inflatable and then start inflator, see "How to Start" Inflator/Deflator Adapter Body paragraph. Assemble the high flow inflator/deflator body as NOTE: If inflatable is not getting firm described in the Assembly enough, place thumb over the section.
- Page 16 HOW TO USE DIGITAL TIRE PRESSURE GAUGE Press the button to turn on the tire gauge. Press the button to select PSI; BAR or KPA, when the LED screen shows. Place the nozzle of the gauge onto the valve stem of the tire and hold tightly for one second, making sure to achieve a good sea, then remove the gauge and read the accurate tire pressure from the LCD.
- Page 17 MAINTENANCE Customer Responsibilities Daily or after each use Before each use • Check Safety Valve • Drain Tank Risk of Unsafe Operation. Unit cycles Place unit on blocks to lift unit off of ground. automatically when power is on. Place suitable container under unit When performing maintenance, you to catch water.
- Page 18 STORAGE Wrap the electrical cord loosely, Before you store the air snap it into itself as shown for compressor, make sure you do storage the following: Drain tank, see "To Drain Tank" paragraph in the "Maintenance" section of this manual for the correct procedure.
- Page 19 STORAGE Mounting the compressor to the wall. NOTE: DO NOT RUN COMPRESSOR WHILE IT IS MOUNTED TO THE WALL. TO USE REMOVE FROM WALL BRACKET. Find proper mounting location on the studs. Not lower than 3.5 ft from the floor. Mark a level line on the wall.
- Page 20 TROUBLESHOOTING Risk of Unsafe Operation. Performing repairs may expose voltage sources, moving parts or compressed air sources. Personal injury may occur. Prior to attempting any repairs, unplug the air compressor and bleed off all air tank air pressure. PROBLEM CAUSE CORRECTION Excessive tank 1.Pressure switch does not...
- Page 21 PROBLEM CAUSE CORRECTION Compressor is Prolonged excessive use of Decrease amount of air usage. not supplying air. Check the accessory air enough air to Compressor is not large requirement. If it is higher operate enough for air requirement. than the SCFM or pressure accessories.
- Page 22 LIMITED WARRANTY This product covered under this warranty is free from defects in material and workmanship for one (1) YEAR limited warranty on air compressor components. The Authorized Warranty Service will repair or replace, at its option, products or components which have failed within the warranty period. Service will be scheduled according to the normal work flow and business hours at the service centre location, and the availability of replacement parts.
-
Page 23: Parts List
Parts list...
Need help?
Do you have a question about the 41004 and is the answer not in the manual?
Questions and answers
I need to replace my pressure hose. What size hose and connector do I need to purchase?
The Husky 41004 uses a 25-foot recoil air hose with a maximum pressure of 200 PSI. The included connectors are quick connectors compatible with 1/4", 3/8", and 5/8" inflators.
This answer is automatically generated
I need parts 251 and 252 the fuse holder [ screw in cap} and a fuse} for the 1.5 Husky Air scout
The parts list in the manual includes parts 251 and 252, but it does not provide specific sourcing information. For repair parts, service, or technical assistance, you can call 1-877-888-3872 as mentioned in the manual.
This answer is automatically generated