Table of Contents
Advertisement
Quick Links
Advertisement
Table of Contents

Related Manuals for Grizzly G1023S


Summary of Contents for Grizzly G1023S
-
Page 1: Instruction Manual
10" HEAVY-DUTY TABLE SAW MODEL G1023S & G1023S110 INSTRUCTION MANUAL COPYRIGHT © FEBRUARY, 2002 BY GRIZZLY INDUSTRIAL, INC WARNING: NO PORTION OF THIS MANUAL MAY BE REPRODUCED IN ANY SHAPE OR FORM WITHOUT THE WRITTEN APPROVAL OF GRIZZLY INDUSTRIAL, INC. PRINTED IN TAIWAN... - Page 2 Some dust created by power sanding, sawing, grinding, drilling, and other construction activities contains chemi- cals known to the State of California to cause cancer, birth defects or other reproductive harm. Some examples of these chemicals are: • Lead from lead-based paints. •...
- Page 3 GENERAL ................................35 TABLES ................................35 V-BELTS................................. 35-36 LUBRICATION ..............................36 MODEL G1023S110 WIRING DIAGRAM ......................37 MODEL G1023S WIRING DIAGRAM ......................... 38 CLOSURE ................................... 39 MACHINE DATA ..................................40 PARTS BREAKDOWNS AND LIST ............................ 41-43 TROUBLESHOOTING................................44 PUSH STICK PATTERN ................................45...
-
Page 4: Safety Instructions For Power Tools
8. USE RIGHT TOOL. Do not force tool or in damp or wet locations, or where any attachment to do a job for which it was not designed. flammable or noxious fumes may exist. Keep work area well lighted. G1023S/G1023S110 Heavy-Duty 10'' Table Saw... - Page 5 Then contact our service 15. USE RECOMMENDED ACCESSORIES. department or ask a qualified expert how Consult the owner’s manual for recom- the operation should be performed. mended accessories. The use of improper accessories may cause risk of injury. G1023S/G1023S110 Heavy-Duty 10'' Table Saw...
-
Page 6: Additional Safety Instructions For Table Saws
If normal safety pre- respect. Failure to follow guidelines could cautions are overlooked or ignored, serious result in serious personal injury, damage to personal injury may occur. equipment or poor work results. G1023S/G1023S110 Heavy-Duty 10'' Table Saw... -
Page 7: Safety Accessories
Be sure to make an additional slot for the blade splitter. There are also a wide selection of table inserts in the Grizzly catalog. Clamp the insert firmly in place with a piece of wood when creating slots. Never hold the table insert with your hand while cutting new slots. - Page 8 ⁄ " apart and 2" to 3" deep. There are a number of featherboards in the Grizzly catalog. See Figure 4. Feather Board Figure 2. Zero Clearance Table Inserts Push Paddles Push paddles (shown in Figure 3) provide added leverage and support when ripping or crosscut- ting wide workpieces.
-
Page 9: Common Definitions, Terms And Phrases
It is important that you read and become familiar with them before assembling, adjusting or operating this machine. Your safety is VERY important to us at Grizzly! Arbor: Metal shaft extending from the drive... - Page 10 GROUNDED 6-15 RECEPTACLE Current Carrying Prongs 6-15 PLUG Grounding Prong Figure 5A. NEMA 5-30 110V plug and outlet. Figure 5B. NEMA 6-15 220V plug and outlet G1023S/G1023S110 Heavy-Duty 10'' Table Saw...
-
Page 11: Model G1023S
Model G1023S Only: Circuit Load 220V Operation The Model G1023S is wired to operate at 220V. When operating at 220V, we recommend using The cord set enclosed does not have a plug as a NEMA-style L6-20 plug and outlet. See Figure the style of plug you require will depend upon 5C. -
Page 12: Grounding
Under no circumstances Ensure compliance by checking with your should the grounding pin local municipality or a licensed electrician. from three-pronged plug be removed. Serious injury may occur. -10- G1023S/G1023S110 Heavy-Duty 10'' Table Saw... -
Page 13: Introduction Commentary
If you have any service questions or parts requests, please call or write us at the location listed below. We are proud to offer the Grizzly Model G1023S/ Grizzly Industrial, Inc. G1023S110 10" Heavy-Duty Table Saw. The 1203 Lycoming Mall Circle... -
Page 14: Unpacking
DO NOT over-exert your- self while unpacking or moving your machine – you will need assis- tance and power equip- ment. Serious personal injury may occur if safe moving methods are not followed. -12- G1023S/G1023S110 Heavy-Duty 10'' Table Saw... -
Page 15: Piece Inventory
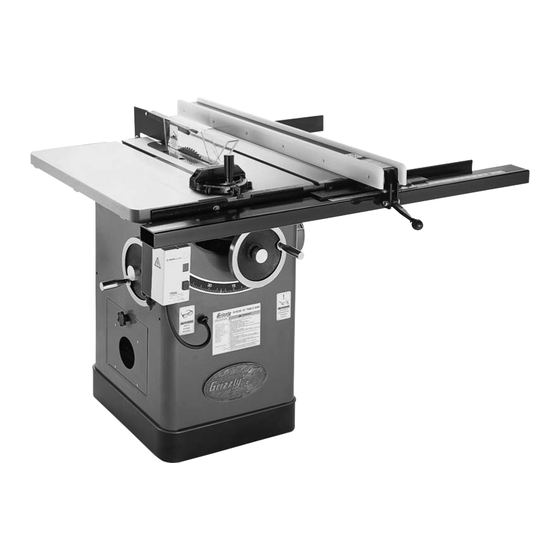
Shop Fox Classic fence can be found in ® Figure 6. G1023 Series base unit. the manual that accompanies the fence. Those items are not included in this manual. Figure 7. Rip fence assembly. G1023S/G1023S110 Heavy-Duty 10'' Table Saw -13-... -
Page 16: Clean Up
Some residential floors may require Clean this grease off with a solvent cleaner or additional bracing to support both machine citrus-based degreaser such as Grizzly’s G7895 and operator. Degreaser. Do not use chlorine-based solvents – if you happen to splash some onto a painted Working Clearances: Consider existing and surface, you will ruin the finish. -
Page 17: Extension Wings
10mm, 12mm, Check flushness over the front bolt and re- 14mm open end wrenches and a 3mm Allen ® adjust if necessary. wrench. Repeat Steps 3-4 for the other extension wing. G1023S/G1023S110 Heavy-Duty 10'' Table Saw -15-... -
Page 18: Extension Wings
Figure 9. Using tape to shim for wing alignment. Fence Your Model G1023 Series comes with a Shop Classic fence. For fence assembly instruc- ® tions, refer to the manual provided with the fence. -16- G1023S/G1023S110 Heavy-Duty 10'' Table Saw... -
Page 19: Motor Brace
To install the guard support shaft: Place the threaded end of the shaft through the hole in the back of the saw (Figure 12). Figure 13. Splitter bracket installed. Thread the shaft into the tilt assembly. G1023S/G1023S110 Heavy-Duty 10'' Table Saw -17-... -
Page 20: Handwheel
Figure 15. Setscrews on each corner of insert. The table insert provides access to the blade and the arbor when removed. When in place, the insert provides support for the materials being cut. Disconnect the power cord from the outlet! -18- G1023S/G1023S110 Heavy-Duty 10'' Table Saw... -
Page 21: Saw Blade
Hand tighten the nut and snug with the wrench included with the saw. DO NOT overtighten. IMPORTANT: Make sure the blade is installed with the teeth facing the front of the saw. Figure 17. Blade splitter square to table. G1023S/G1023S110 Heavy-Duty 10'' Table Saw -19-... - Page 22 Figure 19, simply add washers Proper between the splitter and the front support Alignment bracket, and adjust the rear splitter support as shown in Figure 20. Figure 20. Proper splitter/blade alignment. -20- G1023S/G1023S110 Heavy-Duty 10'' Table Saw...
- Page 23 You other part of the saw. If there is contact, can always adjust the splitter back to the left repeat steps 7-9. with washers. Tighten the adjustment bolt securely. G1023S/G1023S110 Heavy-Duty 10'' Table Saw -21-...
-
Page 24: Blade Tilt
Retighten the locking knob. Recheck your blade height with the sample Figure 22. Geared trunnion. material and re-adjust, if necessary. -22- G1023S/G1023S110 Heavy-Duty 10'' Table Saw... -
Page 25: Miter Slot To Blade
The saw blade is dangerously sharp. Use extra care when handling the blade or working near it. Serious injury is possible. Figure 23. Adjusting blade to miter slot. G1023S/G1023S110 Heavy-Duty 10'' Table Saw -23-... - Page 26 Repeat Step 10 in Section 4: Assembly, “Blade Guard/Splitter.” Also, if you ever remove the table in the future, be sure to make note of shim placements and reassemble exactly how it came apart. Figure 26. -24- G1023S/G1023S110 Heavy-Duty 10'' Table Saw...
-
Page 27: Blade Alignment
If you make the adjustment described in this self while lifting or mov- section, check and adjust the blade splitter ing the table and wings to make sure it aligns with the blade. – get assistance. G1023S/G1023S110 Heavy-Duty 10'' Table Saw -25-... -
Page 28: Rip Fence
To adjust the miter gauge so it is perpendicular to the saw blade: Disconnect machine from the power source. Loosen the lock knob on the miter gauge and place a square against the face of the miter body and the blade. -26- G1023S/G1023S110 Heavy-Duty 10'' Table Saw... - Page 29 There are many different jigs that can be built to increase safety, accuracy, and types of cuts. WE STRONGLY RECOMMEND that you read books, trade magazines, or get formal training to maximize the potential of your table saw. G1023S/G1023S110 Heavy-Duty 10'' Table Saw -27-...
-
Page 30: Test Run
Figure 30. Ripping blade. Triple Flat Chip Blade Blade Alternate Alternate Top Bevel Bevel Raker Figure 31. Various saw tooth cutting profiles. -28- G1023S/G1023S110 Heavy-Duty 10'' Table Saw... - Page 31 The gullets are small and shallow within the groups of five teeth, similar to a crosscut blade; then large and deep between the groups, like a ripping blade. See Figure 33. Figure 34. Plywood blade. G1023S/G1023S110 Heavy-Duty 10'' Table Saw -29-...
-
Page 32: Blade Selection
AFTER the blade has come to a com- To make a crosscut using the miter gauge: plete stop. Inspect the board for soundness. You do not necessarily need a square edge to crosscut with accuracy. -30- G1023S/G1023S110 Heavy-Duty 10'' Table Saw... -
Page 33: Ripping
Do not allow your fingers to get purchase the G3445 or G1411 push stick close to the blade! Do not reach over the from the Grizzly catalog. Use them to hold blade to off-load the workpiece. the workpiece against the table and fence, and push the workpiece fully past the blade. -
Page 34: Dado Operations
Be certain that stock is flat and 10. Re-install the blade guard. straight. Failure to follow these warnings could result in serious personal injury. -32- G1023S/G1023S110 Heavy-Duty 10'' Table Saw... -
Page 35: Rabbet Operations
Re-install the blade guard. control during operations which require that the blade guard and splitter must be removed from the saw. ALWAYS replace the blade guard after dadoing is complete. G1023S/G1023S110 Heavy-Duty 10'' Table Saw -33-... - Page 36 Considerable skill and training beyond the scope of this manual are required to safely operate a moulding head. Serious personal injury could result if this caution is not fol- lowed. Figure 40. Rabbet cutting. -34- G1023S/G1023S110 Heavy-Duty 10'' Table Saw...
-
Page 37: Maintenance General
Kleen Bore's Rust Guardit™. Disconnect power to the machine when perform- ing any maintenance or repairs. Failure to do this may result in serious personal injury. G1023S/G1023S110 Heavy-Duty 10'' Table Saw -35-... -
Page 38: V-Belts
Keep clothing rolled up and out of the way of machinery and keep hair pulled back. Wear safety glasses dur- ing the entire mainte- nance process. Failure to comply may result in serious personal injury. -36- G1023S/G1023S110 Heavy-Duty 10'' Table Saw... - Page 39 G1023S/G1023S110 Heavy-Duty 10'' Table Saw -37-...
- Page 40 -38- G1023S/G1023S110 Heavy-Duty 10'' Table Saw...
-
Page 41: Closure
We recommend you keep a copy of our cur- data, troubleshooting guide, parts diagram, parts rent catalog for complete information regarding list and Warranty/Return information for your Grizzly's warranty and return policy. If you need Model G1023 Series Heavy-Duty 10" Table additional technical information relating to this Saw. -
Page 42: Machine Data
MACHINE DATA SHEET Customer Service #: (570) 546-9663 • To Order Call: (800) 523-4777 • Fax #: (800) 438-5901 GRIZZLY MODELS G1023S & G1023S110 TABLE SAWS Design Type ............................10" Tilting Arbor Maximum Diameter of Saw Blade ........................10" Diameter of Arbor .............................. - Page 43 80-1 80-2 80-1 80-2 106A...
- Page 44 HEX BOLT 7/16-20 X 1 P1023S032 FLAT WASHER 3/8 P1023S087 MAGNETIC SWITCH ASSEMBLY SDE (G1023S110) P1023S033 FLAT WASHER #10 P1023S087A MAGNETIC SWITCH ASSEMBLY SDE (G1023S) P1023S035 GEARED BEARING HOUSING P1023S088 SWITCH MOUNT BRACKET P1023S036 HEX BOLT 3/8-16 X 1-1/2 P1023S089...
- Page 45 HEX NUT 1/4-20 P1023S500 HANDWHEEL UPGRADE KIT P1023S541 HEX BOLT 5/16-18 X 3/4 P1023S501 BLADE GUARD P1023S542 FLAT WASHER 5/16 P1023S502 HEX BOLT M6-1 X 40 P1023S543 HEX NUT 5/16-18 P1023S503 LOCK NUT M6-1 G1023S/G1023S110 Heavy-Duty 10'' Table Saw -43-...
-
Page 46: Troubleshooting
Inspect roll pins and setscrews in the worm gear. Tighten if contacting geared trunnion. necessary. Disconnect power to the machine when perform- ing any maintenance or repairs. Failure to do this may result in serious personal injury. -44- G1023S/G1023S110 Heavy-Duty 10'' Table Saw... - Page 47 G1023S/G1023S110 Heavy-Duty 10'' Table Saw -45-...
-
Page 48: Warranty And Returns
WARRANTY AND RETURNS Grizzly Industrial, Inc. warrants every product it sells for a period of 1 year to the original purchaser from the date of purchase. This warranty does not apply to defects due directly or indirectly to misuse, abuse, negligence, accidents, repairs or alterations or lack of maintenance. -
Page 49: Warranty Card
___Intermediate ___Master Craftsman Would you allow us to use your name as a reference for Grizzly customers in your area? Note: We never use names more than three times. What stationary woodworking tools do you own? Check all that apply. - Page 50 FOLD ALONG DOTTED LINE Place Stamp Here GRIZZLY INDUSTRIAL, INC. P.O. BOX 2069 BELLINGHAM, WA 98227-2069 FOLD ALONG DOTTED LINE Send a Grizzly Catalog to a friend: Name_______________________________ Street_______________________________ City______________State______Zip______ TAPE ALONG EDGES--PLEASE DO NOT STAPLE...
Need help?
Do you have a question about the G1023S and is the answer not in the manual?
Questions and answers