Grizzly G1023SL Instruction Manual
Grizzly left-tilting 10" table saw instruction manual g1023sl, g1023slx
Hide thumbs
Also See for G1023SL:
- Owner's manual (72 pages) ,
- Parts manual (10 pages) ,
- Owner's manual (72 pages)
Table of Contents
Advertisement
LEFT-TILTING 10" TABLE SAW
MODEL G1023SL/G1023SLX
INSTRUCTION MANUAL
COPYRIGHT © FEBRUARY, 2003 BY GRIZZLY INDUSTRIAL, INC.
WARNING: NO PORTION OF THIS MANUAL MAY BE REPRODUCED IN ANY SHAPE
OR FORM WITHOUT THE WRITTEN APPROVAL OF GRIZZLY INDUSTRIAL, INC.
PRINTED IN TAIWAN
ONLINE MANUAL DISCLAIMER
THE INFORMATION IN THIS MANUAL REPRESENTS THE CONFIGURATION OF THE MACHINE AS IT IS CURRENTLY BEING SHIPPED. THE
MACHINE CONFIGURATION CAN CHANGE AS PRODUCT IMPROVEMENTS ARE INCORPORATED. IF YOU OWN AN EARLIER VERSION OF THE
MACHINE, THIS MANUAL MAY NOT EXACTLY DEPICT YOUR MACHINE . CONTACT CUSTOMER SERVICE IF YOU HAVE ANY QUESTIONS
ABOUT DIFFERENCES. PREVIOUS VERSIONS ARE NOT AVAILABLE ONLINE.
Advertisement
Table of Contents

Related Manuals for Grizzly G1023SL


Summary of Contents for Grizzly G1023SL
-
Page 1: Instruction Manual
INSTRUCTION MANUAL COPYRIGHT © FEBRUARY, 2003 BY GRIZZLY INDUSTRIAL, INC. WARNING: NO PORTION OF THIS MANUAL MAY BE REPRODUCED IN ANY SHAPE OR FORM WITHOUT THE WRITTEN APPROVAL OF GRIZZLY INDUSTRIAL, INC. PRINTED IN TAIWAN ONLINE MANUAL DISCLAIMER THE INFORMATION IN THIS MANUAL REPRESENTS THE CONFIGURATION OF THE MACHINE AS IT IS CURRENTLY BEING SHIPPED. THE MACHINE CONFIGURATION CAN CHANGE AS PRODUCT IMPROVEMENTS ARE INCORPORATED. - Page 2 Some dust created by power sanding, sawing, grinding, drilling, and other construction activities contains chemi- cals known to the State of California to cause cancer, birth defects or other reproductive harm. Some examples of these chemicals are: • Lead from lead-based paints. •...
-
Page 3: Table Of Contents
SWITCH ...15 FENCE ...15 MOTOR BRACE ...16 GUARD BRACKET ...16 HANDWHEEL ...17 TABLE INSERT...17 DUST PORT ...18 SAW BLADE ...18 BLADE GUARD/SPLITTER ...18-20 ADJUSTMENTS ...21 BLADE HEIGHT ...21 BLADE TILT ...21 MITER SLOT TO BLADE...22-23 BLADE ALIGNMENT ...24-25 RIP FENCE ...25 MITER GAUGE ...25... -
Page 4: Section 1: Safety
6. MAKE WORKSHOP CHILD PROOF 7. DO NOT FORCE TOOL. It will do the job 8. USE RIGHT TOOL. Do not force tool or G1023SL/G1023SLX Left-Tilting 10'' Table Saw AWAY. All children and visitors should be kept a safe distance from work area. -
Page 5: Instructions For Power Tools
Consult the owner’s manual for recom- mended accessories. The use of improper accessories may cause risk of injury. G1023SL/G1023SLX Left-Tilting 10'' Table Saw 16. REDUCE THE RISK OF UNINTENTION- AL STARTING. On machines with mag- netic contact starting switches there is a risk of starting if the machine is bumped or jarred. -
Page 6: Additional Safety Instructions For Table Saws
No list of safety guidelines can be com- plete. Operating this machinery may require additional safety precautions specific to your shop environment. Failure to use rea- sonable caution while operating this machine could result in serious personal injury. G1023SL/G1023SLX Left-Tilting 10'' Table Saw... -
Page 7: Safety Accessories
Be sure to make an additional slot for the blade splitter. There are also a wide selection of table inserts in the Grizzly catalog. Clamp the insert firmly in place with a piece of wood when creating slots. Never hold the table insert with your hand while cutting new slots. - Page 8 Push paddles (shown in Figure 3) provide added leverage and support when ripping or crosscut- ting wide workpieces. There are a number of push paddles in the Grizzly catalog. Figure 3. Push Paddles Featherboards Easily made from scrap stock, featherboards pro- vide an added degree of protection against kick- back.
-
Page 9: Common Definitions, Terms And Phrases
The following is a list of common definitions, terms and phrases used throughout this manual as they relate to this table saw and woodworking in general. Becoming familiar with these terms is important before assembling, adjusting or operating this machine. Your safety is VERY important to us at Grizzly! Arbor: Metal shaft extending from the drive mechanism, to which cutting blade is attached. -
Page 10: Section 2: Circuit Requirements
G1023SL/G1023SLX to your existing or new cir- cuit, connect a plug that matches your 220V receptacle as long as it is rated to 20 amps or more. If you will be installing a new receptacle and plug, we recommend using a NEMA-style 6L-20 plug and outlet shown in Figure 5. -
Page 11: Extension Cords
The extension cord must also contain a ground wire and plug pin. Always repair or replace extension cords when they become worn or damaged. G1023SL/G1023SLX Left-Tilting 10'' Table Saw Wiring Always utilize a qualified electrician when doing any electrical work on this equipment. -
Page 12: Section 3: Introduction
SECTION 3: INTRODUCTION Commentary We are proud to offer the Grizzly Model G1023SL/G1023SLX Left-Tilting 10" Table Saw. The Model G1023SL/G1023SLX is part of a growing Grizzly family of fine woodworking machinery. When used according to the guide- lines set forth in this manual, you can expect years of trouble-free, enjoyable operation and proof of Grizzly’s commitment to customer satis-... -
Page 13: Unpacking
Unpacking The Model G1023SL/G1023SLX base unit is shipped from the manufacturer in a carefully packed carton. If you discover the machine is damaged after you have signed for delivery, immediately call our Customer Service for advice. The fence (and extension table kit, if applicable) will arrive in a separate box. -
Page 14: Piece Inventory
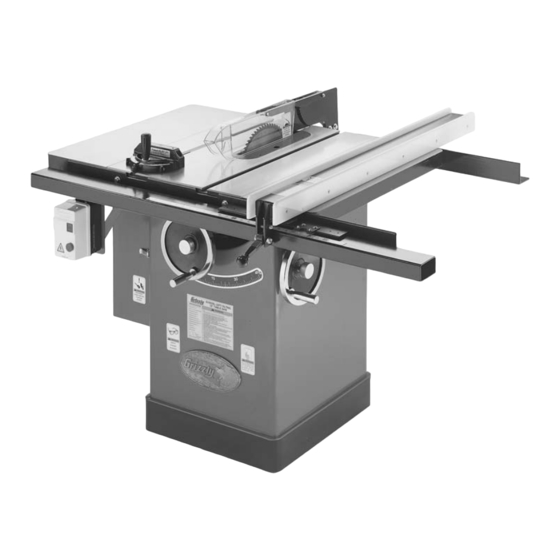
• Handwheel and Handle • Switch Brace • Hardware Bag * The Model G1023SLX comes with only (1) extension wing. Figure 6. G1023SL/G1023SLX base unit. -12- Figure 8. G1023SL component layout. The hardware bag should contain the following: ® • (1) 3mm Allen Wrench ®... -
Page 15: Clean Up
Clean up The table and other unpainted parts of the Model G1023SL/G1023SLX are coated with a waxy grease that protects them from corrosion during shipment. Clean this grease off with a solvent cleaner or citrus-based degreaser such as Grizzly’s G7895 Degreaser. Do not use chlorine- based solvents –... -
Page 16: Section 4: Assembly
Failure to do so could result in injury. Most of your Model G1023SL/G1023SLX has been assembled at the factory, but some parts must be assembled or installed after delivery. We have organized the assembly process into steps. -
Page 17: Extension Wings
Mount the switch brace between the lower switch screw and the table screw. Figure 10. Installing switch. Fence Your Model G1023SL/G1023SLX comes with a Shop Fox ® Classic fence. For fence assembly instructions, refer to the manual provided with the fence. -
Page 18: Motor Brace
Place the upper bracket half on the lower half and secure both halves with the bolts nuts and four washers as shown in Figure 13. Do not fully tighten the nuts at this moment. Figure 13. Splitter bracket installed. G1023SL/G1023SLX Left-Tilting 10'' Table Saw... -
Page 19: Table Insert
Disconnect the power cord from the outlet! G1023SL/G1023SLX Left-Tilting 10'' Table Saw Ensure that all four setscrews are firmly in contact with the table casting. Using a 6mm hex wrench, raise or lower each of the four setscrews shown in Figure 15 until the insert is flush with the table top. -
Page 20: Dust Port
2. Set a machinist’s square against the face of the blade splitter. Slightly rotate the rear bracket to adjust the face of the blade splitter perpendicular to the table top as shown in Figure 18. G1023SL/G1023SLX Left-Tilting 10'' Table Saw Mounting Bolts... - Page 21 “Table Insert” instructions; otherwise, contin- ue with the next step. Figure 19. Guard in line with blade. G1023SL/G1023SLX Left-Tilting 10'' Table Saw 4. If the blade splitter is to the right of the blade as shown in Figure 20, simply add washers...
- Page 22 9. Moving the arbor bracket moves the V-belts DO NOT over- 10. Recheck the guard alignment to the blade 11. Adjust the blade to 45°. Raise and lower it G1023SL/G1023SLX Left-Tilting 10'' Table Saw Adjustment Bolt Arbor Bracket and pulleys out of alignment, so adjustment of the motor pulley is required.
-
Page 23: Section 5: Adjustments
Retighten the locking knob. Recheck your blade height with the sample material and re-adjust, if necessary. G1023SL/G1023SLX Left-Tilting 10'' Table Saw adjust- loose clothing safety glasses 90°... -
Page 24: Miter Slot To Blade
The shims are placed under the table over each of the four table mounting bolts. The saw blade is dangerously sharp. Use extra care when handling the blade or working near it. Serious injury is possible. G1023SL/G1023SLX Left-Tilting 10'' Table Saw... - Page 25 G1023SL/G1023SLX Left-Tilting 10'' Table Saw Figure 26. Shim procedure diagram A. Figure 27. Shim procedure diagram B.
-
Page 26: Blade Alignment
G1023SL/G1023SLX Left-Tilting 10'' Table Saw quate blade clearance through all blade adjustments. Recheck guard alignment to the blade and to the table top. Adjust as nec- essary and tighten down all the bolts before use. -
Page 27: Rip Fence
8. Recheck the blade to miter slot adjustments, and adjust as necessary. Rip Fence The rip fence included with your Model G1023SL/G1023SLX Left-Tilting 10" Table Saw is designed to provide excellent ripping accuracy when properly adjusted. For complete adjustment procedures, refer to the manual that is included with the fence. -
Page 28: Section 6: Operations
-26- Before G1023SL/G1023SLX Left-Tilting 10" Table Saw, you should give it a thorough inspection. While making your inspection, ask yourself the follow- ing questions: wear dust 10. -
Page 29: Test Run
With one finger on the START button and one finger on the STOP button, turn the saw on. Be ready to turn the saw off in case of a mishap. Watch and listen to the saw. Note whether there are any unusual sounds or excessive vibrations. - Page 30 Figure 34. Combination blade. Plywood Blade: Used for cutting plywood or veneers. A 10" plywood blade will have 40- 80 teeth, a steep alternate top bevel tooth profile and very shallow gullet. See Figure Figure 35. Plywood blade. G1023SL/G1023SLX Left-Tilting 10'' Table Saw...
-
Page 31: Blade Selection
Inspect the board for soundness. You do not necessarily need a square edge to crosscut with accuracy. G1023SL/G1023SLX Left-Tilting 10'' Table Saw Inspect the miter gauge. Is it properly set and tight? Move the rip fence completely out of the way. -
Page 32: Ripping
Page 45, or you can purchase the G3445 or G1411 push stick from the Grizzly catalog. Use them to hold the workpiece against the table and fence, and push the workpiece fully past the blade. -
Page 33: Dado Operations
Be certain that stock is flat and straight. Failure to follow these warnings could result in serious personal injury. G1023SL/G1023SLX Left-Tilting 10'' Table Saw Always use push sticks, featherboards, push paddles and other safety accessories whenever possible to increase safety and... -
Page 34: Rabbet Operations
ALWAYS replace the blade guard after dadoing is complete. G1023SL/G1023SLX Left-Tilting 10'' Table Saw ⁄ " Sacrificial Fence... - Page 35 If the cut is satisfactory, repeat with your fin- ish stock. Re-install the blade guard. Figure 41. Rabbet cutting. G1023SL/G1023SLX Left-Tilting 10'' Table Saw Rabbeting operations can also be accomplished using a conventional saw blade. To create a sin- gle-blade rabbet: Clearly mark the width of the rabbet cut on your workpiece.
-
Page 36: Section 7: Maintenance
SECTION 7: MAINTENANCE General Regular periodic maintenance on your Model G1023SL/G1023SLX will ensure its optimum per- formance. Make a habit of inspecting your machine each time you use it. Check for the fol- lowing conditions and repair or replace when necessary: 1. -
Page 37: V-Belts
Wear safety glasses dur- ing the entire mainte- nance process. Failure to comply may result in serious personal injury. G1023SL/G1023SLX Left-Tilting 10'' Table Saw Lubrication Lubricate the areas indicated below every 12 months. Blade angling trunnions. These should be lubricated with 6 or 7 drops of light machine oil. -
Page 38: Magnetic Switch
SINGLE-PHASE 220V POWER SOURCE L1/1 L2/3 T1/2 T2/4 MOTOR -36- L3/5 T3/6 G1023SL/G1023SLX Left-Tilting 10'' Table Saw 3 HP Magnetic Switch SDN TYPE G1023SL/G1023SLX... -
Page 39: Section 8: Closure
Grizzly’s policy of continuous improvement, changes may be made at any time with no oblig- ation on the part of Grizzly. Whenever possible, though, we send manual updates to all owners of a particular tool or machine. Should you receive one, add the new information to this manual and keep it for reference. -
Page 40: Machine Data
...Miter Gauge ...Ground Table Top ...Powder Coated Paint -38- MACHINE DATA SHEET ⁄ " x 27" w/Wings ® Classic Fence With Standard Rails G1023SL/G1023SLX Left-Tilting 10'' Table Saw ⁄ " ⁄ " W x 20 ⁄ " D ⁄ " ⁄... -
Page 41: Parts Breakdowns And List
G1023SL/G1023SLX Left-Tilting 10'' Table Saw -39-... - Page 42 -40- G1023SL/G1023SLX Left-Tilting 10'' Table Saw...
- Page 43 G1023SL/G1023SLX Left-Tilting 10'' Table Saw -41-...
- Page 44 ⁄ " 58A P1023SL058A CORD CLAMP PLATE ⁄ " 58B P1023SL058B CORD CLAMP PLATE 63A P1023SL063A REAR TRUNNION 63B P1023SL063B BUSHING ⁄ "-18 G1023SL/G1023SLX Left-Tilting 10'' Table Saw PART # DESCRIPTION CAP SCREW PB03 HEX BOLT ⁄ P1023SL032 FLANGE P1023SL033...
- Page 45 DUST HOSE ADAPTER PW07 LOCK WASHER P1023SL094 DUST DEFLECTOR P1023SL095 SPECIALSCRW 95A PSS08 SETSCREW 95B PN02 HEX NUT G1023SL/G1023SLX Left-Tilting 10'' Table Saw ⁄ "-16 X 1" 104 P1023SL104 ⁄ " 106 PW02 140 PB11 ⁄ "-16 141 PW07 142 PLW01...
-
Page 46: Troubleshooting
Remove hand wheel and adjust bullets. Inspect roll pins and setscrews in the worm gear. Tighten if necessary. Disconnect power to the machine when perform- ing any maintenance or repairs. Failure to do this may result in serious personal injury. G1023SL/G1023SLX Left-Tilting 10'' Table Saw... -
Page 47: Push Stick Pattern
G1023SL/G1023SLX Left-Tilting 10'' Table Saw -45-... -
Page 48: Warranty And Returns
WARRANTY AND RETURNS Grizzly Industrial, Inc. warrants every product it sells for a period of 1 year to the original purchaser from the date of purchase. This warranty does not apply to defects due directly or indirectly to misuse, abuse, negligence, accidents, repairs or alterations or lack of maintenance. -
Page 49: Warranty Card
Do you think your purchase represents good value? ___Yes Would you recommend Grizzly Industrial to a friend? ___Yes Would you allow us to use your name as a reference for Grizzly customers in your area? Note: We never use names more than three times. ___Yes Comments:_________________________________________________... - Page 50 FOLD ALONG DOTTED LINE FOLD ALONG DOTTED LINE Send a Grizzly Catalog to a friend: Name_______________________________ Street_______________________________ City______________State______Zip______ GRIZZLY INDUSTRIAL, INC. P.O. BOX 2069 BELLINGHAM, WA 98227-2069 TAPE ALONG EDGES--PLEASE DO NOT STAPLE Place Stamp Here...
Need help?
Do you have a question about the G1023SL and is the answer not in the manual?
Questions and answers