Table of Contents
Advertisement
Advertisement
Table of Contents

Related Manuals for Proteus DOLPHIN V4


Summary of Contents for Proteus DOLPHIN V4
- Page 3 ..... . 01~03 ........04~05 .
- Page 4 A. INTRODUCTION This owner's manual contains assembly, operation, maintenance and safety information. In the interest of safety, please make sure that you read and understand all the information below. B. IMPORTANT SAFETY NOTICE a. Read carefully and follow owner's manual and all accompany information before using this machine. b.
- Page 5 k. Never hold your breath while exercising. You should breathe at an affordable rate. l. Rest adequately between workouts. Muscles tone and develop during these rest periods. beginners should work out twice a week and increase gradually to 4 or 5 times per week. m.Do not over training.
- Page 6 WARNING : Before commencing with any exercise program, please consult your family physician. If at any time during exercise you feel faint, dizzy or experience pain, stop and consult your family physician. In the event any of the above mentioned warnings are breached by the consumer, the manufacturer may use same as a defense to any claim for injuries, damage or loss.
-
Page 7: Table Of Contents
Description Q'ty Description Q'ty ront decorative cover ( L ) Main frame ear decorative cover ( R ) ront stabilizer ear decorative cover ( L ) ear stabilizer rank hole cover eat post ront Interval ring andlebar post ear Interval ring andlebar ront decoration strip rank assembly ( L / R ) - Page 8 Description Q'ty Sliding tube 38 x 38 plug U bracket with bolt 3/8" sock bolt x 65mm M8 sock bolt x 15mm M8 washer M8 spring washer M8 nylon nut M4 screw M4 screw M5 screw x 25 mm ontrol cable on monitor ulse cable on monitor crew...
- Page 10 Description Q'ty Part no. ront decorative cover ( R ) ront decorative cover ( L ) Rear decorative cover ( R ) Rear decorative cover ( L ) 3/8" sock bolt x 65mm M8 sock bolt x 15mm M8 washer M4 screw...
-
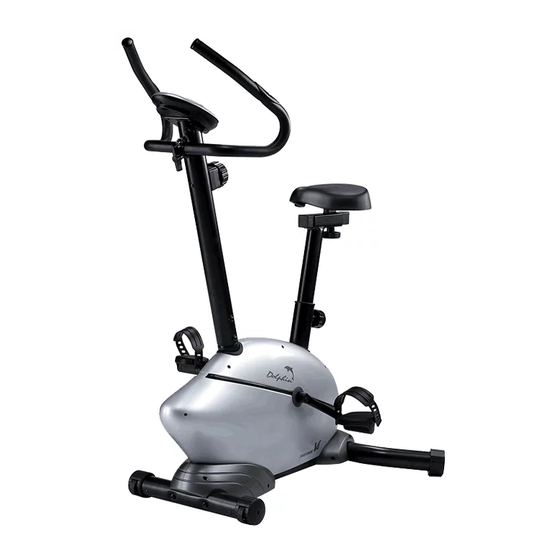
Page 11: Main Frame(
ASSEMBLY : IMPORTANT : Read all instructions carefully. Assemble all units in accordance with the steps in the manual. Lay out all parts on the floor and check if you have all the parts included completely before beginning assembly. In case of a discrepancy, please call the customer service department of the store for help. - Page 12 Pedals Attach pedal ( 17 / 18 ) to pedal cranks,( pedals marked "R" and "L" indicates right and left side of bike. Make sure not to mix up ). 2. Left pedal has left-hand thread and must be turned counterclockwise ( ccw ) to attach right pedal has right-hand thread, must be turned clockwise ( cw ) to attach.
- Page 13 c. F ront / Rear decorative covers Place front decorative covers ( 19,20 ) onto the right place as illustrated. First fasten with screw ( 49-a ) then fasten screw ( 49-b ). ( use tool A ) 2. Place rear decorative covers ( 21,22 ) onto the right place as illustrated. First fasten with screw ( 49-a ) then fasten screw ( 49-b ).
-
Page 14: Eat Post
d. S eat post Attach saddle ( 11 ) to saddle plate of seat post ( 04 ). Fasten with spring washers ( 46 ) and nylon nuts ( 47 ). (use tool B) 2. Then attach seat post ( 04 ) to main frame ( 01 ). Adjust saddle to desired height, then fasten by knob (30). -
Page 15: Handlebar Post
Tension control cable and handlebar post Insert tension control cable ( 32 ) into bottom of handlebar post ( 05 ). 2. Pull the tension cable ( 32 ) out of middle hole of handlebar post( 05 ). 3. Connect extension monitor cable ( 09 ) and lower monitor cable ( 10 ). -
Page 16: Handlebar
Handlebar Assemble handlebar ( 06 ) onto handlebar post ( 05 ) with U brace ( 35 ) as a cover, finger fastening with washer ( 54 ) and socket screw ( 38 ), then fasten washer ( 37 ) and T-knob ( 36 ) as adjuster. -
Page 17: Monitor
Monitor Connect extension monitor cable ( 09 ) and control cable ( 51 ). 2. Connect pulse cables ( 34, 52 ) together. 3. Attach monitor ( 08 ) onto monitor plate on handlebar post ( 05 ) with screws ( 53 ). ( use tool A ) NOTE : The monitor is powered with battery. -
Page 18: T Ension Control
h. Final adjustment 1. The height and seat position can be adjusted,To adjust the height, loose the knob ( 30 ) and pull it out to adjust seat post ( 04 ) to a desired height, then fasten the knob. To adjust seat position, loose the knob ( 42 ) and adjust saddle ( 11 ) to a desired position, then fasten the knob. - Page 19 MONITOR * Function Buttons * About Displays * Operation Instructions NOTE :BATTERY INSTALLATION 1. Please install 2 AA or UM-3 batteries in the battery case . 2. Ensure that the batteries are correctly fitted. Battery must be correctly positioned and make sure the battery spring is properly contacted with battery.
- Page 20 FUNCTION BUTTONS: A. ENTER / MODE : ENTER FUNCTION : Press this button to enter setting mode and confirm the setting values. Select functions. (before exercise mode) Time-Distance-Calorie-Pulse Select personal data. (In the body fat measurement mode). Gender-Height-Weight-Age MODE FUNCTION : During exercise status, press to switch displays between "SPEED,DISTANCE"...
- Page 21 B. UP : a. Select function and display on the main screen. Pulse-Calorie-Distance-Speed-Time (Or Pulse-Calorie-ODO-RPM-Time) b. Increase the setting value of the following functions. Time,Distance,Calorie,Pulse and Gender,Height,Weight,Age c. Increase the setting value of year, month, date, hour and minute. DOWN : a.
- Page 22 E. RECOVERY (PULSE RECOVERY FUNCTION) a. You can press RECOVERY button to the pulse recovery function during start exercise or stop exercise mode, but except in the body fat measure mode. b. It is a function to check the pulse recovery condition after exercise. Which is scaled from F1.0 to F6.0.
- Page 23 Upper display ABOUT DISPLAYS : A. LCD display : The upper display: Shows the data. The main display: Main display Press the button UP or DOWN until the "scan" flash on the screen. Monitor will display the following function and each function will stay for 5 seconds on the main screen.
- Page 24 TIME : Shows the time. Press the ENTER button to the setting mode, then press UP or DOWN button to set the desired time to exercise. The range of setting value is from 0:00 to 99:00. After finish setting the value, it starts countdown. While counting down to 0:00, the monitor will beep 12 times and count up from 0:00.
- Page 25 D. DISTANCE Shows the distance with counting up or down. Press the ENTER button to enter setting mode, press UP or DOWN button to set the desired distance. The range of setting value is from 1.0 to 999 KM or Mile. After finish setting the value, it starts countdown.
- Page 26 F. PULSE a. Show the current heart rate in bpm (beats per minute). The range of pulse value is from 60 to 240 bpm. b. Press the ENTER button to the setting mode, then press UP or DOWN button to set the target heart rate to be reached.
- Page 27 Operation Instructions A. Clock and calendar setting When the batteries are installed , the screen will fully display for one second, and ready for clock and calendar setting function. a. Using UP , DOWN and ENTER button to confirm your setting hour. b.
- Page 28 c. Using UP , DOWN and ENTER button to confirm your setting year. d. Using UP , DOWN and ENTER button to confirm your setting month. e. Using UP , DOWN and ENTER button to confirm your setting day. Then the display will go to the exercise mode.
- Page 29 NOTE: 1. Alarm setting : You may set the alarm while not pedaling. Press the DOWN and ENTER at the same time for 3 seconds during stop mode. 1-1. Alarm setting procedure is as same as clock setting above. 1-2. After the alarm is set, the "ALARM" shows on the upper left of LCD. To deactivate alarm, enter alarm setting mode then press BODY FAT button to deactivate or reactivate the alarm.
- Page 30 Distance: Calories: Pulse : c. After setting the target value for exercise, just pedaling to start workout. And the value of setting will begin to counting down. Once the value of setting is counting down to zero, the monitor will beep 12 times and start counting up the value.
- Page 31 C. BODY FAT FUNCTION INSTRUCTION - When you are not pedaling, BODY FAT MEASUREMENT function available. - Input personal data by press ENTER, UP and DOWN button. - The default value of personal data is as described as followed. The personal data will not be kept in monitor when monitor power off, run out of batteries or change unit of measurement.
- Page 32 c. The preset value of height is 175.0 Cm ( 5'9" ) and glitters. Use UP and DOWN button to change the setting. Then p ress ENTER to confirm the setting d. The preset value of weight is 70.0 Kg ( 155.0 Lb ) and glitters. Use UP and DOWN button to change the setting.
- Page 33 e. The preset value of age is 30 and glitters. Use UP and DOWN button to change the setting. Then p ress ENTER to confirm the setting Then press BODY FAT button to measure and place both of your hands on the contact pads. After the measure, the monitor will show your BMR, BMI, FAT% and T.H.R.
- Page 34 REFERENCE BMR : The Basal Metabolic Rate, is the amount of energy required to maintain the basal metabolism for a specified unit of time. Continuously throughout life, every body expends energy for the activities that keep it alive. These activities include breathing, producing heartbeats, maintaining body temperature and muscle tone, and the functioning of the glands, cells, and nervous system.
- Page 35 BMI Classification Asia People Western People Underweight <19 <18.5 Healthy Weight 19-24.9 18.5-22.9 Overweight 25-29.9 23.0-24.9 Heavily Overweight 30-34.9 25.0-29.9 Obese >35 >30 FAT %: Body fat ratio. Which means percentage of fat in your weight. Normal FAT% for men is 12~25%, and 20~30% for women.
- Page 38 Without our authorization, any contents of this manual are not allowed to be copied, saved or transferred. We reserve rights to revise specification, equipment, and maintenance informations for our R&D team keeps updating our product quality. Before printing this manual, we have done the best efforts to make this manual more comprehensible for all users.
Need help?
Do you have a question about the DOLPHIN V4 and is the answer not in the manual?
Questions and answers