Table of Contents
Advertisement
Quick Links
Advertisement
Table of Contents

Related Manuals for Audionet STERN


Summary of Contents for Audionet STERN
- Page 1 STERN Ultimate Linear Preamplifier HANDMADE IN BERLIN, GERMANY User’s Manual...
-
Page 3: Table Of Contents
Inputs and outputs 5.1 Inputs 5.2 Outputs 5.3 Bi-Amping 5.4 Audionet Link Operating 6.1 Powering up 6.2 Switching on and off 6.3 Using Audionet Link 6.4 Control elements on the front panel 6.5 Volume control 6.6 Display 6.7 Input selection 6.8 Muting... - Page 4 7.3 Overview of factory defaults Audionet Metal Remote Control 8.1 Key assignment 8.2 Changing the batteries 8.3 Settings for Audionet preamplifier STERN Control App 10 Network setup 10.1 Connecting to a wireless network 10.2 Setting up the Access Point Mode 10.3 Network trouble shooting...
-
Page 5: Preface
Even if you're an experienced aficionado of ultra-highend components, please start listening to your new Audionet STERN by reading this manual carefully be- fore you plug it in. This will ensure you'll enjoy all functions of this unit without... -
Page 6: Included Items
• Always use the provided cloth bag to prevent scratches on the casing. • Please allow the STERN to adapt to the climatic conditions in your listening room before you switch the unit on for the first time after the transport. -
Page 7: Overview Front Panel
Overview front panel power key rotary encoder keys (dynamically assigned functions) display... -
Page 8: Overview Back Panel
15 line out 2 16 WLAN antenna socket 17 serial port (RS232) OUTPUT RIGHT INVERTED OUTPUT LEFT 18 ‘Audionet Link’ out 1 XLR 1 19 ‘Audionet Link’ out 2 20 additional ground terminal XLR 2 21 ‘mains phase’ marking LINE 1... -
Page 9: Installation And Power Supply
• Do not place the STERN in close range to heat sources like radiators. • Do not place the STERN on top of other units. Especially not on top of power amplifiers, preamplifiers or similar components that produce heat. Both units could suffer damage from thermal overload. -
Page 10: Mains Connection
• The electrical specifications of your home country must meet the electrical specifications printed onto the back panel. • The STERN is a Class I unit and must be earthed. Please ensure a stable earth connection. The phase ('hot' pin) is marked on the back panel ('PHASE') •... -
Page 11: Orientation Of Mains Plug
4.3 Orientation of mains plug The correct polarization of mains is important for the reasons of audio clarity and stability. Please connect the power cord so that the hot pin of the wall outlet is connected to the pin of the mains input marked with 'PHASE'... -
Page 12: Inputs And Outputs
Please connect the left and right input of the same number printed on the back panel of the STERN to the corresponding output of the source which you would like to connect to the STERN. -
Page 13: Bi-Amping
5.4 Audionet Link For your convenience, the STERN is able to switch all other Audionet units (e.g. power amplifiers) on or off, that are connected via 'Audionet Link' (e.g. by a sim- ple touch on the included remote control or the power key on the front panel). - Page 14 The STERN is equipped with two identical 'Audionet Link' outputs. In case you would like to control more than one Audionet unit via 'Audionet Link', use the second 'Audionet Link' output of your STERN as well. The 'power on' signal of the 'Audionet Link' output 2...
-
Page 15: Operating
(refer to sections 'Installation and power supply' on page 9 and 'Inputs and outputs' on page 12). The STERN is a stand-by unit. Please insert the power cord into the mains input socket on the back panel and connect the STERN to mains power. The display shows a welcome message for a brief moment. -
Page 16: Using Audionet Link
The display turns dark, indicating that the unit is in stand-by mode now. Note • Of course, you may switch the STERN on and off with the included Audionet Metal Remote Control. For detailed information please refer to section 'Au- dionet Metal Remote Control' on page 49. -
Page 17: Control Elements On The Front Panel
Turn the rotary encoder clockwise to increase and counter clock- wise to decrease the volume. The volume control of the STERN has a range from –80 dB to +10 dB in real 1 dB steps relatively to the level of the input signal. Differences in input levels can be adjusted for each input channel of the STERN separately (see section 'Offset' on page 45). - Page 18 'Setup Menu' on page 23) as well as for selecting the input channel (see section 'Input selection' on page 20). • Use the keys 'VOL+' and 'VOL-' (see section 'Key assignment' on page 49) to control the volume with the Audionet Metal Remote Control.
-
Page 19: Display
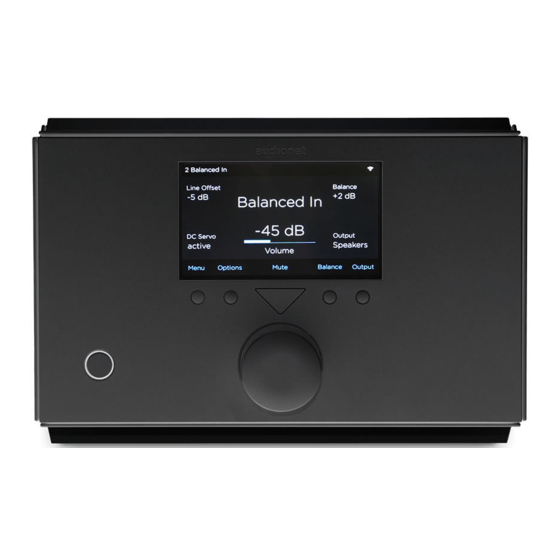
6.6 Display The display provides the following information in normal operating mode: 3 - Line Input Line Input 3 -42 dB Menu Options Mute Input Info 1 Number and type of the currently selected input channel, corresponding to the number printed above the input jack on the back panel (refer to section 'Overview back panel' on page 8). -
Page 20: Input Selection
'Setup Menu' starting from page 23. 6.7 Input selection Push the key on the front panel while the STERN is in normal operating Input mode. Afterwards select the desired input channel by using the rotary encoder. -
Page 21: Muting
Mute panel to mute or un-mute the volume. As well as during an input selection, the STERN uses 'soft' muting. The volume is stepped down gently to -80 dB. Afterwards the outputs are switched off. The displays second line informs on a muted unit with the text... - Page 22 • If you are within one of the setup menus and would like to mute the volume, press the key first to get back to the main screen and press the Home Mute key afterwards. • Basically, the function is always assigned to the most left key beneath Home the display.
-
Page 23: Setup Menu
Setup Menu To adjust the STERN to your preferences, please use both setup menus Menu . Both of the keys are always available on the Options Menu Options main screen of the display. All global settings are located within the setup menu . - Page 24 While inside one of the menu items, use the rotary encoder to select a setting. Press key to save the selected setting to the non-volatile memory of the Save STERN. The display acknowledges the procedure with the message ' Saved...
- Page 25 Saved Home Back Default After saving the setting, the display of the STERN reverts to its main screen. You will always return to the menu level above by pressing the key. The Back key directs all the way back to the main screen. Both keys...
-
Page 26: Global Settings: Menu
• STERN will automatically leave the setup menu and return to normal opera- tions mode, if no adjustments are made within 12 seconds. • If the STERN is powered down to stand-by mode, all settings are stored au- tomatically in the non-volatile memory of the unit. Even after disconnecting from mains, STERN still remembers your settings. -
Page 27: Balance
Turn the rotary encoder counter clockwise to shift the balance to the left. The value in the display turns negative. STERN allows a shift of the balance up to 9 dB to the left or the right. The displayed bar graph visualises a balance shift to the left or the right side with a blue rectangle. -
Page 28: Power
7.1.3 Power Global Settings - Power Display Auto Start Balance Auto Power Off Power Serial By-Pass Network Reset Info Home Back Select The sub-menu consists of the two options Power Auto Start Auto Power Auto Start Turn the rotary encoder on the front panel clockwise to activate the Auto Start function. - Page 29 Turn the rotary encoder clockwise to activate the Auto Power Off function of STERN. Turn the rotary encoder counter clockwise to disable the Auto Power Off function. The Auto Power Off function is disabled. STERN will stay pow- ered on, not matter if there is an input signal on the currently selected input channel or not.
- Page 30 • While the serial port is active, the STERN will have an increased power con- sumption during stand-by mode. • Disable the serial port, if you do not wish to control the STERN via serial port (e.g. with a home automation system).
-
Page 31: By-Pass
7.1.4 By-Pass The sub-menu 'By-Pass' consists of two menu items: Input for By-Pass Servo for By-Pass Global Settings - By-Pass Display Input for By-Pass Balance DC Servo for By-Pass Power Serial By-Pass Network Reset Info Home Back Select Input for By-Pass Use the rotary encoder on the front panel to select the input channel you would like to use for the By-Pass Mode. - Page 32 0 - No Input The By-Pass Mode is primarily intended to integrate the overwhelming sound quality of the STERN into an existing home cinema setup or to expand an existing excellent stereophonic system based on the STERN to a complete home cinema setup without missing out on the qualities of the STERN.
- Page 33 6 Connect your DVD / BluRay player to your home cinema preamplifier. Use the STERN to listen to high quality analog sources. If you would like to use your home cinema system, activate the By-Pass Mode of the STERN and use your home cinema preamplifier as usual.
- Page 34 'STERN' key on the Audionet Metal Remote Control, this mode will be saved, i.e. if you switch on the STERN, the unit will switch to the last saved input channel selection and thus into By-Pass Mode.
- Page 35 Only do activate the DC Servo in cases where the source connected to the STERN holds a high DC component in its output signal. The DC Servo eliminates the DC component. The input channel dedicated to the By-Pass Mode is now AC-coupled.
-
Page 36: Network
7.1.5 Network The Network menu contains three items: Wireless Connection Update Global Settings - Network Display Wireless Balance Connection Power Update Serial By-Pass Network Reset Info Home Back Select Wireless Global Settings - Network - Wireless Display Wireless Balance Connection Power Update Serial... - Page 37 The wireless network is disabled. The wireless network is activated. In order to control the STERN via app, the wireless network has to be set to active. If you do not intend to use the network control, keep the wireless net- work disabled.
- Page 38 Connection Global Settings - Network - Connection Display Wireless Balance Connection Power Update Serial By-Pass Make connection Network Reset Info Home Back Re-Connect Info Press key to re-start the wireless connection. Re-Connect Redirects directly to info page 4 (refer to section 'Info' on Info page 42).
- Page 39 If any updates are found, STERN starts the update process. A progress bar will appear and inform you on the status. Please wait until the update process has finished. The STERN will re-boot automatically and is ready for the playback of music afterwards.
-
Page 40: Reset
After you press the button to choose one of the above listed reset meth- Select ods, STERN will ask you to confirm, if you are sure to start the resetting process. Factory Default Reset - All Settings Reset all settings to factory defaults. - Page 41 All settings are reset to factory defaults afterwards. Press the key instead, if you want to cancel the reset process and leave with- out resetting the STERN. Factory Default Reset - All Settings Reset all settings to factory defaults.
-
Page 42: Info
7.1.7 Info The menu item provides the user with a quick overview of the user settings. Info Four info pages are available. Use the keys to skip to the next or Next Prev previous info page. The status bar on the top of the display corner shows the number of the currently displayed info page. - Page 43 Press this key to get directly to info page 2 as a shortcut to check the current channel settings of the selected input channel. The info page 3 provides additional information on the STERN and its software: Name of the device.
- Page 44 Information on the current network connection is available on info page 4: Current operating mode of the network module: Mode Infrastructure Mode connects to the selected wireless network (see section 'Connecting to a wireless net- work' on page 53). Access Point Mode network module provides a stand-alone access point (see section 'Setting up the Access Point Mode' on page 55).
-
Page 45: Channel Settings: Options
7.2 Channel settings: Options Options - 3 - Line Input Offset DC Servo Name Home Back Select 7.2.1 Offset Turn the rotary encoder clockwise to increase the input level of the current channel. To decrease the input level, turn the rotary encoder counter clockwise instead. -
Page 46: Dc Servo
The adjustment of the input level may be defined individually for each of the six input channels of the STERN. The range varies from –9 dB to +9 dB in steps of 1 dB. The offset function is used to achieve a matching volume in case of different output levels of the various sources connected to the STERN. -
Page 47: Name
7.2.3 Name You can assign a fully user-definable name containing up to 12 characters in length to each of the six input channels. The display will show the number of the cur- rently selected input channel as well as the assigned channel name. The cursor marks the character which you now may alter. -
Page 48: Overview Of Factory Defaults
7.3 Overview of factory defaults Option Setting Global settings: Display 100 % Balance 0 dB Auto Start Auto Power Off Input for By-Pass 0 - no input DC Servo for By-Pass Wireless Channel settings: Offset 0 dB (for all inputs) DC Servo Off (for all inputs) 1: Balanced In 1... -
Page 49: Audionet Metal Remote Control
Audionet Metal Remote Control The Audionet Metal Remote Control controls all important functions of the eve- ryday use of your STERN. This chapter explains all commands in detail. Key assignment Power key STERN STERN Use the key 'STERN' to switch the POWER STERN on or off. -
Page 50: Changing The Batteries
8.3 Settings for Audionet preamplifier The Audionet Metal Remote Control has 6 keys to control an Audionet (pre-)amplifier like the STERN. The previous section 'Key assignment' explains the function of these keys. - Page 51 The DIP switch for selecting the system address of the Audionet Metal Remote Control is located here: Set the DIP switch labelled 'SYS ADDRESS' in position '19' or '16' according to the following table: Audionet preamplifier Address STERN, PRE G2, PRE 1 G3,...
-
Page 52: Stern Control App
STERN Control App It is possible to control the STERN via app by using the wireless network con- nection. The Audionet STERN app for iOS is available for download at the Apple iTunes app store. Please refer to the documentation of your Apple device if you need further information on how to access the iTunes app store or how to install the app. -
Page 53: Network Setup
Wireless Note • At the first start-up of the STERN or after resetting the network to factory defaults (see section 'Reset' on page 40) the STERN provides a wireless net- work of its own (a so-called Access Point). The name of this network is 'AudionetStern'. - Page 54 4. The STERN app will recognize the STERN afterwards and connect to it automatically. 8. You are now ready to use the STERN app to control the STERN (see section 'STERN Control App' on page 52).
-
Page 55: Setting Up The Access Point Mode
10.2 Setting up the Access Point Mode The STERN will act as an access point by fac- tory default, e.g. providing its own wireless net- work that your iPhone/iPad may connect to. This enables you to use the STERN app without any other routers or access points. -
Page 56: Network Trouble Shooting
10.3 Network trouble shooting In case the STERN is not able to connect to the selected wireless network, the display of the STERN will inform you about the problem. This might occur most likely if a wrong passphrase is entered during the initial setup or if the access point that is providing the selected wireless network is powered down / not available. - Page 57 ') listed above at any time from the menu. Go Back • If you want to retry to log onto the selected wireless network, press the ' button on the main screen of the STERN. Then select the menu item Menu ' and afterwards the sub-item ' '.
-
Page 58: Updating The Stern
The display of the STERN informs the user of the progress of the update process. Update Updating... Please wait... In case you choose not to update this time, the STERN app will remind you about it later. - Page 59 • Do not disconnect the STERN from mains power while the update process is running. • The STERN must be connected to a wireless network that has access to the internet, so that the STERN app is able to access the Audionet Server to check for updates and to download the necessary files.
-
Page 60: Monitoring Mains Power Voltage
' on the front panel to continue. The Failure Power off STERN will now enter stand-by mode. If the mains power is stable again you may restart the STERN. While switching on from stand-by mode and during operations the STERN also monitors the level of mains power voltage. - Page 61 Mains power voltage out of permitted range Power Off Press key ' on the front panel to continue. The STERN is now in stand- 'Power off by mode. If the mains power voltage level is back inside the permitted range, you...
-
Page 62: Technical Information
• Galvanic separation of all analog circuits by opto couplers. • The input and output sections as well as the volume control are realized using enhanced, discrete Audionet operational amplifier modules with state-of-the- art mica capacitors. • Rhodium Cinch jacks by Furutech. - Page 63 • By-Pass mode for integration into home cinema systems. • Audionet Link outputs for the remote control of further Audionet devices. • User definable names for each input, input levels adjustable for each input.
-
Page 64: Security Advice
STERN or the other connected units. • Use a dry cloth for cleaning! We do wish you many exciting listening experiences with your new Audionet device. If you still have any questions, do not hesitate to ask your Audionet retailer or contact us directly. -
Page 65: Technical Data
1 SMA for WLAN (control only) Outputs 2 pair RCA line, Rhodium (Furutech) 1 pair RCA inverted, Rhodium (Furutech) 2 pair XLR balanced, gold plated 2 Audionet Link, optical 1 connector, gold plated, for additional earth connection Output impedance 24 Ω real... - Page 66 Dimensions vertical width: 270 mm height: 500 mm depth: 505 mm horizontal width: 450 mm height: 320 mm depth: 505 mm Weight 50 kg Finish plates: aluminum, 9 mm, pearl blasted, silver or black, text and icons printed black or white display: color TFT chassis:...
- Page 67 Idektron GmbH & Co KG Engineered and produced by: Idektron GmbH & Co. KG, Alboinstrasse 36-42, 12103 Berlin, Germany en.audionet.de contact@audionet.de...
Need help?
Do you have a question about the STERN and is the answer not in the manual?
Questions and answers