Table of Contents
Advertisement
Advertisement
Table of Contents

Related Manuals for HIKVISION DS-KB8112-IM


Summary of Contents for HIKVISION DS-KB8112-IM
-
Page 1: Door Station
Video Intercom Vandal-Resistant Door Station Quick Start Guide UD03855B-B... - Page 2 This Manual is subject to domestic and international copyright protection. Hangzhou Hikvision Digital Technology Co., Ltd. (“Hikvision”) reserves all rights to this manual. This manual cannot be reproduced, changed, translated, or distributed, partially or wholly, by any means, without the prior written permission of Hikvision.
- Page 3 DAMAGES FOR LOSS OF BUSINESS PROFITS, BUSINESS INTERRUPTION, SECURITY BREACHES, OR LOSS OF DATA OR DOCUMENTATION, IN CONNECTION WITH THE USE OF OR RELIANCE ON THIS MANUAL, EVEN IF HIKVISION HAS BEEN ADVISED OF THE POSSIBILITY OF SUCH DAMAGES. SOME JURISDICTIONS DO NOT ALLOW THE EXCLUSION OR LIMITATION OF LIABILITY OR CERTAIN DAMAGES, SO SOME OR ALL OF THE ABOVE EXCLUSIONS OR LIMITATIONS MAY NOT APPLY TO YOU.
-
Page 4: Regulatory Information
Video Intercom Vandal-Resistant Door Station·Quick Start Guide Regulatory Information FCC Information Please take attention that changes or modification not expressly approved by the party responsible for compliance could void the user’s authority to operate the equipment. FCC compliance: This equipment has been tested and found to comply with the limits for a Class B digital device, pursuant to part 15 of the FCC Rules. - Page 5 Video Intercom Vandal-Resistant Door Station·Quick Start Guide 1. This device may not cause harmful interference. 2. This device must accept any interference received, including interference that may cause undesired operation. EU Conformity Statement This product and - if applicable - the supplied accessories too are marked with "CE"...
- Page 6 Video Intercom Vandal-Resistant Door Station·Quick Start Guide This device meets the CAN ICES-3 (B)/NMB-3(B) standards requirements.
- Page 7 Video Intercom Vandal-Resistant Door Station·Quick Start Guide Safety Instruction These instructions are intended to ensure that user can use the product correctly to avoid danger or property loss. The precaution measure is divided into Warnings and Cautions: Warnings: Neglecting any of the warnings may cause serious injury or death.
- Page 8 Video Intercom Vandal-Resistant Door Station·Quick Start Guide Please make sure that the power has been disconnected before you wire, install or dismantle the device. When the product is installed on wall or ceiling, the device shall be firmly fixed. ...
- Page 9 Video Intercom Vandal-Resistant Door Station·Quick Start Guide Do not aim the device at the sun or extra bright places. A blooming or smear may occur otherwise (which is not a malfunction however), and affecting the endurance of sensor at the same time. ...
-
Page 10: Table Of Contents
Video Intercom Vandal-Resistant Door Station·Quick Start Guide Table of Contents 1 Introduction ................1 1.1 Overview ..................1 1.2 Features ..................1 2 Appearance ................3 3 Terminals and Wiring ..............4 3.1 Terminals and Interfaces............... 4 3.2 Wiring Description ................ 5 3.2.1 Door Lock Wiring ..............5 3.2.2 Door Magnetic Wiring ............ -
Page 11: Introduction
Video Intercom Vandal-Resistant Door Station·Quick Start Guide 1 Introduction 1.1 Overview The DS-KB8112-IM is a vandal- resistant door station, which has passed IK 9 (Impact Protection Level). The door station, featuring in the vandal- resistant design, convenient installation, and easy operation, supports the video intercom function, access control function, door magnetic alarm, motion detection, and so on. - Page 12 Video Intercom Vandal-Resistant Door Station·Quick Start Guide Noise suppression and echo cancellation H.264 video compression standard Low illumination Alarm Functions Supports the door magnetic alarm Auto-uploads alarm messages to the master station or the client software Remote Controls ...
-
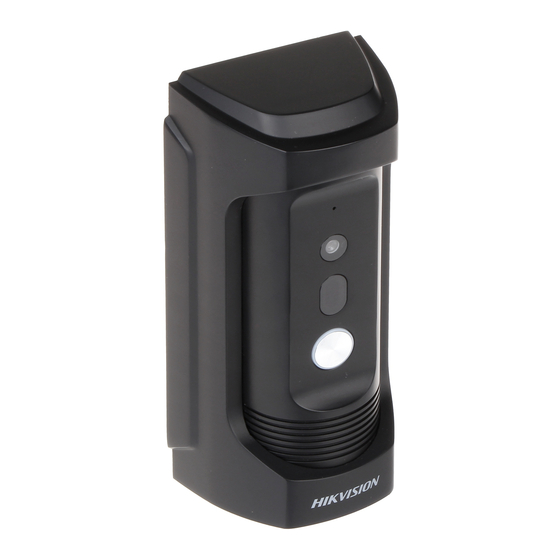
Page 13: Appearance
Video Intercom Vandal-Resistant Door Station·Quick Start Guide 2 Appearance Figure 2-1 Door Station Overview Table 2-1 Components Description Description Microphone Built-in Camera Low Illumination Supplement Light Call Button Loudspeaker... -
Page 14: Terminals And Wiring
Video Intercom Vandal-Resistant Door Station·Quick Start Guide 3 Terminals and Wiring 3.1 Terminals and Interfaces Figure 3-1 Terminals and Interfaces Table 3-1 Descriptions of Terminals and Interfaces Name Interface Description Power 12 VDC Power Supply 12 VDC Supply Input Network Interface (PoE Supported) Alarm Input ALARM... -
Page 15: Wiring Description
Video Intercom Vandal-Resistant Door Station·Quick Start Guide Name Interface Description Door Lock Relay Output (Connect Electric Bolt or Magnetic Lock) 3.2 Wiring Description 3.2.1 Door Lock Wiring Terminal NC/COM is set as default for connecting magnetic lock/electric bolt; terminal NO/ COM is set as default for connecting electric strike. -
Page 16: Door Magnetic Wiring
Video Intercom Vandal-Resistant Door Station·Quick Start Guide 3.2.2 Door Magnetic Wiring To connect door magnetic, it is required to set the output of terminal AI to be door status via Batch Configuration Tool or iVMS-4200 client software or the web browser. Figure 3-3 Door Magnetic Wiring 3.2.3 Exit Button Wiring To connect exit button, it is required to set the output of terminal AI... -
Page 17: Alarm Device Input Wiring
Video Intercom Vandal-Resistant Door Station·Quick Start Guide Figure 3-4 Exit Button Wiring 3.2.4 Alarm Device Input Wiring When you set the output of terminal AI to be custom via Batch Configuration Tool or iVMS-4200 client software or the web browser, you can connect any alarm input device to the door station via the terminal AI. -
Page 18: Installation
Video Intercom Vandal-Resistant Door Station·Quick Start Guide 4 Installation Before you start: Make sure the device in the package is in good condition and all the assembly parts are included. The device supports two ways of power supply: 12 VDC, or PoE power supply. -
Page 19: Wall Mounting
Video Intercom Vandal-Resistant Door Station·Quick Start Guide 4.1.2 Wall Mounting Steps: 1. Fix the wall mounting plate to the wall with 4 expansion screws. Wall Mounting Plate Expansion Screws Figure 4-2 Install the Plate 2. Insert terminal blocks into the interfaces of the door station body, and connect the network cable. - Page 20 Video Intercom Vandal-Resistant Door Station·Quick Start Guide 3. Fix the door station body to the protective shield tightly. Protective Shield Door Station Main Body Figure 4-4 Fix the Body to the Shield 4. Hook the door station to the wall mounting plate tightly. Hooks Figure 4-5 Hook the Door Station to the Plate 5.
- Page 21 Video Intercom Vandal-Resistant Door Station·Quick Start Guide Set Screw Rubber Plug Figure 4-6 Secure the Door Station...
-
Page 22: Remote Operation
Video Intercom Vandal-Resistant Door Station·Quick Start Guide 5 Remote Operation 5.1 Activating Device Purpose: You are required to activate the device first by setting a strong password for it before you can use the device. Activation via Batch Configuration Tool, Activation via Web Browser, and activation via iVMS-4200 client software are supported. -
Page 23: Activation Via Batch Configuration Tool
Video Intercom Vandal-Resistant Door Station·Quick Start Guide 3. Create a password, and confirm the password. STRONG PASSWORD RECOMMENDED– We highly recommend you create to a strong password of your own choosing (using a minimum of 8 characters, including upper case letters, lower case letters, numbers, and special characters) in order to increase the security of your product. - Page 24 Video Intercom Vandal-Resistant Door Station·Quick Start Guide Figure 5-3 Activation Interface (Batch Configuration Tool) 3. Create a password, and confirm the password. STRONG PASSWORD RECOMMENDED– We highly recommend you create to a strong password of your own choosing (using a minimum of 8 characters, including upper case letters, lower case letters, numbers, and special characters) in order to increase the security of your product.
-
Page 25: Editing Network Parameters
Video Intercom Vandal-Resistant Door Station·Quick Start Guide 5.2 Editing Network Parameters Purpose: To operate and configure the device via LAN (Local Area Network), you need connect the device in the same subnet with you PC. You can edit network parameters via batch configuration tool, iVMS-4200 software, and web browser. -
Page 26: Adding Device
Video Intercom Vandal-Resistant Door Station·Quick Start Guide Figure 5-5 Edit Network Parameters The default port No. is 8000. After editing the network parameters of device, you should add the devices to the device list again. 5.3 Adding Device To configure the activated device via batch configuration tool and iVMS-4200 client software remotely, you should add the device to the tool or the software first. - Page 27 Video Intercom Vandal-Resistant Door Station·Quick Start Guide Make sure the device to be added is in the same subnet with your PC. Otherwise, please edit network parameters first. Steps: 1. Select an active online device or hold the Ctrl or Shift key to select multiple devices in the online devices list.
-
Page 28: Adding Device By Ip Address
Video Intercom Vandal-Resistant Door Station·Quick Start Guide If you add devices in batch, please make sure selected devices have the same user name and password. 5.3.2 Adding Device by IP Address Steps: 1. Click the button to pop up the adding devices dialog box. Figure 5-8 Adding Button 2. -
Page 29: Accessing Via Web Browser
Video Intercom Vandal-Resistant Door Station·Quick Start Guide When you add devices by IP Address, or IP Segment, the devices should be online devices. 5.4 Accessing via Web Browser System Requirement: Operating System: Microsoft Windows XP SP1 and above version CPU: 2.0 GHz or higher RAM: 1G or higher Display: 1024×768 resolution or higher... - Page 30 Video Intercom Vandal-Resistant Door Station·Quick Start Guide 5. Install the plug-in before viewing the live view and configuring the device. Please follow the installation prompts to install the plug-in. Figure 5-11 Downloading Plug-in 6. Reopen the web browser after the installation of the plug-in, and repeat steps 2 to 4 to login.
-
Page 31: Local Operation
Video Intercom Vandal-Resistant Door Station·Quick Start Guide 6 Local Operation Before you start: Make sure the door station has been activated. Make sure the network cable is well-connected. Purpose: You can call the resident (the indoor station) or the center (the master station) via the door station by pressing or holding the call button. - Page 32 Video Intercom Vandal-Resistant Door Station·Quick Start Guide Besides the indoor station, you can also unlock the door by the master station, the client software, and the web. When the video intercom between you and the resident is realized, you can speak to the resident, and the live view of door station will be displayed on the connected indoor station.
-
Page 33: Appendix
Video Intercom Vandal-Resistant Door Station·Quick Start Guide 7 Appendix Installation Notice While installing the door station, make sure that the distance between any two devices is far enough to avoid the howling and echo. The distance between two devices is recommended to be longer than 10 meters. - Page 34 Video Intercom Vandal-Resistant Door Station·Quick Start Guide...
Need help?
Do you have a question about the DS-KB8112-IM and is the answer not in the manual?
Questions and answers