
Subscribe to Our Youtube Channel
Related Manuals for urmet domus 4501


Summary of Contents for urmet domus 4501
- Page 1 Mod. 4501 DS 4501-006A LBT 8321 VOIP INTERFACE “DOMUS VOIP ATA” Ref. 4501/30 QUICK INSTALLATION GUIDE & USER MANUAL...
-
Page 2: Table Of Contents
INDEX QUICK INSTALLATION GUIDE ............3 USER MANUAL .................. 7 Introduction ................7 Features ................. 7 Standard Compliances ............7 LED Indicators ............... 7 Installations & SIP Configurations ......... 7 Default reset by telephone ............. 7 Configurations by Web Browser ..........7 Configurations by Telephone &... -
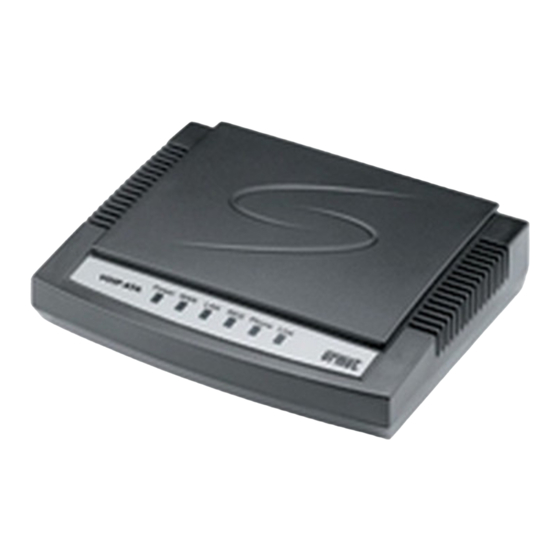
Page 3: Quick Installation Guide
QUICK INSTALLATION GUIDE STEP1: VOIP ATA LED AND REAR PANEL DESCRIPTION POWER ON when the main power is present ON when there’s a correct WAN connection POWER Phone Line ON when a PC is connected to the LAN port VOIP ATA ON when there’s a successful SIP registration Phone Blinking with phone in use... - Page 4 4. The following system information page will appear on the web browser. 5. Program the following network confi gurations in the left-hand column: Phone, Network WAN/LAN Settings, SIP Settings. Remember to click on “Save Change” and then save to confi rm and activate settings: the device will be restarted with the new settings. 6.
- Page 5 Two confi guration modes are possible for the LAN (LAN mode): NAT (default): By using this mode, the WAN and LAN ports refer to two separate interfaces; in this case, as shown in the example above, the PC connected to the LAN port will obtain the address from the device (192.168.123.x). Bridge: By using this mode, the device will behave transparently (as an Ethernet hub/bridge) and in this case, the PC connected to the LAN port will obtain the address from the ADSL Router/Modem to which the device is connected (192.168.101.x in the mentioned example).
- Page 6 STEP 4: HOW TO MAKE POINT-POINT SIP CALLS 1. Select one of the three SIP servers, if you have more, otherwise simply pick up the handset: you will hear the dial tone. 2. Key in 123456# to call number 123456 registered to the SIP server. Note that # is used to forward the call immediately. You will hear the calling tone.
-
Page 7: User Manual
USER MANUAL 1. INTRODUCTION The Domus VoIP ATA is a SIP protocol based IP gateway for Voice Over IP applications (VoIP). It is provided with a PSTN (Line) port for connection to the traditional telephone line and a phone port for an analog telephone. Connected to the Internet, to a phone and to a PSTN line , the Domus VoIP ATA can be used to make VoIP calls and traditional telephone calls. - Page 8 Please enter the username and password into the blank fi eld. The default settings are: Username: root Password: test Click the “Login” button to enter the System information page for web confi gurations. Whenever you change the setting in each Web page, remember to click the “Submit” button in the page, and click the “Save” button to save into the non-volatile memory and click the “Reboot”...
- Page 9 PHONE BOOK PHONE BOOK SETTINGS You may add/delete Name up to maximum 140 entries in Phone book list. • To add a phone name, you need to enter the position, the name, and the phone URL. When you fi nished a new phone list, just click the “Add Phone”...
- Page 10 PHONE SETTING CALL FORWARD SETTING You can select the forward mode and enter the forward URL. All Forward: All incoming call will forward to the URL you choose. Busy Forward: The incoming call will forward to the URL when you are busy and on the phone. No Answer Forward: The incoming call will forward to the URL when no answer.
- Page 11 SNTP SETTINGS You can setup the primary and the second SNTP Server IP Addresses to get the date/time information. You may also set the Time Zone, and how long need to synchronize again. When you fi nished the setting, please click the “Submit” button. VOLUME SETTINGS You can setup the Handset Volume/Gain, PSTN-Out Volume, and PSTN-In Gain in this page.
- Page 12 DND SETTINGS You can setup the DND (Do Not Disturb) to keep the phone slience. You can choose DND Always or DND period.. DND Always: All incoming call will be blocked until the feature is disabled. DND Period: Set a time period and the phone will be blocked during the time period. If the “From” time is large than the “To” time, the block time will from Day 1 to Day 2.
- Page 13 AUTO ANSWER SETTING You may enable the Auto Answer function to answer the incoming call by VoIP ATA FXO port. When the ring count exceeds the number set in Auto Answer Counter, the FXO port will auto answer and allow for extension calls from VoIP to PSTN and vice vesa. For the incoming call from the Internet, the FXO port will answer with a PSTN dial tone and allow caller to redial to PSTN phone number.
- Page 14 Example 1: Drop Prefi x: No, Replace rule 1: 002, 8613+8662 a) Pressing 8613xxx will result in dialing out 002+8613+xxx. b) Pressing 8662xxx will result in dialing out 002+8662+xxx. Example 2: Drop Prefi x: Yes, Replace rule 2: 006, 002+003+004+005+007+009 a) Pressing 002xxx will result in dialing out 006+xxx.
- Page 15 FLASH TIME SETTING You can set the fl ash time duration for the telephone fl ash key or hook switch in this page. The telephone fl ash key is used to switch to the other phone line or HOLD, and is quite useful for the 3-way conference call and the call waiting function. When you fi nished the setting, please click the “Submit”...
- Page 16 CALL TRANSFER FUNCTION The call transfer function allows users to answer an incoming call and to hold the current call by pressing fl ash key, and then transfer the current call to the desired party by dialing the desired party number ended with # key. The call transfer function is exclusive with call waiting function. You may enable call transfer function by disabling the call waiting function (#139#), or disable call transfer function by enabling the call waiting function (#138#).
- Page 17 ALARM SETTINGS You can confi gure the Alarm setting in this page. NETWORK You can check the Network status, and confi gure the WAN, LAN, DDNS, and VLAN settings in this section. NETWORK STATUS You can check and show the current Network setting in this page. DS4501-006A...
- Page 18 WAN SETTINGS The WAN setting is used to confi gure the Ethernet port connects to the ADSL Modem/Router. The default setting is NAT mode for IP PHone, and this enables the embedded NAT router between the LAN port and PC port. You may change to Bridge Mode if you need NOT use the embedded NAT router.
- Page 19 LAN SETTINGS The default IP address is 192.168.123.1 for VoIP ATA, with Net Mask 255.255.255.0., and DHCP Server enabled. The IP addresses for DHCP are from 150 to 200. Connect your PC to the PC port, set your PC as DHCP Client mode, and then the PC will get an IP address from the VoIP ATA automatically. When you fi...
- Page 20 DDNS SETTINGS You can confi gure the DDNS setting in this page. You need to have the DDNS account and input the informations properly. You need a DDNS account with a public IP address then others can call you via the DDNS account. Most of the VoIP applications are working with a SIP Proxy Server as well as DDNS Server.
- Page 21 VLAN SETTINGS There are two parts for VLAN settings. One is to set for VoIP packets related to VoIP ATA, and the other is for the VLAN setting in the NAT Mode. There are two kinds of destination packets coming to the WAN port, one is VoIP packets for VoIP ATA, and the other will go through the WAN port to the LAN port.
- Page 22 DMZ SETTING The DMZ can be enabled/disabled and confi gured in this page. DS4501-006A...
- Page 23 VIRTUAL SERVER The Virtual Server IP and Port numbers can be confi gured in this page. PPTP SETTING The PPTP Server can be set ON/OFF in this page. DS4501-006A...
- Page 24 SIP SETTINGS SERVICE DOMAIN SETTINGS You can setup the Service Domain, Port Settngs, Codec Settings, RTP Setting, RPort Setting and Other Settings for SIP Proxy Server registrations in this page. You may register up to three SIP Servers for three Realms in the VoIP ATA. You can receive the incoming calls from all the three SIP Servers. For outgoing calls, you may select the registration SIP server fi...
- Page 25 PORT SETTINGS The SIP Port and RTP Port numbers are default at 5060 and 60000, respectively. The RTP port number must be even number. If you have more than one VoIP phones or ATAs’ under the same NAT router, it is recommended that different RTP port numbers be assigned to each of IP Phones or ATAs’.
- Page 26 CODEC ID SETTINGS You can set the Codec ID to meet the other device’s requirement. When you fi nished the setting, please click the Submit button. DTMF SETTINGS You can setup the options for DTMF function in this page. The options include RFC2833 (Outband DTMF), Inband DTMF, and Send DTMF SIP info.
- Page 27 OTHER SETTINGS You can setup the Hold by RFC, Voice/SIP QoS and SIP expire time in this page. To change these settings please following your ISP information. When you fi nished the setting, please click the Submit button. The QoS setting is to set the voice packets’ priority. Higher value for voice packets will get higher priority to the Internet.
- Page 28 NAT TRANSVERSAL STUN SETTING You can Enable/Disable and confi gure STUN Server IP address in this page. This function helps IP Phone working properly behind NAT. To change these settings please follow your ISP information. When you fi nished the setting, please click the Submit button. DS4501-006A...
- Page 29 OTHERS You can setup Auto Confi g, FXO&FXS port, MAC Clone, Tone and Some Advanced Settings in this page. AUTO CONFIGURATION SETTING Auto Confi guration function can be used to download the confi guration fi le stored in the TFTP, HTTP, or FTP server. This function must co- work with the Auto Confi...
- Page 30 TONES SETTINGS The Tone setting can be adjusted to generate Dial tone, Ring tone, Ring Back tone, and Busy tone for different countries. When you fi nished with the settings, please click the Submit button. ADVANCED SETTING The advanced settings might be useful for some network requirements. The ICMP function is to echo when someone ping this device. This can prevent from haker attacking the device by not echoing.
- Page 31 SYSTEM AUTHORITY The user login name and password can be changed in this page. SAVE CHANGE If you want to save the changes you have made for new setting in the VoIP ATA, You have to click the Save button. After you click the Save button, the VoIP ATA will automatically restart and the new setting will get effective.
- Page 32 UPDATE UPDATE FIRMWARE The VoIP ATA provides two methods, HTTP or TFTP, to update new fi rmware as the following steps: • Select the fi rmware code type, Risc or DSP code. (mostly for Risc code) • Click the “Browse” button to choose the updated fi le location for HTTP download. •...
- Page 33 AUTO UPDATE SETTINGS The VoIP ATA provides two methods, HTTP or TFTP, to update new fi rmware as the following steps. RESTORE DEFAULT SETTINGS You can restore the VoIP ATA to factory default in this page. Click the Restore button, then the VoIP ATA will restore to default and automatically restart again.
- Page 34 REBOOT If you want to restart the VoIP ATA, you can just click the Reboot button, and then the VoIP ATA will restart automatically. DS4501-006A...
-
Page 35: Configurations By Telephone & Ivr
8. CONFIGURATIONS BY TELEPHONE & IVR You can use telephone to confi gure and to check the status of VoIP ATA. Make sure that the LAN port is connected to Ethernet, or you may hear a busy tone from the telephone. Group IVR Action Phone Command... -
Page 36: Voip Application Examples
9. VOIP APPLICATION EXAMPLES You can use PC Web browser to confi gure VoIP ATA. For example, enter http://192.168.123.1:9999 from PC web browser. A. ADSL Connections without Router for VoIP ATA ADSL Modem INTERNET Line PSTN PSTN PC IP: 192.168.123.1 Analog Telephone B. - Page 37 EXAMPLE 3: 3-WAY CONFERENCE CALL, CALL TRANSFER, CALL WAITING, HOLD APPLICATIONS These are for call transfer and conferencing among Parties A, B, and C. Three parties are registered to SIP server with either fi xed real IP or private IP. There are two kinds of call transfer; Blind Transfer and Attendant Transfer. BLIND TRANSFER 1.
-
Page 38: Trouble Shooting For Web Configurations
10. TROUBLE SHOOTING FOR WEB CONFIGURATIONS DO NOT HEAR DIAL TONE? When you pick up the phone and hear a busy tone, it indicates the WAN port is NOT connected. Make sure the ADSL Ethernet cable is connected to the WAN port of VoIP ATA and Power Reset again. CAN NOT ACCESS WEB PAGE? Web Browser is a useful tool to confi... -
Page 39: Glossary
11. GLOSSARY SIP account: SIP service registration parameters supplied by a service provider (see step 3 of the quick confi guration for examples). ADSL: Asymmetric Digital Subscriber Line: Modems attached to twisted pair of copper wiring that transmit from 1.5Mbps to 12Mbps downstream (to the subscriber) and from 16kbps to 1280kbps upstream, depending on line distance. - Page 40 DS 4501-006A LBT 8321 URMET S.p.A. Area tecnica 10154 TORINO (ITALY) servizio clienti +39 011.23.39.810 VIA BOLOGNA 188/C http://www.urmet.com Telef. +39 011.24.00.000 (RIC. AUT.) e-mail: info@urmet.com +39 011.24.00.300 - 323...
Need help?
Do you have a question about the 4501 and is the answer not in the manual?
Questions and answers