Table of Contents
Advertisement
Advertisement
Table of Contents

Subscribe to Our Youtube Channel
Related Manuals for KYMCO SPADE 150i


Summary of Contents for KYMCO SPADE 150i
- Page 1 SPADE 150 Fi Series Scooter Owner’s Manual...
- Page 2 Battery & EFI Damage Alert WARNING To avoid damage from the scooter's electronic fuel injection system, do not remove or install a battery wire when the ignition switch is at the "ON" position.
- Page 3 Read this manual carefully This Owner’s Manual contains important information on safety, operation and maintenance of your KYMCO SPADE 150i scooter. Anyone who operates your scooter should carefully read and understand the contents of this manual before riding the scooter. For your safety, understand and follow all of the warnings contained in this Owner’s Manual and the labels applied to your scooter.
-
Page 4: Important Information
Important Information Vehicle ID Number Theft Prevention Branding 1. Engine Number: Coping with theft prevention policy of the Engine number of this model is imprinted government to prevent your motorcycle from underneath the left crank box as shown in Fig. (1): being stolen, the vehicle is branded with a theft preventive code, identical to Engine Number, (see Figure below) at proper positions. -
Page 5: Table Of Contents
Contents 1. Precautions on Safe Driving 2. Motorcycle Parts 3. Operation of Dashboard and Controller Functions 4. Starting the Engine 5. Proper Riding Method 6. Checks Before Riding 7. Periodical and Simplified Maintenance and Troubleshooting Authorities and Maintenance 9. Specifications The actual product must prevail if any content in this manual differs from the actual product. -
Page 6: Precautions On Safe Driving
1.Precautions on Safe Driving 1-1. Checks before driving 1-5. Clothing 1-6. Loading... - Page 7 Checks before driving 8. Exhaust gas from the muffler contains carbon 1. Peruse the User Manual and Precautions. monoxide which is harmful to human body. 2. Driver must wear a helmet, gloves, goggles, etc. 9. Start the engine only in a well ventilated location. 3.
- Page 8 1. The exhaust muffler is very hot after the engine stops, 4. While driving, hold handlebars with both hands and avoid touching it. place feet on footrests; the rear rider must hold the front rider’s waist with both arms and put feet on rear 2.
- Page 9 1. Making an acute turn or driving with single hand is 3. Operability of the handle varies in conditions with or strictly forbidden. without an extra load. 2. Abide by traffic rules. 4. Avoid overloading when carrying objects. Make sure that objects are fixed properly.
- Page 10 3. Vehicle functionalities are related to its structure; arbitrary modification may deteriorate operability of 1. Never smoke when filling fuel. vehicle, causing shortened service life and obstructed 2. Stop engine when filling fuel. driver safety. 4. Arbitrary modification of a vehicle is an illegal action forbidden by law.
- Page 11 Clothing Caution Natural mental relaxation and comfortable clothes are Buckle up chin-belt Button up long sleeves, essentials to a safe driving. when wearing a snug tidily, prevent Abide by traffic rules, do not be anxious, relax and helmet.
- Page 12 Loading It is forbidden to install a carrying basket or bracket on the front header. Carrying anything in front of the vehicle will surly block the headlight and significantly affect driving safety. Maximum loading of front or rear luggage box is 5kg.
-
Page 16: Motorcycle Parts
2. Motorcycle Parts 2-1. Right View 2-2. Left View... -
Page 17: Right View
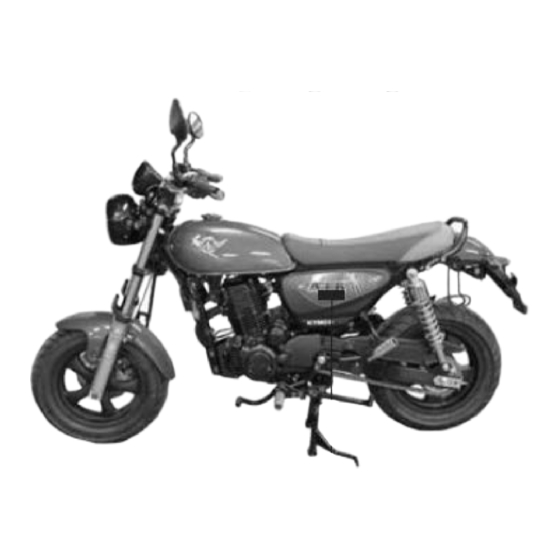
Right View 1. Headlight 2. Front RH winker 3. Steering stem lock 4. Horn 5. Head Light switch / Starting Button 6. Tail light /Brake Light 7. Rear RH winker 8. Main Stand 9. Exhaust Muffler 10. Rear Brake Tread Lever 11.Front Brake tread Lever ※Your vehicle may differ from the picture depending on the model. -
Page 18: Left View
Left View 12. Meters 13. Clutch lever 14. Front LH winker 15. Main Switch 16. Gear Tread Lever 17. Side Stand 18. High/Low Beam Switch / Winker Switch / Horn Button 19. Tank Cap 20. Rear LH winker 21. Reflex Reflector ※Your vehicle may differ from the picture depending on the model. -
Page 20: Operation Of Dashboard And
3. Operation of Dashboard and Controller Functions 3-1. Meters, Indicators 3-3. Main Switch 3-4. Steering Lock, Electrical Start Button 3-5. Headlight Switch, Hi/Low Beam Switch 3-6. Direction Light Switch, Horn Button 3-7. Cell Phone Socket (12v) - Page 21 7.Oil change indicator: Dashboard It lights up when you traveled 2000km, indicating an 1.Speedometer (Mile): oil change is required. *Zero the oil change mileage: Standard speed is in mile per hour (mph) 1. Pressing ADJ. button for about 2s to cycle among 2.Adjustment Button: the 3 modes: ODC→TRIP→Blank.
- Page 22 When Battery Indicator lights up, the battery is weak during driving, go to a KYMCO dealer for check- and immediate check-up and/or recharge is required. up.(EURO 4 models would keep lighting)
- Page 23 Main Switch 1 ● At this position, engine electrical power is cut off, engine stops. ● You may remove the key when stopped. ● At this position, engine electrical power is connected; you can start the engine. ● The key stays in when driving, and cannot be taken out.
- Page 24 Steering Stem Lock Starting Button For theft prevention, lock the steering stem when parking your motorcycle. While using electrical starting, pull the clutch lever tightly Locking Method: before pressing the Starting Button. Turn the steering stem fully to the left; then turn the key CCW 180°...
- Page 25 Horn Button High/Low Beam Toggle Switch With Main Switch turned to ON position, pressing the For switching over between high beam and low beam: Horn Button will activate the horn. Indicates High Beam Indicates Low Beam Switch it to position for beaming the far.
- Page 26 Direction Light Switch Cell Phone Socket (12v) Use Direction Lights when making a turn or changing a * This power socket is used for charging a mobile device. lane. Direction lights blink when the switch is cut in. Do not use it for other electrical products, especially ●...
- Page 28 4. Starting the Engine 4-1. Electrical Start 4-2. Handling a Tumbled Vehicle...
-
Page 29: Starting The Engine
Turn Main Switch to “ON” position Starting the Engine ● When starting the engine with the electrical motor, do not turn the Throttle Grip; pull the clutch tight and push the starting button, engine will now be started. <Note> For starting difficulties with a cold engine or after a long time without using the vehicle, key on for 2-4 seconds and key off, repeat the procedure several times to warm up the fuel pump for... - Page 30 ● Make a short warm-up (2-3 minutes) after starting a cold engine. Handling a tumbled vehicle ● Never run the engine in high rpm when not loaded, for ensuring a prolonged service life of engine. To re-start a stopped engine after a tumble of vehicle, you ●...
-
Page 32: Proper Riding Method
5. Proper Riding Method 5-1. Clutch and Gear Shifting 5-2. Correct Driving 5-3. Running-in a New Engine 5-4. Driving on Rainy Days 5-5. Parking Precautions 5-6. Theft Prevention of Vehicle... - Page 33 Clutch Lever Gear Shifting Tread Lever Clutch and Gear Shifting 1. Pull tight the clutch lever and turn down throttle grip, then press the shift lever with left foot to engage Gear 1. 2. Slowly increase Throttle Grip and gradually release clutch lever at the same time, the vehicle will start to move forward slowly.
- Page 34 Proper Riding Speed Regulation Activate direction light before taking on the road; make Speed regulation is achieved via Throttle Grip. sure of traffic safety behind you before driving out. Turning Back ....... Will increase the speed. Increase fuel (throttle) slowly. When starting off or climbing a slope, slowly turning the Throttle Grip...
- Page 35 Apply both front and rear brakes Proper driving prolongs service life of your motorcycle. ● After returning Throttle Grip to its Close position, apply both front and rear brakes at the same time. ● Do not exceed 60kpm during the run-in period of a ●...
- Page 36 Do not brake suddenly or turn Take extra cautions when riding in abruptly rainy days ● Road surfaces on rainy days are different from in fine days; braking distance will be longer, you should Braking suddenly or turning abruptly is the cause for a reduce your speed and take advanced actions for lateral skid and tumble, which is extremely dangerous.
- Page 37 Making a Stop ■ Vehicle at full stop ■ When approaching stop location ● Light up Direction Lights in advance to alert Return Direction Light Switch; turn Main Switch to OFF. vehicles behind you, then stop the vehicle slowly. ● Return the Throttle Grip to origin, and apply both front and rear brakes in advance.
- Page 38 ■ Stand on the left side on a level ground ■ For theft prevention, lock the steering and brace up the Main Stand stem and remove the key. ● Brace up the Main Stand on a level ground where traffic is not impeded. ●...
-
Page 40: Checks Before Riding
6. Checks before Riding 6-1. Checks before Riding 6-12. Periodical Checks... - Page 41 Make sure to carry out not-so-difficult or non- replenish oil to a level between the upper and lower troublesome checks before driving; in case of any limits. anomaly, go to a national KYMCO dealer for service. Upper Limit Lower Limit Oil level...
- Page 42 Replenish the fuel to a level 1 inch from the tank To ensure using genuine KYMCO oil products, please opening. Excessive level of fuel will result in an go to the dealer you purchased the vehicle from or overflow.
- Page 43 Check for any play in up/down, front/rear and left/right directions. Check for over-tightness. Check for any collision on the handlebar. If any anomaly is sensed, go to a KYMCO dealer or service center for inspection and repair.
- Page 44 Check and Adjust Brakes A proper play must be provided for the brake lever (1); a normal play is 1-2 cm Play refers to the distance between the positions of the lever where is loose and where it is tightened. 1- 2 cm CAUTION ...
- Page 45 <Checking Rear Brake adjustment> <Checking Front Brake Fluid> Lower Limit 1. Straighten the Handlebar and check the level of brake fluid in either front or rear reservoir is between the marks of upper and lower limits. 2. If level is near the Lower Mark, check the brake lining for a worn condition.
- Page 46 ● Is braking effective? ● Drive slowly to verify the effect of front and rear Check and adjust Brake Light: brakes. ● Turn Main Switch to ON position. ● Respectively pull the Front and Rear Brake Levers; verify if Brake Light goes on. ●...
- Page 47 Check Winkers ● Turn Main Switch to ON position. ● Operate Winker Switch to verify if each Direction Light and indicator blink. ● Check Winker Casing for stain or fracture. Winkert Switch...
- Page 48 Check and adjust Clutch Cable Check and adjust Clutch Cable Play of Clutch Lever (1) must be 1-2cm; always check Check the play of Clutch Cable. If necessary, adjust the the play. If necessary, adjust nuts (2) and (3). nuts (4) and (5).
- Page 49 Check Transmission Chain for a 1-2cm sag Side Mark Rear Axle Nut at the center of chain length between 2 gears. Adjustment Method: Loosen Rear Axle Nut and turn adjustment nuts on both sides, align the adjuster with the Side Mark and lock Rear Axle Nut.
- Page 50 With 2 rider minimum limit due to wear. Front Wheel 2.0kgf/cm 2.0kgf/cm ● Check front and rear rims for any slackening or Rear Wheel 2.0kgf/cm 2.25kgf/cm deformation which may affect driving safety. Go to a KYMCO dealer for service. 6-10...
- Page 51 Check Front/Rear Cushion Check if Headlight/Taillight goes on normally. Exert load onto Handlebar and Seat Pad and shake the vehicle up and down, check if shock absorbers act Turn Main Switch to ON position. Operate Headlight normally. Switch and check if Headlight goes on. Also check for any stain or fracture.
- Page 52 ● For the sake of vehicle safety and driving comfort, 300km. please receive regular checks as scheduled. ● KYMCO dealers take care of after sales services as well as maintenance tasks. ● Refer to User Manual for timing of checks and check items.
-
Page 53: Change Oil
Change Oil CAUTION < Oil Change Period> Use only KYMCO 4-Cycle Motor Engine Oil. Initial oil change: 300km; subsequent oil changes: every The following conditions expedite oil deterioration; 1000km. you need to advance oil change. Riding on pebbled roads often. - Page 54 Do not mix oils of different brands, class or low quality ones; they may cause engine faults. KYMCO Motor Oil contains additives (e.g., carbon cleaners) during the manufacturing process. Arbitrarily mixing additives bought from the market may deteriorate the oil, affect lubricating properties and shorten the service life of engine.
- Page 55 Spark Plug Check and Adjustment Side Electrode Dirty electrode or excessive gap can cause poor sparking. Core < Cleaning Method> ● Use a Spark Plug Cleaning Device is the best way. ● If a Spark Plug Cleaning Device is not available, clean Washer with a needle brush.
-
Page 56: Periodical And Simplified
Periodical and Simplified Maintenance and Troubleshooting 7-1. Precautions 7-2. Summary of Periodical Maintenance 7-3. Battery Check 7-4. Fuse Replacement 7-5. Air Cleaner 7-6. User Precautions 7-7. Troubleshooting... - Page 57 Precautions: CAUTION If check results show that a cleaning, adjustment or Take safety precautions while performing maintenance replacement is required, carry it out according to Set up Main Stand of vehicle on a flat ground. instructions prescribed in the Periodical Check Record. ...
- Page 58 Management carrying out maintenance. Air Intake Pressure Sensor System It is suggested that 1 bottle of Reverse Sensor KYMCO specified Fuel Ignition Coil Injection Nozzle Cleaner must Battery be added in the Fuel Tank every Major Chassis Bolts 1000km.
- Page 59 Battery Indicator on Dashboard will light up if battery Make sure that any slackened nut of battery pole is properly voltage gets excessively low. You need to remove and charge tightened. the battery or go to a KYMCO dealer for service.
- Page 60 In the event of a blown fuse, find out the cause before replacing it, otherwise it may burn again. Go to a KYMCO dealer or service center for check-up if the cause cannot be identified. By all means avoid using a power water jet for cleaning hood peripherals when washing the vehicle.
- Page 61 Screw Cleaner Filter Screen Cleaning Air Cleaner Foam Excessive dust accumulation is the main reason for a horsepower drop. 1. Remove LH Rear Cover first, remove Air Cleaner Screw. 2. Remove Air Cleaner Element Cover and take out Air Cleaner Foam. 3.
- Page 62 Dashboard and lights due to inside/outside temperature differences; which is not a quality issue of them. However, if large amount of drops or accumulation of water appears inside Dashboard and light cover, please consult a KYMCO dealer for receiving service.
- Page 63 In case of fault of vehicle: In case of failure to start engine or engine stops during a Go to a KYMCO Dealer for repair if any fault occurs riding, please check the following items first: when driving the vehicle. We recommend that genuine Is there any more gasoline in the tanks? KYMCO parts must be used for any replacement.
- Page 64 Environment Protection Mechanisms and Maintenance 8-1. Understanding Exhaust Emission Control System 8-2. Maintenance of Exhaust Emission Control System 8-3. Understanding Evaporative Emission Control System 8-4. Checking Evaporative Emission Control System 8-5. Standard and Reference Table of Possible Causes of Pollution, Exhaust Concentrations, Fines, and Noise Levels.
- Page 65 2. For ensuring normal performance of Exhaust Emission Control System, never modify your vehicle arbitrarily, otherwise you may subject to a fine for pollution resulting from affected exhaust emission control. 3. Should you have any doubt, go to a KYMCO Dealer for check up.
- Page 66 Maintenance of Exhaust Emission Control System Operation Method: 1. Refer to Page 7-5 for cleaning filter of Air Cleaner Element. 2. Engine Oil – In order to perfect engine lubrication and parts movement, replace engine oil at the first 300km and at every subsequent 1000km.
- Page 67 Evaporative Emission Control System (E.E.C) is an evaporative fume exhaust device that collects fuel vapor from front fuel tank and throttle valve, for preventing the vapor from emitting to the atmosphere and causing air pollution.
- Page 68 4. Perform maintenance items as prescribed in List of smoking, etc.), go to a contracted service center Maintenance Items of Exhaust Emission Control System. specified by KYMCO or maintenance. 5. Use #92 or higher grade unleaded gasoline only, for ensuring functionality of pollution prevention Irregular Checks: components.
- Page 69 Standard and Reference Table regarding Possible Causes of Pollution and Values of Exhaust Concentrations, Fines, and Noise Levels Reference Table of possible causes for excessive emission Effective exhaust emission inspection standard and fine standard concentration during idle speed of motorcycle/automobile Fine Fine over pollution type...
-
Page 70: Specifications
9.Specifications 9-1. SPADE 150Fi Specifications RT30HE... - Page 71 RT30HE Item Specifications Item Specifications Engine Type RT30-1 Axle Base 1230mm Displacement 149.4 c.c.(mL) Dry Weight (Net) 123kg Cylinder diameter × Φ62mm × 49.5mm Stroke Front Wheel 120/80-12 Tires Rear Wheel 130/70-12 Compression Ratio 10:1 Gear Shifting Method 5-Gear International Shifting Fuel type Battery Capacity 12V8Ah (Model: 9B-BS)
- Page 73 SPADE 150Fi Series User Manual KWANG YANG MOTOR CO., LTD. Edition – June 2017 Copyright © Do Not Copy Printed in Taiwan...
- Page 75 KYMCO's products sold inTaiwanarealldesigned, manufactured, and qualitycontrolled in Taiwan. © KYMCO. All rights reserved. Printed in Taiwan. www.kymco.com.tw...
Need help?
Do you have a question about the SPADE 150i and is the answer not in the manual?
Questions and answers