
Related Manuals for Cookworks MY-CS6007WP

Summary of Contents for Cookworks MY-CS6007WP
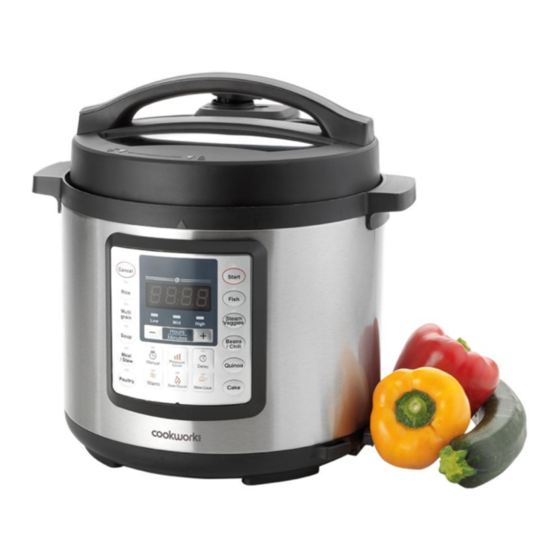
- Page 1 Pressure Cooker Model No. MY-CS6007WP Care & Instruction Manual For household and indoor use only Please read these instructions before use and retain for future reference ISSUE-1 2/8/2017...
- Page 2 Electrical safety You should only plug the appliance into a 220V‐240V AC, 50Hz supply. Connecting it to other power sources may damage the appliance and will invalidate the guarantee. Switch off and unplug when not in use and before cleaning or ...
- Page 3 Warning! This appliance is intended exclusively for use in domestic households. It is not suitable for commercial use. Do not attempt to remove the lid when the pressure cooker is operating or when it is still under pressure (float valve raised). Do not cover or block exhaust valve during operation and allow it ...
- Page 4 Contents Pressure cooker Power lead Steam trivet Condensate Small ladle Rice spoon Measuring cup ISSUE-1 2/8/2017...
- Page 5 Parts 1. Exhaust valve cover 8. Pressure cooker handles (removable) 2. Push rod 9. Pressure cooker housing 3. Float valve gasket 10. Power cable socket (removable) 4. Seal 11. Lid handle (removable) 5. Control panel 12. Exhaust valve (removable) 6. Bowl 13.
- Page 6 Control Panel ISSUE-1 2/8/2017...
- Page 7 Fitting the condensate cup Slide the condensate cup into position at the reverse of the pressure cooker as shown (figs. 1) Figs. 1 Removing and fitting the lid To remove the lid (figs. 2) - hold the lid by the handle and turn the lid anticlockwise until the alignment mark () on the rim of the pressure cooker housing is aligned with the ‘unlocked’...
- Page 8 Using the pressure cooker – manual mode 1. Use utensils suitable for non stick pans when using this item. 2. Wash all removable parts before first use and dry thoroughly. 3. Place the pressure cooker housing on a stable, flat, heat resistant surface and away from surfaces that may be damaged by steam.
- Page 9 12. When the cooker is up to pressure, the display will start to count down the cooking time, the float valve will pop up (fig. 5) and some hissing and a small amount of steam is normal just before the float valve pops up. Fig.
- Page 10 Using the pressure cooker – programmed mode 1. Follow steps 1 – 8 above for manual mode. 2. Press the programmed button corresponding to the food being cooked and the default cooking time (see table 1) will be shown in the display, the ‘medium’ indicator will illuminate and the cook indicator above the start button will flash.
- Page 11 Pressure cooker - general cooking advice Pressure cooking is great for casseroles, stews and for cooking cheaper cuts of meat. Many dried pulses and beans can be added to the recipe without the need for overnight soaking. Favourite recipes can be adapted and prepared in a fraction of the time as food cooks in about a third to one half of the time that they would by conventional methods and some typical recipes have been added at the end of this manual to show how to use the pressure cooker.
- Page 12 Outline cooking times Meats Weight / Pressure quantity cooking time Chicken breasts, boneless 8-10 Chicken thighs, boneless 8 x 85g Whole chicken 1.4 – 1.8kg 20-30 Beef stew (inc potatoes and veg) 15 – 20 Short ribs (5cm) 1.8kg 45-60 Brisket / skirt 1.4kg Pot roast, topside / chuck...
- Page 13 Vegetables (cooked by steaming method) Add approximately 1 cup of liquid into the bowl of the pressure cooker and then place the trivet into the base of the bowl. Unless told otherwise, place the vegetables to be cooked onto a ...
- Page 14 Using the sear/ saute function 1. Use utensils suitable for non stick pans when using this item. 2. Wash the removable bowl and lid before first use and dry thoroughly. 3. Place the pressure cooker on a stable, flat, heat resistant surface and away from surfaces that may be damaged by steam.
- Page 15 Using the slow cook function 1. Use utensils suitable for non stick pans when using this item. 2. Wash all removable parts before first use and dry thoroughly. 3. Place the pressure cooker housing on a stable, flat, heat resistant surface and away from surfaces that may be damaged by steam.
- Page 16 Slow cook function - general cooking advice All ingredients must be fully thawed before cooking. Vegetables such as carrots, potatoes and turnips require longer cooking than many types of meat and should be cut into the smallest sizes practical. Place in the bottom or the sides of the bowl and cover with liquid.
- Page 17 Using the delay start function 1. Follow the usual directions outlined above for assembling and setting the pressure cooker but DO NOT press the START button. 2. Press the DELAY button and the display will show a default delay time of 2 hours. 3.
- Page 18 Troubleshooting Observation Possible cause Action to take Difficult Seal installed Refit the seal close lid correctly. Float valve is catching on Gently push the rod to release. the push rod. won’t Cooker still pressurized Allow pressure to normalize. open and float valve still raised. Steam leaks Seal ring incorrectly fitted...
- Page 19 Demonstration recipe ideas Cooking a gammon joint 1.25kg Gammon joint 2 tbsp whole grain mustard ¼ cup brown sugar or honey 10 black peppercorns 2 bay leaves 1. Prepare all ingredients. 2. Place the bowl into the pressure cooker housing, plug in and switch on.
- Page 20 Lamb shanks in port and garlic sauce 2 lamb shanks 1 tbsp vegetable oil 10 garlic cloves, peeled and whole ½ cup of lamb stock ½ cup port 1 tbsp tomato puree 2 tsp rosemary, fresh and finely chopped 15g butter, salted 2 tsp balsamic vinegar Salt and pepper, to taste 1.
- Page 21 Beef stew with a horseradish twist 450g beef braising steak, cut into roughly 3cm pieces 1 tbsp plain flour 1 tbsp vegetable oil 1 onion, finely chopped 1 carrot, chopped 250g closed cup chestnut mushrooms, sliced 390g tin chopped tomatoes 300ml beef stock, made with 1 stock cube 1 bay leaf 2 tbsp horseradish sauce...
- Page 22 Technical specification Rated voltage 220-240V AC 50/60Hz Power consumption 1000W Max. capacity 6 litres Working pressure 70kPa Class rating I (earthed) BS 1362 fuse Plug / Wiring advice The wires in this mains lead are coloured in accordance with the following UK electrical code: BLUE = NEUTRAL BROWN = LIVE...
- Page 23 Recycling electrical products This marking indicates that this product should not be disposed with other household wastes throughout the EU. To prevent possible harm to the environment or human health from uncontrolled waste disposal, recycle it responsibly to promote the sustainable reuse of material resources. To return your used device, please use the return and collection systems or contact the retailer where the product was purchased.
- Page 24 ISSUE-1 2/8/2017...
Need help?
Do you have a question about the MY-CS6007WP and is the answer not in the manual?
Questions and answers