Table of Contents
Advertisement
Quick Links
Advertisement
Table of Contents

Subscribe to Our Youtube Channel
Related Manuals for Repotec RP-G802W


Summary of Contents for Repotec RP-G802W
-
Page 1: User Manual
Easy Smart GbE Switch 8-Port Gigabit Easy Smart Switch User Manual... -
Page 2: Fcc Certifications
Easy Smart GbE Switch FCC Certifications This Equipment has been tested and found to comply with the limits for a Class B digital device, pursuant to part 15 of the FCC Rules. These limits are designed to provide reasonable protection against harmful interference when the equipment is operated in a commercial environment. -
Page 3: Table Of Contents
Easy Smart GbE Switch Table of Contents Chapter 1 Introduction ············································································· 4 1.1General Description ················································································ 4 1.2 Key Features ························································································ 4 1.3 The Front Panel ···················································································· 5 1.4 The Rear Panel ····················································································· 5 1.5 Installation ··························································································· 6 Chapter 2 Getting Started ······································································· 7 2.1 Connect to switch Web Pages ··································································... - Page 4 Easy Smart GbE Switch Chapter 7 Security ················································································· 38 7.1 Storm Filter ························································································· 38 7.2 Loop Prevention ··················································································· 39 7.3 DHCP Snooping ··················································································· 41 Product Specifications ················································································ 42...
-
Page 5: Chapter 1 Introduction
Easy Smart GbE Switch Chapter 1 Introduction 1.1 General Description The device is high-performance Gigabit Ethernet switch, with all 8 ports capable of 10/100/1000Mbps auto-negotiation operation (NWay) which means the switch could automatically negotiate with the connected partners on the network speed and duplex mode. This switch supports the Web GUI to control each port status and bandwidth control by port rate limiting. -
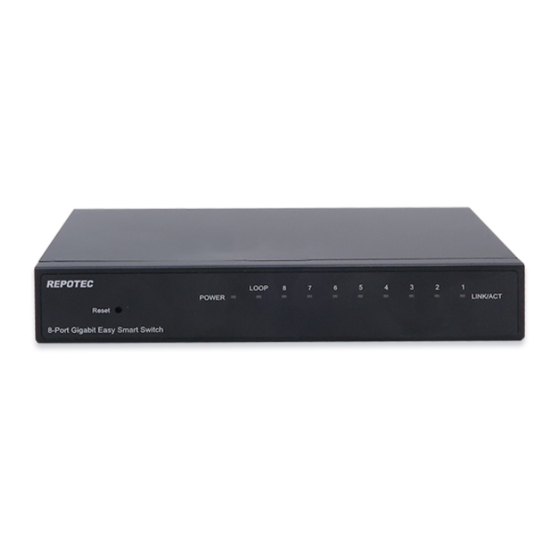
Page 6: The Front Panel
Easy Smart GbE Switch 1.3 The Front Panel The following figure shows the front panel of the switch. LEDs Definition This device provides extensive LEDs to show the activities on power, system and ports. See the following description for your reference: Status Operation Steady Green... -
Page 7: Installation
Easy Smart GbE Switch adapter. Please use the +5V/1A power adapter provided with the Easy Smart GbE Switch. After the switch powered on, the power LED is lit for a normal power status. 1.5 Installation Desktop Installation 1. Place the switch on a flat desk. 2. -
Page 8: Chapter 2 Getting Started
Easy Smart GbE Switch Chapter 2 Getting Started Connect to switch Web Pag 1. To connect to the web server, input the IP of switch in the URL field of the browser. 2. The default IP is 192.168.1.1 and default Subnet mask is 255.255.255.0 3. - Page 9 Easy Smart GbE Switch – Click the menu items to open submenu links, and then click on a submenu link to open the screen in the main window. – It shows the switch’s current link status. Green squares indicate the port link is up, while black squares indicate the port link is down.
-
Page 10: System
Easy Smart GbE Switch In the navigation panel, click a main link to reveal a list of submenu links shown as the following: System Monitoring VLAN Security The following table describes the links in the navigation panel. LINKS DESCRIPTION System-Management This link takes you to a screen that changes/displays general information of the switch including switch name, MAC Switch Information... -
Page 11: Eee
Easy Smart GbE Switch This link takes you to enable or disable port EEE(Energy Efficient Ethernet) function. System-Maintenance This link takes you to a screen where you can change the User Account web configuration login account and password. This link takes you to a screen where you can upgrade the Firmware Upgrade firmware. - Page 12 Easy Smart GbE Switch This link takes you to a screen where you can filter or limit Storm Filter broadcast, multicast, unknown unicast and unknown multicast frame in the network. This link takes you to a screen where you can setup loop Loop Prevention prevention and loop detection features.
- Page 13 Easy Smart GbE Switch Chapter 3 System The System page is mainly for system configuration of the switch, including management , maintenance and multicast setting for the switch. 3.1 Management Use the Management pages to view switch information and configure some settings for ports, trunk group and EEE.
- Page 14 Easy Smart GbE Switch Click System > Management > IP Address Setting On this page user can get and modify the network parameters of the switch. With editable textbox in the table,user could configure the field value. LABEL DESCRIPTION Enable or Disable the DHCP function. If DHCP setting is enabled, the switch will obtain the IP address, subnet Mask and default gateway DHCP Client from the DHCP Server automatically;...
- Page 15 Easy Smart GbE Switch 2. Click Apply, then the remind view pops up. 3. Press OK, and wait for several seconds to make the setting of ports take effect, then you’ll see the page as below. The following table describes the labels in this screen. LABEL DESCRIPTION Port Config...
- Page 16 Easy Smart GbE Switch Flow Control Config: Displays the configuration of the Flow Control for the port. Actual: Displays the actual working state of the port. Note: 1. The switch can’t be managed through the disable port. 2. The switch might lose connection temporarily for the specific port (which connect to the management PC) setting.
- Page 17 Easy Smart GbE Switch The following table describes the labels in this screen. LABEL DESCRIPTION Trunk Group Config Displays the Trunk Group ID. Group ID Ports Select the ports as the trunk group member. Add/Modify Click to select the action of operation, to add/modify Trunk Group to the switch.
- Page 18 Easy Smart GbE Switch 3.2 Maintenance The Maintenance pages are doing the switch user account, Firmware upgrade, Configuration Backup/Restore, Reset to default configuration, Configuration Save and Reboot functions. 3.2.1 User Account Click System > Maintenance > User Account This page user can change the administrator’s username and password in order to refuse illegal users.
- Page 19 Easy Smart GbE Switch The following table describes the labels in this screen. LABEL DESCRIPTION Create a name for administrator’s login. New Username New Password Type in a new password for administrator’s login. Retype Password Retype password to make sure the password is exactly you typed before in “New Password”...
- Page 20 Easy Smart GbE Switch 1. Enter the Enter Loader Mode button, then the confirm interface pops up. Press OK , then the switch will save the configuration and switch to loader mode after 6 seconds. The firmware upgrade screen displays as shown below. 3.
- Page 21 Easy Smart GbE Switch 5. Click OK and wait for several seconds to download the firmware, then you’ll see the upgrade status interface as shown below. After finishing the TFTP upgrade procedure, switch will reboot automatically. 6. If you select to upgrade firmware thought HTTP, click Firmware Upgrade < HTTP Firmware Upgrade to view the screen as shown below.
- Page 22 Easy Smart GbE Switch Note: 1. Don’t turn-off the switch and disconnect the link while firmware upgrading. 2. You are suggested to backup the configuration before upgrading. 3.2.3 Config. Backup and Restore Click System > Maintenance > Config. Backup and Restore On this page user can download the current configuration and save it as a file to your computer, or upload a backup configuration file to restore your switch to this previous configuration.
-
Page 23: Config Save
Easy Smart GbE Switch 1. Click Factory Default to reset all switch configurations to the factory defaults and the switch will restart automatically. 3.2.5 Config Save Click System>Maintenance>Config Save You can save the current configuration easily by clicking the Config Save menu without any function button and you’ll see the successful page directly. -
Page 24: Multicast
Easy Smart GbE Switch 3. The switch will be restarted directly in about 20 seconds without any successful page. 3.3 MultiCast Internet Group Management Protocol (IGMP) snooping is a multicast control mechanism, which can be used on the switch for dynamic registration of the multicast group. Internet Group Management Protocol (IGMP) snooping allows a switch to forward multicast traffic intelligently on the switch. -
Page 25: Monitoring
Easy Smart GbE Switch Chapter 4 Monitoring The Monitoring page monitors port statistics information, perform cable diagnostic and allows you to configure port mirroring. 4.1 Port Statistics Click Monitoring > Port Statistics On this page user can view the statistic information of each port, which facilitates you to monitor the traffic and locate faults promptly. -
Page 26: Port Mirroring
Easy Smart GbE Switch switch and the distance to the problem location, which facilitates you to locate and diagnose the trouble spot of the network. Select the ports to be diagnosed and click Apply. The following table describes the labels in this screen. LABEL DESCRIPTION Check... - Page 27 Easy Smart GbE Switch 3. Select a port as the mirrored port 4. Click Apply The following table describes the labels in this screen. LABEL DESCRIPTION Mirror Direction Select mirror direction: user can select disable/rx/tx/both four items to mirror selected port Mirroring Port Select mirror session port to operate monitoring function Mirrored Port...
-
Page 28: Vlan
Easy Smart GbE Switch Chapter 5 VLAN A VLAN is a group of end stations with a common set of requirements, independent of physical location. VLANs have the same attributes as a physical LAN but allow you to group end stations even if they are not located physically on the same LAN segment. -
Page 29: Mtu Vlan
Easy Smart GbE Switch The following table describes the related labels in this screen. LABEL DESCRIPTION Port-based VLAN Config Port-based VLAN Enable or Disable Port-based VLAN mode. VLAN ID Enter the ID number of VLAN. It ranges from 1 to 4. VLAN Name Specify the VLAN Name for new created VLANs. - Page 30 Easy Smart GbE Switch 1. Click Enable and Apply to operate the MTU VLAN Setting, then pops up “Warring Message” to remind that VLAN configuration setting will be change to MTU VLAN mode. 2. Click OK to view the MTU VLAN configuration screen. 3.
-
Page 31: 802.1Q Vlan
Easy Smart GbE Switch The following table describes the labels in this screen. LABEL DESCRIPTION MTU VLAN Enable or Disable MTU VLAN mode. VLAND ID The factory default for VLAD ID is 1. VLAN Name Display the name of VLAN you set. Member Ports Display the member ports set for MTU VLAN. - Page 32 Easy Smart GbE Switch On this page user can configure 802.1Q Static VLAN feature and view the related settings. Click Enable and Apply to operate the 802.1Q Static VLAN Setting, then pops up “Warring Message” to remind that VLAN configuration setting will be change to 802.1Q Static VLAN mode.
-
Page 33: 802.1Q Vlan Port
Easy Smart GbE Switch The following table describes the labels in this screen. LABEL DESCRIPTION 802.1Q Static VLAN Config Enable or Disable the 802.1Q Static VLAN mode. 802.1Q Static VLAN VLAN ID Enter the ID number of VLAN. It ranges from 1 to 4094. VLAN Name Specify the VLAN Name for new created 802.1Q Static VLANs. - Page 34 Easy Smart GbE Switch Click Enable and Apply to operate the 802.1Q VLAN Port Setting, then pops up “Warring Message” to remind that VLAN configuration setting will be change to 802.1Q VLAN Port mode. Click OK to view the 802.1Q VLAN Port configuration screen as shown below. Hold “Ctrl”...
- Page 35 Easy Smart GbE Switch The following table describes the labels in this screen. LABEL DESCRIPTION 802.1Q VLAN Port Config Enable or Disable the 802.1Q VLAN Port mode. 802.1Q VLAN Port Port Select the desire port for configuration. PVID Enter a PVID number of the ports. It ranges from 1 to 4094. When adding the tag header to the received untagged packet, the switch will automatically uses this PVID value as the VLAN ID of the added tag.
-
Page 36: Qos
Easy Smart GbE Switch Chapter 6 QoS (Quality of Service) functions to provide different quality of service for various network applications and requirements and optimize the bandwidth resource distribution so as to provide a network service experience of a better quality. The QoS configuration includes Port-based Priority and Bandwidth Control. -
Page 37: Bandwidth Control
Easy Smart GbE Switch The following table describes the labels in this screen. LABEL DESCRIPTION Port-based Priority Config Select the desired port for configuration. It is multi-optional, you can Port choose eight ports at most at a time. Specify the priority queue the packets from the port are mapped to. The Priority Queue priorities are labeled as 1~4 and among them the bigger the value, the higher the priority. - Page 38 Easy Smart GbE Switch Hold “Ctrl” and the left button of the mouse to select the port, and select the type, state and rate of the selected port for bandwidth control, then click Apply. The following table describes the labels in this screen. LABEL DESCRIPTION Bandwidth Control Config...
-
Page 39: Security
Easy Smart GbE Switch Chapter 7 Security Use the Security pages to configure settings for the switch security features. It includes Storm Filter, Loop Prevention and DHCP Snooping. 7.1 Storm Filter Click Security > Storm Filter Storm Filter function allows the switch to filter broadcast, multicast, unknown unicast and unknown multicast frame in the network. -
Page 40: Loop Prevention
Easy Smart GbE Switch Select the desired port for Storm Filter configuration. It is multi-optional, Port you can select 8 ports at a time at most. State Select the state of setting Disable: Disable the storm filter function. Enable: Enable the storm filter function. - Page 41 Easy Smart GbE Switch 5. The Loop Detection function will operate automatically to detect looping ports, the link state will be showed as below when some ports on net work loop status if you have set this function. The following table describes the labels in this screen. LABEL DESCRIPTION Loop Prevention Setting...
-
Page 42: Dhcp Snooping
Easy Smart GbE Switch Disable or Enable the loop prevention function of the selected port. State Loop Prevention Table Displays the port number of the switch. Port Displays the loop state of all ports. Loop State Displays the loop status of all ports. The default factory of all ports is Loop Status FORWARDING for the switch. -
Page 43: Product Specifications
Easy Smart GbE Switch The following table describes the labels in this screen. LABEL DESCRIPTION DHCP Snooping Enable or Disable the DHCP Snooping Setting. Setting DHCP Server Port Select the port to specify which port should connect to DHCP server. Apply Click Apply to make the settings take effect immediately.
Need help?
Do you have a question about the RP-G802W and is the answer not in the manual?
Questions and answers