Table of Contents
Advertisement
Quick Links
Advertisement
Table of Contents

Subscribe to Our Youtube Channel
Related Manuals for Planet NVR-3210


Summary of Contents for Planet NVR-3210
- Page 1 32-Channel Network Video Recorder Series NVR-3210/NVR-3250/NVR-3280...
- Page 2 Further, PLANET reserves the right to revise this publication and to make changes from time to time in the contents hereof without obligation to notify any person of such revision or changes.
- Page 3 Do not dispose of WEEE as unsorted municipal waste; they should be collected separately. Revision User’s Manual of PLANET 32-Ch Network Video Recorder Model: NVR-3210/NVR-3250/NVR-3280 Rev: 1.1 (August, 2015) Part No. EM-NVR-3210/NVR-3250/NVR-3280...
-
Page 4: Table Of Contents
Product Introduction ..............6 Package Contents................6 Overview ..................7 Features..................8 Product Specifications..............9 Chapter 2. Hardware Interface ..............11 Physical Descriptions ..............11 2.1.1 NVR-3210................11 2.1.2 NVR-3250................12 2.1.3 NVR-3280................14 Hardware Installation ..............16 2.2.1 Installing Hard Disk..............16 Chapter 3. Connecting to the NVR.............24 Using Device Search Utility............25 Accessing NVR with its default IP address ........30... - Page 5 Things to Pay Attention to -- the USB Backup Function ..80 10.5.2 Playing the Backup File with the NVR Media Player ..81 Appendix A: Ping IP Address ................85 Appendix B: Planet DDNS Application............86 Appendix C: Configuring Port Forwarding Manually ........87 ...
-
Page 6: Product Introduction
32-Channel Network Video Recorder NVR-3210/NVR-3250/NVR-3280 Chapter 1. Product Introduction 1.1 Package Contents The package should contain the following items: NVR-3210 NVR-3250 NVR-3280 NVR Unit x 1 NVR Unit x 1 NVR Unit x 1 User’s Manual CD x 1 User’s Manual CD x 1 User’s Manual CD x 1... -
Page 7: Overview
NVRs to help the administrators to monitor the surveillance system more efficiently. The 32-Ch NVR series not only supports PLANET IP cameras but also is compatible with most of major IP camera brands in the market. Furthermore, the NVRs can automatically search and find the available cameras in the network and provide smart setup wizard program, so it greatly reduces users’... -
Page 8: Features
Exports recorded video files in AVI format Network Service 1 x RJ45, 10/100/1000BASE-T TCP, DHCP, DNS, HTTP, FTP, NTP, SMTP, UPnP, ARP, RTSP Supports PLANET DDNS Easy Installation & Management Web/local and management utility for easy configuration E-map interface in Web/Local and utility configuration... -
Page 9: Product Specifications
32-Channel Network Video Recorder NVR-3210/NVR-3250/NVR-3280 1.4 Product Specifications Product NVR-3210 NVR-3250 NVR-3280 Hardware 1 x RJ45, 10/100/1000BASE-T (The second Ethernet port of Ethernet NVR-3280 is reserved for future usage) USB Interface 6 x USB 2.0 for backup device and mouse... - Page 10 32-Channel Network Video Recorder NVR-3210/NVR-3250/NVR-3280 Network and Configuration HTTP, TCP, SMTP, DHCP, ARP, NTP, DNS, UPnP, FTP, Network Service RTSP Streaming Protocols Depending on the supported cameras Triggers and Event System Events – System Start System Settings Modified Camera Settings Modified...
-
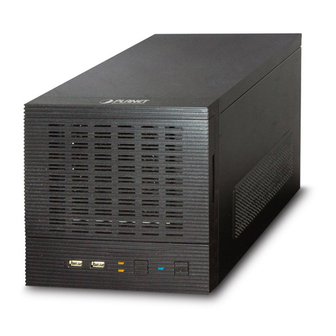
Page 11: Chapter 2. Hardware Interface
32-Channel Network Video Recorder NVR-3210/NVR-3250/NVR-3280 Chapter 2. Hardware Interface 2.1 Physical Descriptions 2.1.1 NVR-3210 Front Panel Reset/Restart Button Power LED Power Button System LED Event LED LEDs Color Description Firmware upgrade: blinking System Amber System failure (AP failed): off System normal: solid... -
Page 12: Nvr-3250
32-Channel Network Video Recorder NVR-3210/NVR-3250/NVR-3280 Rear Panel Audio Ethernet E-SATA Connector Description Connect your USB flash disk for firmware upgrade and backup VGA output E-SATA External E-SATA HDD Ethernet 10/100/1000Mbps network Audio Line in, line out, mic 2.1.2 NVR-3250 Front Panel... -
Page 13: Rear Panel
32-Channel Network Video Recorder NVR-3210/NVR-3250/NVR-3280 LEDs Color Description During firmware upgrade: blinking System failure (AP failed): Off System Amber System normal: Solid During event recording: solid Event Amber No event: Off Power Blue During power on/restart/reset to default/OS failed: solid... -
Page 14: Nvr-3280
32-Channel Network Video Recorder NVR-3210/NVR-3250/NVR-3280 2.1.3 NVR-3280 Front Panel LEDs Color Description Firmware upgrade: blinking System System failure (AP failed): off System normal: solid Event recording: solid Event Green No event: off Power Green Power on/Restart/Reset to default/OS failed: solid... - Page 15 32-Channel Network Video Recorder NVR-3210/NVR-3250/NVR-3280 Rear Panel Connector Description VGA output Ethernet Dual 10/100/1000Mbps network for redundancy Connect your USB flash disk for firmware upgrade and backup E-SATA External E-SATA HDD Audio Line in, line out, mic DI x 8 / DO x 4...
-
Page 16: Hardware Installation
32-Channel Network Video Recorder NVR-3210/NVR-3250/NVR-3280 2.2 Hardware Installation 2.2.1 Installing Hard Disk NVR-3210 1. Release the HDD tray by pulling the lock to the right. 2. Pull the HDD tray out of the case. 3. Place the HDD on the bottom of the tray. - Page 17 32-Channel Network Video Recorder NVR-3210/NVR-3250/NVR-3280 4. Put the HDD tray back to the case. 5. Push the tray door back to the case to secure it. NVR-3250 Start by removing the front plate. ...
- Page 18 32-Channel Network Video Recorder NVR-3210/NVR-3250/NVR-3280 To remove the front plate, turn the tool-less screws on both sides counter-clockwise to loosen it from the unit. Please note the screws will still be attached to the front plate even after the screws are completely loosened from the unit.
- Page 19 32-Channel Network Video Recorder NVR-3210/NVR-3250/NVR-3280 5. Pull out the HDD tray further to be removed. Once the tray is removed from the unit, note there are four holes, which are used to secure the HDD. Once the HDD is placed in the tray, flip it over and secure the HDD with the screws.
- Page 20 32-Channel Network Video Recorder NVR-3210/NVR-3250/NVR-3280 Push the tray back into the unit and push it all the way in. Secure the tray by pushing in the latch, which locks the tray with the unit. NVR-3280 1. Start by removing the front plate.
- Page 21 32-Channel Network Video Recorder NVR-3210/NVR-3250/NVR-3280 2. To remove the front plate, turn the tool-less screws on both sides counter-clockwise to loosen it from the unit. Please note the screws will still be attached to the front plate even after the screws are completely loosened from the unit.
- Page 22 32-Channel Network Video Recorder NVR-3210/NVR-3250/NVR-3280 5. Pull out the HDD tray further to be removed.. 6. Once the tray is removed from the unit, note there are four holes, which are used to secure the HDD. 7. Once the HDD is placed in the tray, flip it over and secure the HDD with the screws.
- Page 23 32-Channel Network Video Recorder NVR-3210/NVR-3250/NVR-3280 8. Push the tray back into the unit and push it all the way in. 9. Secure the tray by pushing in the latch, which locks the tray with the unit. ...
-
Page 24: Chapter 3. Connecting To The Nvr
32-Channel Network Video Recorder NVR-3210/NVR-3250/NVR-3280 Chapter 3. Connecting to the NVR There are various ways you can connect to the NVR and below are the suggested methods for different network setups: The NVR is placed in a network with a DHCP server: Connect to the NVR by using “Device Search”... -
Page 25: Using Device Search Utility
32-Channel Network Video Recorder NVR-3210/NVR-3250/NVR-3280 3.1 Using Device Search Utility If the NVR is placed in a corporate network or a local area network where a DHCP server is already presented, please install the “Device Search” utility from the bundled CD disk. - Page 26 32-Channel Network Video Recorder NVR-3210/NVR-3250/NVR-3280 Please click “Next” to continue. Please click “Install” to start the installation. ...
- Page 27 32-Channel Network Video Recorder NVR-3210/NVR-3250/NVR-3280 Once the installation is completed, please check the “Finish”. Please go to Start => Programs => NVR => Search NVR to run the search tool. Then you will see the utility start searching the network.
- Page 28 32-Channel Network Video Recorder NVR-3210/NVR-3250/NVR-3280 You may change NVR’s IP address by clicking on the button highlighted below. You will be prompted for the NVR’s login information before proceeding to change device’s IP address. ...
- Page 29 32-Channel Network Video Recorder NVR-3210/NVR-3250/NVR-3280 You may click on the button highlighted below to perform search again. Or double-click on any of the search results to access NVR’s web administration page. ...
-
Page 30: Accessing Nvr With Its Default Ip Address
32-Channel Network Video Recorder NVR-3210/NVR-3250/NVR-3280 3.2 Accessing NVR with its default IP address The NVR comes with a pre-configured static IP address “192.168.0.20”. However, it is only used when there is no DHCP server presented in the network. Connect the NVR and PC to your switch or hub, or connect the PC directly to the NVR using a crossover Cat5 Ethernet cable. -
Page 31: Chapter 4. Web-Based Management
32-Channel Network Video Recorder NVR-3210/NVR-3250/NVR-3280 Chapter 4. Web-based Management This chapter provides setup details of the Internet Camera’s Web-based Interface. 4.1 Main/Live Viewing The main/live viewing is the first interface displayed once you access to the NVR through the internet browser. -
Page 32: Date And Time Display
32-Channel Network Video Recorder NVR-3210/NVR-3250/NVR-3280 4.1.1 Date and Time Display The Date and the Time are defined by the user in the settings section of the NVR. 4.1.2 User’s Configuration It displays the name of the current user. If you click on the name of the user, the context menu offers the functions below:... -
Page 33: Video Frame
32-Channel Network Video Recorder NVR-3210/NVR-3250/NVR-3280 4.2 Video Frame All the camera’s videos are displayed in this frame. If the cursor is pointing at one of the cameras, it will show a bar at the top. The bar displays the channel’s number and some functions as shown on the snapshot below. - Page 34 32-Channel Network Video Recorder NVR-3210/NVR-3250/NVR-3280 snapshots are automatically saved to x:\SnapshotFolder ("x" represents the partition where Windows is installed, e.g., C:\) If the "3 continuous snapshots" option is chosen, the new window will display snapshots and let you view them individually by using the "Prev", "Next" buttons as shown above.
- Page 35 32-Channel Network Video Recorder NVR-3210/NVR-3250/NVR-3280 Auto pan controls: User can use “right”, “stop”, ”left”, “360 degree” button to control the PTZ auto pan function. - Changing Channel User can select to change the view to other channels or disconnect the current channel camera view.
-
Page 36: List Viewing
32-Channel Network Video Recorder NVR-3210/NVR-3250/NVR-3280 4.3 List Viewing It displays the list of channels added to the NVR. Each channel represents a camera with its name, the channel number and its currents status. The channel status is defined by 3 colors:... -
Page 37: Sequence Viewing
32-Channel Network Video Recorder NVR-3210/NVR-3250/NVR-3280 4.3.2 Sequence Viewing The sequence mode will automatically switch between a single and group of cameras every a certain period of time. You can define this period from 5 seconds to 60 seconds. 4.3.3 Save Viewing Click on the save view button and you will able to name the current view and save it. -
Page 38: Saved Viewing
32-Channel Network Video Recorder NVR-3210/NVR-3250/NVR-3280 4.4 Saved Viewing This section can display the views that you have already saved. You can choose the views from the list you have created. You are also able to switch between saved views every certain period of time by clicking on the “start sequence function”. -
Page 39: Chapter 5. Playback Viewing
32-Channel Network Video Recorder NVR-3210/NVR-3250/NVR-3280 Chapter 5. Playback Viewing Playback is a function that allows you to play one or more videos that were previously recorded by a chosen recording method or due to an event trigger. The NVR offers synchronized playback from up to 4 channels and various types of search methods are provided to help you find the footage you need quickly. -
Page 40: Certain Functions Of Playback Video
32-Channel Network Video Recorder NVR-3210/NVR-3250/NVR-3280 5.1 Certain Functions of Playback Video You can do the following by clicking camera menu on the playback video. It’s similar with live view. User can refer to the previous description. Snapshot Take snapshot - as soon as a snapshot selection is made, the snapshots are automatically saved to x:\SnapshotFolder ("x"... - Page 41 32-Channel Network Video Recorder NVR-3210/NVR-3250/NVR-3280 If the "3 continuous snapshots" option is chosen, the new window will display snapshots and let you view them individually by using the "Prev", "Next" buttons as shown above. Adjust Brightness/Contrast You are able to adjust brightness and contrast of the live video from the camera menu.
-
Page 42: The Main Layout For Playback
32-Channel Network Video Recorder NVR-3210/NVR-3250/NVR-3280 5.2 The Main Layout for Playback Here is some explanation of other parts of playback page as shown below: - Zooming in on range of time If you click on the icon, you can zoom in on range of the time and get more details on the playback bar. - Page 43 32-Channel Network Video Recorder NVR-3210/NVR-3250/NVR-3280 Once you locate the recorded videos with steps described in the previous section, move the time bar to the specific start time which you want to export and then click the “Bookmark” button. “Bookmark” is used to set a time range for this specific time will be marked by a blue line. Move the time bar to the end time and click the “Bookmark”...
- Page 44 32-Channel Network Video Recorder NVR-3210/NVR-3250/NVR-3280 Specify the starting and ending hours of the video by entering numbers in the text boxes. Hit the “Start” button to start exporting. The file will be automatically named and saved under the C:\ partition.
-
Page 45: Playing Exported Playback Videos With Nvr Media Player
32-Channel Network Video Recorder NVR-3210/NVR-3250/NVR-3280 5.3 Playing Exported Playback Videos with NVR Media Player You can also use the NVR Media Player to play the exported AVI files. This can save you the trouble of installing third-party media player or codecs when playing the exported AVI videos. - Page 46 32-Channel Network Video Recorder NVR-3210/NVR-3250/NVR-3280 Locate the exported AVI file and click “open”. (Normally under “C:\ExportFolder)” ...
-
Page 47: Chapter 6. Event Viewing
32-Channel Network Video Recorder NVR-3210/NVR-3250/NVR-3280 Chapter 6. Event Viewing This section displays the last events recorded by the NVR. The events can only be detected and displayed if you have configured it on the NVR’s settings. You can display the event of all the channels at once or by each channel. -
Page 48: Chapter 7. Nvr Setup - Device Configuration
32-Channel Network Video Recorder NVR-3210/NVR-3250/NVR-3280 Chapter 7. NVR Setup – Device Configurati 7.1 Settings The “Settings” page provides users with options to set up the device quickly and properly. There are two modes, basic mode and advance mode. You just select mode from the drop-down manual. -
Page 49: Network Settings
32-Channel Network Video Recorder NVR-3210/NVR-3250/NVR-3280 7.1.1 Network Settings The NVR supports three connection types that can be configured (depending on how the network is set up): Set network automatically Set the NVR to configure network settings automatically When no other DHCP server is in the network, the NVR should use the default IP: 192.168.0.20 and turn on built-in DHCP servers... - Page 50 32-Channel Network Video Recorder NVR-3210/NVR-3250/NVR-3280 Use manual configuration Set the NVR to use static IP 1) Built-in DHCP server should be turned on when this mode is selected. 2) Use the NVR’s default static IP when this mode is selected.
-
Page 51: Dhcp Server
* Please make sure a valid DNS server has been configured under the “Network Settings” page in order for this function to work properly. * The NVR currently only works with free DDNS service provided by “PLANET DDNS”. For more information, please go to www.planetddns.com... - Page 52 In order to properly configure the DDNS service function, please register a free DDNS domain name and account from PLANET DDNS first. Go to http://www.planetddns.com from the browser to do so. Fill in the necessary fields as illustrated above.
- Page 53 “User ID” and “Password” field and click “Apply” to finish You can click the “Check DDNS Status” button to check the PLANET DDNS service status. If you are getting a “Disconnected” message, it means that DDNS service server is down or the NVR is not connected to the Internet.
-
Page 54: Time And Date
32-Channel Network Video Recorder NVR-3210/NVR-3250/NVR-3280 7.2 Time and Date Set the time and date by selecting the time zone according to your location. It is imperative that you set the recorder’s time correctly to avoid the following errors: • Incorrect display time for playback videos •... -
Page 55: Storage
32-Channel Network Video Recorder NVR-3210/NVR-3250/NVR-3280 7.3 Storage Once you install a hard disk to the recorder, you would need to initialize it so that it can be ready for recording. You can obtain basic information about the disk you installed on this page. -
Page 56: Users & Privileges
32-Channel Network Video Recorder NVR-3210/NVR-3250/NVR-3280 7.4 Users & Privileges Multiple users can access the recorder simultaneously. You can add, remove, and edit users by using options provided on this page to keep user information organized. Each recorder comes with a built-in “admin” account with password “admin”. It’s highly recommended to change the password upon your initial login. -
Page 57: Changing The Password Of The "Admin" Account
32-Channel Network Video Recorder NVR-3210/NVR-3250/NVR-3280 7.4.2 Changing the Password of the “Admin” Account Click and highlight the “admin” account in the account list. Its information should be displayed. Enter a new password in the “Password” field and enter it again in “Confirm Password”. -
Page 58: Chapter 8. Nvr Setup - Video And Recording Configuration
32-Channel Network Video Recorder NVR-3210/NVR-3250/NVR-3280 Chapter 8. NVR Setup – Video and Recordi ng Configuration 8.1 Camera Setup The NVR provides two options for adding a new camera. Users have the option to let the recorder automatically find the cameras or it is possible to enter camera’s information and add it manually. - Page 59 32-Channel Network Video Recorder NVR-3210/NVR-3250/NVR-3280 After that, the search should begin and its status should be displayed: Cameras found should be listed and simply select a camera from the list. Its corresponding information should be displayed in the “Camera Information” section. Enter its username and password, and press “Next”...
-
Page 60: Adding A Camera Manually
32-Channel Network Video Recorder NVR-3210/NVR-3250/NVR-3280 If connection establishes successfully, camera’s detailed information should be polled and displayed as shown below. Adjust its video format, frame rate, resolution or bitrate, etc. if you wish and then click “Apply” to finish adding the camera. - Page 61 32-Channel Network Video Recorder NVR-3210/NVR-3250/NVR-3280 Simply follow the instruction described above but instead of using the “Add manually” function, enter the camera’s IP address and credential in the “Camera Information” manually. If cameras are marked with "*" in the search result, it means those cameras are already configured and connected to the NVR.
-
Page 62: Recording
32-Channel Network Video Recorder NVR-3210/NVR-3250/NVR-3280 8.2 Recording The “recording” gives users the overall control of how and when a recording is performed and the quality of different types of recordings performed on each channels. It can help the recorder to operate with sufficient system resource by performing recording only when it’s necessary with adjustable recording frame rate. -
Page 63: Scheduling
32-Channel Network Video Recorder NVR-3210/NVR-3250/NVR-3280 8.3 Scheduling You can define the time range of the schedule recording for all channels on this page. Use the “Channel” drop-down menu and select a camera first. You can use the schedule table to set the time range. Click the cell boxes and then move horizontally to let you set what hours to perform recording during a day. - Page 64 32-Channel Network Video Recorder NVR-3210/NVR-3250/NVR-3280 You can also use the “Quick Configuration” to define recording time range instead of clicking cell boxes one by one on the timetable. Simply check what days you would like to perform recording and specify the recording duration by either choosing “All Day” or enter a start and end time for specific recording duration.
-
Page 65: Preset Point Setting
32-Channel Network Video Recorder NVR-3210/NVR-3250/NVR-3280 8.4 Preset Point Setting 8.4.1 PTZ Preset Settings The recorder supports PTZ cameras and can set multiple preset points or retrieve and manage preset points that are set in the camera. This is helpful if you need to monitor multiple spots in one area from a particular camera. -
Page 66: Ptz Preset Sequence
32-Channel Network Video Recorder NVR-3210/NVR-3250/NVR-3280 8.4.2 PTZ Preset Sequence Once you have multiple preset points defined for a camera, it is convenient for monitoring to set up the sequencing viewing among those preset points and let the recorder automatically switch between them for you. -
Page 67: Osd Settings
32-Channel Network Video Recorder NVR-3210/NVR-3250/NVR-3280 8.5 OSD Settings The OSD (On Screen Display) allows users to add informational text message and embed it onto the video. By default, this function is turned off. To add texts to one or more videos, select a camera you would like to add text to and choose “Display OSD”... - Page 68 32-Channel Network Video Recorder NVR-3210/NVR-3250/NVR-3280 Choose one or more display options if you would also like the recorder to automatically embed the system time or the frame rate for you. Or simply choose to display a custom message of your own.
-
Page 69: Nvr Setup -- Event Configuration
32-Channel Network Video Recorder NVR-3210/NVR-3250/NVR-3280 Chapter 9. NVR Setup -- Event Configurati 9.1 Event Sources The “Event sources” section allows users to define conditions that constitute an event, its corresponding trigger action and when it will be triggered. Such setting can reduce the management overhead and notify the administrator only when it’s necessary. - Page 70 32-Channel Network Video Recorder NVR-3210/NVR-3250/NVR-3280 * Once motion detection is enabled on this page, please configure the motion area and enable motion detection in the corresponding channels (cameras) from camera's own web UI. The NVR only detects the first motion area set in the camera.
-
Page 71: Notification
32-Channel Network Video Recorder NVR-3210/NVR-3250/NVR-3280 9.2 Notification Event servers are to be used with event trigger actions. In case of unusual motion detected by the camera or a disk failure, the recorder can send notification with the acceptable format (image/txt) to a destined event server according to the configuration. - Page 72 32-Channel Network Video Recorder NVR-3210/NVR-3250/NVR-3280 FTP notification To add an FTP server, 1. Start by giving a name to the server that you are adding to the recorder. 2. Enter the hostname or the IP address of the FTP server.
-
Page 73: E-Map
32-Channel Network Video Recorder NVR-3210/NVR-3250/NVR-3280 9.3 E-map 9.3.1 Local Map Setting E-map monitor is a function that alerts users whenever there is an event triggered (e.g. motion detected) from a camera with a geographical perspective. With this function, users can quickly identify which camera has detected an unusual event and where this event is happening. - Page 74 32-Channel Network Video Recorder NVR-3210/NVR-3250/NVR-3280 Then click and drag the camera icon to move the camera to define its location. Access the E-map by enabling “Event view”. You can click on the camera icon to display video. ...
-
Page 75: Google Map Setting
32-Channel Network Video Recorder NVR-3210/NVR-3250/NVR-3280 9.3.2 Google Map Setting The Google Map monitor is a similar function to the aforementioned E-map monitor. It is useful if you are managing multiple cameras from different locations. To configure locations of each camera, first determine the location you’d like to place the camera to on the map. -
Page 76: Chapter 10. Nvr Setup -- Device Operations
32-Channel Network Video Recorder NVR-3210/NVR-3250/NVR-3280 Chapter 10. NVR Setup -- Device Operations 10.1 Device Info Device info gives users a glance of the overall system status and allows users to perform maintenance tasks such as upgrading firmware, restore/backup device settings or reboot device, etc. -
Page 77: Log
32-Channel Network Video Recorder NVR-3210/NVR-3250/NVR-3280 10.2 Log “Log” keeps a record of what’s been happening to the device and provides basic information for troubleshooting. ... -
Page 78: Maintenance
32-Channel Network Video Recorder NVR-3210/NVR-3250/NVR-3280 10.3 Maintenance “Maintenance” provides functions for users to: • Perform Firmware Upgrade (Only on Web UI) • Restart the NVR when necessary • Restart cameras directly from the NVR • Reset the NVR’s settings to their factory default values Firmware Upgrade The firmware can be upgraded through web UI. -
Page 79: Backup & Restore
32-Channel Network Video Recorder NVR-3210/NVR-3250/NVR-3280 10.4 Backup & Restore It is a function that allows users to back up the NVR’s settings to a local hard drive. Users also can restore the NVR’s settings from a previously saved configuration file. -
Page 80: Usb Backup
32-Channel Network Video Recorder NVR-3210/NVR-3250/NVR-3280 10.5 USB Backup It’s a function that allows users to back up the recording data in its database file format as well as in AVI to the externally connected USB hard disk. The USB hard disk(s) will be listed in the drop-down menu displaying the remaining disk space. -
Page 81: Playing The Backup File With The Nvr Media Player
32-Channel Network Video Recorder NVR-3210/NVR-3250/NVR-3280 Note: Please plug in the USB HDD only after the NVR is fully started, or the HDDs will be incorrectly mounted. Play the backup files using the NVR media player. 10.5.2 Playing the Backup File with the NVR Media Player You can use the NVR Media Player to play the exported AVI files or media database file. - Page 82 32-Channel Network Video Recorder NVR-3210/NVR-3250/NVR-3280 A new dialog should be prompted for you to select the file location. When done, click “Check” to validate the file. ...
- Page 83 32-Channel Network Video Recorder NVR-3210/NVR-3250/NVR-3280 Once the file has been successfully verified, you should be prompted with the message shown below. Select the time zone according to your current location. ...
- Page 84 32-Channel Network Video Recorder NVR-3210/NVR-3250/NVR-3280 Finally, click “OK” to begin playing. The player should now play the backup file. ...
-
Page 85: Appendix A: Ping Ip Address
32-Channel Network Video Recorder NVR-3210/NVR-3250/NVR-3280 Appendix A: Ping IP Address The ping (Packet Internet Groper) command is used to detect whether a specific IP address is accessible by sending a packet to the specific address and waiting for a reply. It’s also a very useful tool to confirm whether or not Internet camera is installed or if the IP address conflicts with any other device over the network. -
Page 86: Appendix B: Planet Ddns Application
32-Channel Network Video Recorder NVR-3210/NVR-3250/NVR-3280 Appendix B: Planet DDNS Application Configuring PLANET DDNS Steps: Step 1 Enable DDNS option through accessing web page of the 32-ch NVR. Step 2 Select on DDNS server provided, and register an account if you do not use yet. -
Page 87: Appendix C: Configuring Port Forwarding Manually
Manually set up the device with a fixed IP address, for example, 192.168.0.100. 2. Accessing the Router with Your Web browser The following steps generally apply to any router that you have on your network. PLANET WNRT-620 is used as an example to clarify the configuration process. Configure the initial settings of the router by following the steps outlined in the router’s Quick Installation Guide. -
Page 88: Channel Network Video Recorder Nvr-3210/Nvr-3250/Nvr
32-Channel Network Video Recorder NVR-3210/NVR-3250/NVR-3280 Your WAN IP address will be listed here. 3. Opening/Setting Virtual Server Ports to enable remote image viewing The firewall security features built into the router and most routers prevent users from accessing the video from the device over the Internet. The router connects to the Internet over a series of numbered ports. - Page 89 32-Channel Network Video Recorder NVR-3210/NVR-3250/NVR-3280 Enter valid ports in the Virtual Server section of your router. Please make sure to check the box on this line to enable settings. Then the device can be accessed from WAN by the router’s WAN IP address.
Need help?
Do you have a question about the NVR-3210 and is the answer not in the manual?
Questions and answers