Table of Contents
Advertisement
Quick Links
Advertisement
Table of Contents

Related Manuals for Sanyo CDP-MT500


Summary of Contents for Sanyo CDP-MT500
- Page 1 INSTRUCTION MANUAL CDP-MT500 Compact Disc Player with MP3 Decoder...
- Page 2 PRECAUTIONS CAUTION USE OF CONTROLS OR ADJUSTMENT OR PERFORMANCE OF PRO- CEDURES OTHER THAN THOSE SPECIFIED HEREIN MAY RESULT IN HAZARDOUS RADIATION EXPOSURE. THIS PRODUCT SHOULD NOT BE ADJUSTED OR REPAIRED BY ANY- ONE EXCEPT QUALIFIED SERVICE PERSONNEL. CAUTION – INVISIBLE LASER RADIATION WHEN OPEN AND INTERLOCKS DEFEATED.
- Page 3 • High volume levels can create poten- • Do not use where there are extremes tially dangerous situations by drown- of temperature (below 5°C or exceed- ing out surrounding sounds. Use cau- ing 35°C). tion when driving while operating the •...
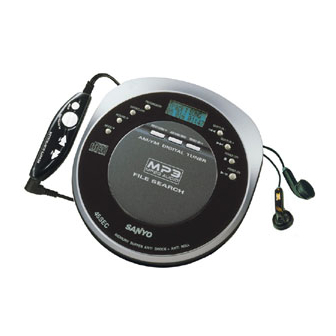
- Page 4 CONTROLS 14. Display 1. Disc compartment 15. Anti roiling shock/Band select/Menu 2. Function switch (FUNCTION) button (ASR/BAND/MENU) 3. Open switch (OPEN) 16. Preset tuning up/ o button 4. Hold switch (HOLD) (PRESET UP/ o) 5. Bass expander switch (DBBS) 17. Search/Skip/Tuning down button 6.
- Page 5 The buttons on the remote control function in the same way as the corresponding buttons on the unit. 1. Search/Skip/Tuning down button ( f) 2. Search/Skip/Tuning up button ( e) 3. Volume control (VOLUME) 4. Play/Pause button (PLAY/PAUSE ak) 5. Stop button (STOP n)
-
Page 6: Power Supply
POWER SUPPLY AC adaptor Plug one end of the AC adaptor into the DC IN 4.5V socket, then plug the other end into an AC outlet. • Use only the supplied AC adaptor • If the AC adaptor is connected. The power supply automatically switches to the AC power source and the installed batteries are disconnected. - Page 7 REMOTE CONTROL AND HANDPHONES CONNECTIONS • Be sure to reduce the volume before connecting or disconnecting the headphones. Connect the remote control/headphones or headphones to the PHONES socket.
- Page 8 INFORMATION This unit can play back the CD-R/RW that has recorded music data or MP3 files. Before playing back Music CD or MP3 CD, please read the following. • MP3 CD is the disc that standardized by ISO9660, its file name must include 3-digits extension letters, “mp3”.
- Page 9 MP3 CD directory sample: Playback order: song01 x song02 x … song14 Folder number 01 There is no MP3 file. The unit skips it. MP3 CD album01 song01.mp3 douc01.doc song02.mp3 photo01.jpg song03.mp3 song04.mp3 song05.mp3 album02 03 album04 song06.mp3 song11.mp3 song07.mp3 song12.mp3 song08.mp3 song09.mp3...
-
Page 10: Before Operation
BEFORE OPERATION Anti rolling shock function In the previous anti-shock function, when skips occurred while available memory runs out, then the sound would suffer some interruption. The new anti rolling shock function is designed to prevent skipping to the greatest extent possible instead of supplementing the skipped portion of the sound. - Page 11 Dynamic bass boost system (DBBS) Set the DBBS switch to ON to enhance the bass sound. Auto power on function The power turns on automatically when POWER ON/ i button is pressed. Auto power off function The power turns off automatically after about 60 seconds when all tracks on a disc have been played or when the POWER OFF/ n button is pressed once to stop play.
-
Page 12: Handling Compact Discs
HANDLING COMPACT DISCS Use compact discs bearing the symbol shown below. In addition to conventional 12 cm CDs, this unit can be used to play 8 cm CDs without an adaptor. • Do not expose the disc to direct sunlight, high humidity or high temperatures for ex- tended periods of time. -
Page 13: Playing A Disc
PLAYING A DISC BASIC OPERATION (MUSIC CD) (MP3 CD) • Be sure to reduce the volume before connecting or disconnecting the headphones. 1. Connect the remote control and headphones, then plug the cord from the remote control into the PHONES socket. 2. - Page 14 For Music CD elapsed playing time track number For MP3 CD The music information (“Title, “Artist” and “Album”) scrolls. Title 00:01 Folder number Elapsed playing time File/Music number The track number and elapsed playing time for the current track are displayed. 6.
-
Page 15: Programmed Play
PROGRAMMED PLAY Up to 24 tracks on a disc can be programmed for play in any order. Programmed playback (MUSIC CD) 1. Press the PROG/MEMORY button during stop or pause mode. 2. Press the f or e button to select a track. 3. - Page 16 Programmed Playback (MP3 CD) 1. Press the PROG/MEMORY button during stop. P-01 2. Press the skip button to select a folder number. P-01 3. Press the PROG/MEMORY button. The folder number remains. P-01 4. Press the skip buttons to select a track. P-01 5.
- Page 17 Changing a programme To add a new track to a programme: 1. In the stop or pause mode, press the PROG/MEMORY button repeatedly until (MUSIC CD) or (MP3 CD)blinks on the track number section. 2. Select a track as explained above. 3.
- Page 18 ADVANCE OPERATION (MP3 CD) FILES Search playback (MP3 CD) 1. Press the ASR/BAND/MENU button during stop, the alphabet will appear in the display. A B C D E F G H I J K L File search 2. Using the a, b, o, p buttons to select the first letter of a folder you would like to listen. 3.
-
Page 19: Intro Scan
VARIOUS PLAYING MODE Press the MODE/b button repeatedly during stop to select a various play mode available. Each time the button is pressed, the mode changes as shown below: Repeat one (REP 1) v Repeat all (REP A) v Repeat D (REP D) v Introscan (INTRO) v Random play (RANDOM) v Released •... - Page 20 USING THE LINE OUT SOCKET To record from the CD player Connect the patch cable (not supplied) from the LINE OUT socket on the unit to the LINE INPUT sockets on a cassette recorder. To hear through a pair of speakers Connect the patch cable (not supplied) from the LINE OUT socket on the unit to the AUX or CD INPUT sockets on a stereo system.
-
Page 21: Listening To The Radio
LISTENING TO THE RADIO Automatic/Manual tuning 1. Set the function switch to RADIO. 2. Press the POWER ON/ i button to turn on the radio. 3. Press the ASR/BAND/MENU button to select AM or FM. 4. Automatic tuning Press the f or e button for at least 1 second to tune in a station. The unit will scan up or down the band and receive the next receivable station. - Page 22 2. Press the PROG button. Memory : 3. Press the PRESET DOWN or PRESET UP button on the front panel to select the channel number to be preset. Preset : 4. Press the PROG button. In this example, “103.25 MHz” FM station is preset on FM channel 9. Preset : Listening to preset stations 1.
- Page 23 CLEANING Cleaning the pickup lens Dust on the pickup lens can lead to erratic operation and interruption of the sound during play. • To clean the pickup lens, open the disc compartment lid. Blow the dust off of the lens using a camera lens blower (available at most camera stores).
-
Page 24: Specifications
SPECIFICATIONS CD player Channels: 2 channels S/N ratio: 60 dB Wow and flutter: undetectable Sampling frequency: 44.1 kHz Pickup light source: Semiconductor laser Pickup wave length: 790 nm Laser output: 0.5 mW (continuous wave max.) Tuner Reception frequency: FM: 87.5 ~ 108 MHz AM: 522 ~ 1620 KHz General Terminal impedance:... - Page 26 SANYO Electric Co., Ltd. (AU)1AD6P1P2037--A Printed in China...
Need help?
Do you have a question about the CDP-MT500 and is the answer not in the manual?
Questions and answers