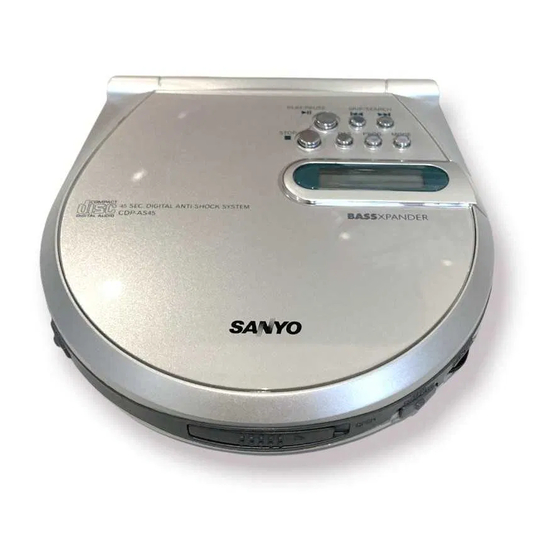
Summary of Contents for Sanyo CDP-AS45
- Page 1 INSTRUCTION MANUAL MANUAL DE INSTRUCAO CDP-AS45 Compact Disc Player English 1 ~ 17 Portugues 18 ~ 29...
- Page 2 CLASS 1 LASER PRODUCT LUOKAN 1 LASERLAITE RECHARGE ON OFF KLASS 1 LASERAPPARA T Ç ë Î ð ´ ¥ Ã þ ¾ µ Í · Ç ë Î ð ´ ¥ Ã þ ¾ µ Í · CAUTION - INVISIBLE LASER RADIATION WHEN OPEN AND INTERLOCKS DEFEATED.
- Page 3 CAUTION- USE OF CONTROLS OR ADJUSTMENTS OR PERFORMANCE OF PROCEDURES OTHER THAN THOSE SPECIFIED HEREIN MAY RESULT IN HAZARDOUS RADIATION EXPOSURE. ACHTUNG- WENN ANDERE ALS DIE IER SPEZIFZIERTEN BEDIENUNGSODER JUSTIEREINRICHTUNGEN BENUTZT ODER ANDERE VERFAHRENSWEISEN AUSGEFUHRT WERKEN, KANN DIES ZU GEFAHRLICHER STRAHLUNGSEXP- OSITION FUHREN.
- Page 4 This set complies with the EMC Directive 89/336 and with the LVD Directive 73/23. Dieses Great entspricht der EMC-Direktive 89/336 und der LVD-Direktive 73/23. Cet appareil est en conformite avec la directive EMC 89/336 et avec la directive BT 73/23. Dit toestel is in overeenstemming met EMC-richtlijn 89/336 en met LVD-richtlijn 73/ Detta set uppfyller EMC-direktivet 89/336 och lagspanningsdirektivet 73/23.
- Page 5 Fi./Abb./Afb.1 Fi./Abb./Afb.2...
- Page 6 00:01 00:38 Fi./Abb./Afb.3 Fi./Abb./Afb.4 HOLD Fi./Abb./Afb.6 Fi./Abb./Afb.5 Fi./Abb./Afb.7 Fi./Abb./Afb.8 Fi./Abb./Afb.9...
- Page 7 PRECAUTIONS High volume levels can create potentially dangerous situations by drowning out surrounding sounds. Use caution when driving while operating the unit, and obey all applicable laws. Do not play your headset at a high volume level. Hearing experts advise against continuous extended play.
- Page 8 CONTROLS (Fig. 1a) 1.Display 2.Stop button ( 3.Play/Pause button ( 4.Skip/Search button( 5.Skip/Search button ( 6.Play mode button (MODE) 7.Programme button (PROG) 8.Digital Anti-Shock system (DAS) 9.Line out jack (LINE OUT) 10.Headphones socket (PHONES) 11.Volume control (VOLUME) 12.Bass expander switch (BASS) 13.Open switch (OPEN) 14.External DC socket (DC 4.5V) 15.Hold switch (OFF/ON)
-
Page 9: Power Supply
POWER SUPPLY AC adaptor Plug one end of the AC adaptor into the DC 4.5V socket, then plug the other end into an AC outlet. Use only the supplied AC adaptor. If the AC adaptor is connected, the power supply automatically switches to the AC power source and the installed batteries disconnected. -
Page 10: Before Operation
BEFORE OPERATION Digital Anti-shock function In the previous anti-shock function, when skips occurred while available memory runs out, then the sound would suffer some interruption. The new digital anti-shock function is designed to prevent skipping to the greatest extent possible instead of supplementing the skipped portion of the sound. This is achieved by expanding the memory capacity, and in addition full attention has been given also to increasing the unit's signal reading capability. - Page 11 Hold function The HOLD switch disables the buttons from operating to prevent play from starting or stopping due to accidental operation. For normal use, leave the switch in the off position. To prevent battery drain: Set the HOLD switch to the on position (Fig.6) when carrying the unit in a bag. The "...
-
Page 12: Handling Compact Discs
HANDLING COMPACT DISCS Use compact discs bearing the symbol shown in Fig.7. In addition to conventional 12 cm CDs, this unit can be used to play 8 cm CDs without an adaptor. Do not expose the disc to direct sunlight, high humidity or high temperatures for extended periods of time. -
Page 13: Playing A Disc
PLAYING A DISC Be sure to reduce the volume before connecting or disconnecting the headphones. 1. Connect the headphones , then plug the cord from the headphones into the PHONES socket (Fig.5). 2. Slide the OPEN switch right to open the disc compartment lid. 3. -
Page 14: Programmed Play
Skip play " " To skip to track 6 while track 3 is playing, press the button repeatedly until 06 appears on the display. To skip back to track 3 while track 6 is playing, press the button repeatedly until "... - Page 15 3. Press the PROG button. Track Number Programme number 4. Repeat steps 2 and 3 to programmed tracks. 5. To check the programmed contents after all tracks have been programmed, press the PROG button repeatedly. The programmed track numbers sequentially appear on the display.
- Page 16 MODE KEY: (CD DISC) NORMAL REPEAT ONE REPEA T ALL SHUFF INTRO REPEAT ONE: " 1 "light on display and will repeat the track you selected REPEAT ALL: " ALL" light on display and will repeat entire tracks INTRO: "INTRO" light on display and will play the first 10 seconds of each track SHUFF: "...
-
Page 17: Intro Scan
INTROSCAN " " 1. Press the MODE button three times during stop. INT appears. 2. Press the button. The first 10 seconds of each track on a disc are played from the first track. 3. When the desired track is playing, press the MODE button twice. Normal play continues. -
Page 18: Specifications
SPECIFICATIONS Channels: 2 channels S/N ratio: 60 dB Wow and flutter: undetectable Sampling frequency: 44.1 kHz Pickup light source: Semiconductor laser Pickup wave length: 790 nm Laser output: 0.5 mW (continuous wave max.) Terminal impedance: PHONES: 16-32 ohms Power source: DC: 4.5V (AC adaptor) DC: 3V (R6/AA x 2) 2.4V (Ni-Cd battery NBP-50B or R6/AA x 2) - Page 19 SANYO ELECTRIC CO.,LTD. OSAKA JAPAN...


Need help?
Do you have a question about the CDP-AS45 and is the answer not in the manual?
Questions and answers