Table of Contents
Advertisement
We advise you to read this manual carefully, which contains all the instructions for
maintaining the appliance's aesthetic and functional qualities.
For further information on the product: www.smegfoodservice.com
Contents
26
26
27
27
27
27
28
28
29
29
30
31
31
32
32
33
33
34
35
36
36
36
36
36
36
36
37
39
40
41
42
42
43
25
Advertisement
Table of Contents

Related Manuals for Smeg ALFA 43 XMF

Summary of Contents for Smeg ALFA 43 XMF
-
Page 1: Table Of Contents
Contents 1 Instructions 1.1 General safety instructions 1.2 Identification plate 1.3 Manufacturer liability 1.4 Appliance purpose 1.5 Disposal 1.6 This user manual 1.7 How to read the user manual 2 Description 2.1 General Description 2.2 Control panel 2.3 Other parts 2.4 Available accessories 3 Use 3.1 Instructions... -
Page 2: Instructions
Instructions 1 Instructions • Switch off the appliance immediately after use. 1.1 General safety instructions • Do not modify this appliance. • Have qualified personnel carry Risk of personal injury out installation and assistance • During use the appliance and its interventions according to the accessible parts become very hot. -
Page 3: Identification Plate
Instructions • Use wooden or plastic utensils. 1.3 Manufacturer liability • Do not seat on the appliance. The manufacturer declines all liability for damage to persons or property caused by: • Do not use steam jets to clean the • Use of the appliance other than that appliance. -
Page 4: This User Manual
Instructions 1.7 How to read the user manual This user manual uses the following reading Power voltage conventions: Danger of electrocution Instructions • Disconnect the mains supply. General information on this user manual, on safety and final • Unplug the appliance. disposal. -
Page 5: Description
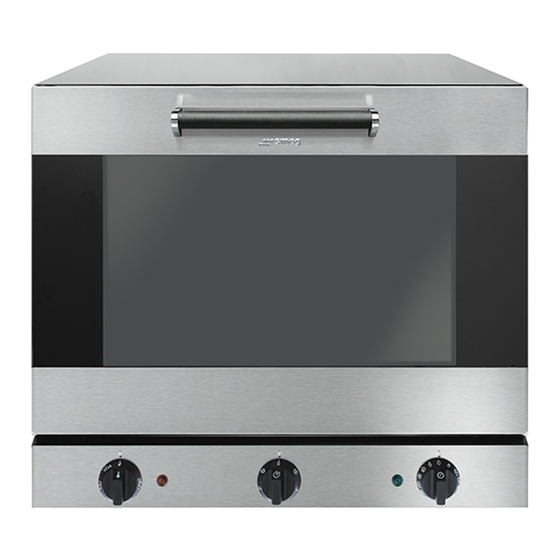
Description 2 Description 2.1 General Description With traditional door With swing door 1 Control panel 5 Tray support frames 2 Oven light 6 Door 3 Seal Frame shelf 4 Fan... -
Page 6: Control Panel
Description 2.2 Control panel With traditional door With swing door 1 Function knob 5 Timer indicator light The oven’s various functions are suitable for When off, it indicates the beginning of different cooking modes. After selecting the timed cooking. When on, it indicates that required function, set the cooking timed cooking has finished. -
Page 7: Other Parts
Description 2.3 Other parts 2.4 Available accessories Shelves Some models are not provided The appliance features shelves to position with all accessories. trays and racks at different heights. The insertion heights are indicated from the Tray bottom upwards (see 2.1 General Description). -
Page 8: Use
3 Use High temperature inside the oven during use 3.1 Instructions Danger of fire or explosion High temperature inside the oven • Do not spray any spray products near during use the oven. Danger of burns • Do not use or leave flammable materials near the oven. -
Page 9: First Use
3.2 First use Opening and closing the door (models with swing door only) 1. Remove any protective film from the outside or inside of the appliance, The appliance is equipped with a swing including accessories. door. To open it, press the “DOOR” key on the control panel. -
Page 10: Cooking Modes
3.4 Cooking modes Grill The heat coming from the grill Defrost element gives perfect grilling results The movement of air at room above all for thin and medium temperature causes frozen food to thickness meat and, in combination defrost quickly. This type of rapid with the rotisserie (where fitted), defrosting is ideal as the taste and gives the food an even browning at... -
Page 11: Cooking Advice
3.5 Cooking advice • The temperature and the cooking time depend on the quality and consistency General advice of the dough. • Use a fan assisted function to achieve • To check whether the dessert is cooked consistent cooking at several levels. right through: At the end of the cooking time, put a toothpick into the highest point •... -
Page 12: Cleaning And Maintenance
Cleaning and maintenance 4 Cleaning and maintenance 4.4 Food stains or residues Do not use metallic sponges or sharp 4.1 Instructions scrapers as they will damage the surfaces. Use ordinary non-abrasive products with Improper use the aid of wooden or plastic utensils if Risk of damage to surfaces necessary. -
Page 13: Removing The Internal Glass Pane
Cleaning and maintenance 2. Grasp the door on both sides with both 4.7 Removing the internal glass pane hands, lift it forming an angle of around Models with traditional door 30° and remove it. Improper use Crushing hazard • Ensure you have locked the door hinges before removing the glass panes. - Page 14 Cleaning and maintenance 4. Clean the external glass pane and the 2. Then, pull the bottom of the glass (2). The panes previously removed. Use 4 pins attached to the glass will detach absorbent kitchen roll. In case of from their housings. stubborn dirt, wash with a damp sponge and neutral detergent.
-
Page 15: Cleaning The Inside Of The Oven
Cleaning and maintenance 4.8 Cleaning the inside of the oven 2. Slide it out of the seats at the back. For the best oven upkeep, clean it regularly after having allowed it to cool. The oven should be operated at the maximum temperature for about 15-20 minutes after the use of specific products, to burn off the... -
Page 16: Extraordinary Maintenance
Cleaning and maintenance 4.9 Extraordinary maintenance 5. Replace the light bulb with one of the same type (40W). Live parts 6. Refit the cover correctly, so that the Danger of electrocution moulded part of the glass is facing the door. •... -
Page 17: If The Appliance Is Not Working Properly
Cleaning and maintenance 4.10 If the appliance is not working properly Problem Possible solution • The timer knob is positioned on 0. • The plug is not properly inserted in the socket. The oven is not working • The electrical system is damaged or not working properly. -
Page 18: Installation
Installation 5 Installation General information Check the grid characteristics against the 5.1 Electrical connection data indicated on the plate. The identification plate bearing the technical Power voltage data, serial number and brand name is Danger of electrocution visibly positioned on the appliance. Do not remove this plate for any reason. -
Page 19: Positioning
Installation Fixed connection 5.2 Positioning Fit the power line with an omnipolar circuit Heavy appliance breaker in compliance with installation Crushing hazard regulations. The circuit breaker should be located near • Position the appliance with the aid of a the appliance and in an easily reachable second person. - Page 20 Installation Steam outlet pipe Multiple installations Depending on the model, there are exhaust flues on the back of the appliance to Weight: 33 kg release the steam produced during cooking. If multiple appliances are installed together, place two or more appliances side by side at a distance of 50 mm between them, positioning them at least 50 mm from the rear wall and 30 mm from any side walls.
- Page 21 Installation Spacers In order to ensure a minimum distance of 50 mm between the appliance and any rear wall, the supplied spacers must be fitted to the rear of the appliance. 1. Remove the 6 screws located in the bottom rear corners of the appliance. 2.
Need help?
Do you have a question about the ALFA 43 XMF and is the answer not in the manual?
Questions and answers