
Related Manuals for Graco Pack 'N Play with Newborn Napper Elite


Summary of Contents for Graco Pack 'N Play with Newborn Napper Elite
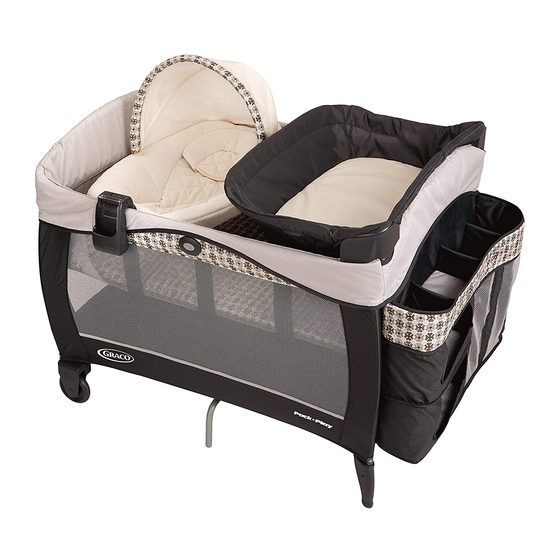
- Page 1 Read all instructions BEFORE assembly and USE of product. KEEP INSTRUCTIONS FOR FUTURE USE. Pack 'n Play Playard ® Newborn Napper Elite ®...
- Page 2 Failure to follow these warnings and the instructions could result in serious injury or death. Setting Up the Playard Using the playard • THIS PRODUCT REQUIRES • The playard is for playing or ADULT ASSEMBLY. sleeping. When used for playing, never leave child unattended and •...
- Page 3 • On soft bedding. NEVER add a mattress, pillow, comforter or padding. Use ONLY mattress pad provided by Graco. • To reduce the risk of SIDS, pediatricians recommend healthy infants be placed on their backs to sleep, unless otherwise...
- Page 4 FOR SAFE BATTERY USE: Keep the batteries out of children’s reach. Any battery may leak battery acid if mixed with a different battery type, if inserted incorrectly (put in backwards) or if all batteries are not replaced or recharged at the same time. Do not mix old and new batteries.
- Page 5 Changes or modifications not expressly approved by the party responsible for compliance could void the user’s authority to operate the equipment. This device complies with part 15 of the FCC Rules. Operation is subject to the following two conditions: (1) This device may not cause harmful interference, and (2) this device must accept any interference received, including interference that may cause undesired operation.
-
Page 6: All Models
2-A Parts list This model may not include some features shown below. Check that you have all the parts for this model BEFORE assembling your product. If any parts are missing, call Customer Service. Tools required: Philips Screwdriver ALL MODELS FEATURES ON CERTAIN MODELS... - Page 7 Playard Setup 1. Disconnect straps holding mattress around playard. 2. Remove mattress from around playard. 3. Pull up on side rails in middle above push button until all four sides are locked. DO NOT push center down yet. SNAP!
- Page 8 4. When setting up, lock rails BEFORE lowering center. Be sure top rails have become rigid. If not, pull up again until they are rigid. If top rails do not latch, lift the center of the floor higher. CHECK that fabric covers corners.
- Page 9 7. Pull the two hook and loop tabs under mattress/pad through the slotted holes and attach to hook and loop patch on bottom of playard. 8. Pull the four snap straps on corners of playard mattress through bottom of playard. Wrap around the tube and fasten snap onto the tube.
- Page 10 • If a sheet is used with the pad use only the one provided by Graco or one specifically designed to fit the dimensions of the bassinet.
- Page 11 1. You will need to remove the mattress/pad from the bottom of the playard to use inside your travel bed. ALWAYS install mattress in travel bed before using as bassinet. 2. Fasten 4 clips onto top rail of Holes for changing table. playard as shown.
- Page 12 4. Fold over the 4 bassinet flaps to cover all four corners of the playard as shown. 5. Insert tapered end of bar into end of other bar with hole in it. Repeat with other set of bars. CHECK: Tubes MUST be assembled before placing mattress/pad in bassinet.
- Page 13 Vibration Unit 1. Open the battery compartment lid by inserting a screwdriver the slot. Insert one D (LR20) cell battery (not included). Replace lid. 2. Cord in bottom of bassinet. 3. Vibration must be fastened tightly and centered on the webbing strap to work properly.
- Page 14 MP3 Speaker System MP3 1. Remove screw from back of mp3 speaker system. 2. Remove battery door and insert 2-AA (LR06) batteries (not included). Replace door and screw.
- Page 15 3. Insert end of cord into side of mp3 speaker system. 4. Attach mp3 speaker system as shown. SNAP! 5. Insert the mattress/pad soft side up into the playard, making sure the hook and loop patches on bottom of mattress attaches to matching hook and loop patches on the bassinet.
- Page 16 To Fold 1. Release snap straps and hook and loop straps on bottom of playard. Pull mattress fully out of playard. DO NOT unlock top rails yet. Pull the center of the playard floor up with the tab in the middle of the playard.
- Page 17 3. Center of floor must be up. a. Lift up slightly on the top rail. b. Push in on the button located on the side of the top rail to release the two tubes. c. Push down. d. Repeat on all four rails until all tubes are released.
- Page 18 4. Do not force. If unit will not fold, look for a partially latched top rail. Squeeze the latch button to release the rail.
- Page 19 To Cover 1. Cover unit with handle out. 2. Zip together.
- Page 20 This model may not include some features shown. Using MP3 Speaker System WARNING • You must remove the MP3 speaker system from the unit when your child can pull up to a standing position. • To avoid suffocation, do not allow child to play with the MP3 speaker system.
- Page 21 1. To turn unit on, slide button and a light will come on. 2. Vibration: Slide button to one of two vibration speeds. SLOW FAST LENTO RAPIDE 3. To use an MP3 player (not included), connect player to cord in speaker system as shown.
-
Page 22: Changing Table
• Always stay within arm’s reach of your child when using the changing table. Never leave child unattended. • The changing table is designed for use only with this Graco playard. Do not use on the floor, bed, counter or other surfaces. - Page 23 Plastic hubico 1. Make changer tube channels visible by flipping changer over so the changer fabric side is facing down. Slide tube with plastic hubs into the channel in fabric as shown.
- Page 24 2. While changer fabric is still facing down, slide changer tube into other channel in fabric as shown. 3. Tubes should appear exactly as shown. CHECK tubes are completely in channels on both side of the changer. 4. Snap changer tubes together as shown.
- Page 25 5. Snap two short connector tubes into the openings in the SNAP! plastic hubs as shown. SNAP! 6. Insert changer connector tubes into openings in corners of playard. SNAP! 7. To remove, push in buttons on changer connector tubes while pulling up on corners of changing table.
-
Page 26: Fall Hazard
Newborn Napper® WARNING Prevent serious injury or death: follow these warnings and the instructions. • You are responsible to provide adult supervision when using your napper. • Napper must be properly attached to bassinet before use. • Never use this napper on any other product. FALL HAZARD: To prevent falls, stop using the product when infant: •... - Page 27 WARNING To prevent serious injury or death, DO NOT REMOVE FOAM. NOTE: Napper should always be attached opposite the changing table. 1. Remove mattress pad from bassinet.
- Page 28 2. Unfasten the webbing strap holding the vibration in the playard. 3. Unplug the vibration unit and remove from bassinet. 4. Place napper upside down on a flat surface with the vibration unit pocket facing up.
- Page 29 5. Locate the vibration unit pocket on the underside of the napper. 6. Unfasten, hook and loop tape as shown. 7. Plug-in one end of the short cord into the side of the vibration unit as shown. 8. Insert vibration unit into pocket.
- Page 30 9. Close pocket by re-attaching hook and loop tape as shown. 10. After closing the pocket make sure the short cord is sticking out as shown. 11. Insert the head support strap through the slot in the napper. MAKE sure strap is not twisted. 12.
- Page 31 13. Locate channel openings on bottom of napper. 14. Insert tube with plastic end into channel opening . Snap buttons should be down as shown...
- Page 32 15. NOTE: DO NOT connect tubes until step 21. Insert the other tube into the channel on opposite side, inserting the plastic end first. 16. Make sure snap buttons are facing down so that they are not visible from above.
- Page 33 17. Insert mattress pad into bassinet. 18. Place napper inside of bassinet with head support at either end as shown. 19. Insert tube into channel on inside of bassinet as shown. Pull open channel for easy insertion.
- Page 34 20. Insert tube into channel of bassinet on opposite side as shown. 21. Instert metal tube into plastic tube. SNAP! 22. Make sure the button clicks into place as shown.
- Page 35 23. Insert opposite metal tube into plastic tube. 24. Make sure the button clicks into place as shown.
- Page 36 25. Find short cord connected to vibration unit under napper pad. 26. Plug in the short cord coming out of the napper pocket into the MP3 speaker system as shown. 27. Attach MP3 speaker system at foot end of napper as shown.
- Page 37 28. Place canopy over napper as shown. 29. Firmly attach canopy to napper by clipping the canopy mounts to the sides of the napper as shown. 30. Attach the canopy hook and loop tape at the head end of napper as shown.
- Page 38 To Remove Napper 1. Remove MP3 speaker system then unclip canopy mounts and remove canopy from napper. 2. Press buttons on both sides of napper to release metal tubes from plastic tubes. 3. Pull on tubes to remove napper from bassinet.
- Page 39 5-D Parent Organizer WARNING • Always keep objects out of child's reach. • Do not allow child to climb on organizer. • Remove when child is able to pull himself up in the playard. • NEVER use on inside of unit. Child may use as a step to climb out of unit or reach items in bag.
- Page 40 1. Open flap and insert square insert into pocket as shown. Close flap by reattaching hook and loop tape. 2. Open flaps on ends of uprights and insert the long board into and the short board into upright . Close flap by reattaching hook and loop tape.
- Page 41 3. Attach parent organizer to end of playard with the holes for the changing table. Insert hook and loop tape into loop and reattach to parent organizer as shown.
-
Page 42: Care And Maintenance
Care and Maintenance FROM TIME TO TIME CHECK YOUR PLAYARD for worn parts, torn materi- al or stitching. Replace or repair the parts as needed. Use only Graco® replacement parts. IF PLAYARD IS USED AT THE BEACH, you MUST clean sand off your pla- yard, including the feet, before packing it into cover.
Need help?
Do you have a question about the Pack 'N Play with Newborn Napper Elite and is the answer not in the manual?
Questions and answers