Table of Contents
Advertisement
Available languages
Available languages
In USA - BEST Hartford, Wisconsin
In CANADA - BEST Drummondville, QC, Canada
REGISTER YOUR PRODUCT ONLINE AT : www.BestRangeHoods.com/register
For additional Information visit www.BestRangeHoods.com
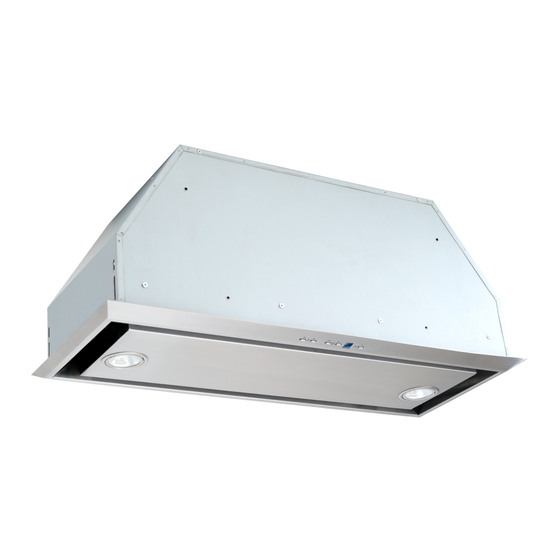
Model P195P
- 1 -
ENGLISH.......................................2
FRANÇAIS..................................11
ESPAÑOL...................................20
Advertisement
Table of Contents

Related Manuals for Best P195P1M52


Summary of Contents for Best P195P1M52
- Page 1 Model P195P ENGLISH........2 FRANÇAIS........11 ESPAÑOL........20 In USA - BEST Hartford, Wisconsin In CANADA - BEST Drummondville, QC, Canada REGISTER YOUR PRODUCT ONLINE AT : www.BestRangeHoods.com/register For additional Information visit www.BestRangeHoods.com - 1 -...
-
Page 2: To Reduce The Risk Of Fire, Electric Shock, Or Injury To Persons, Observe The Following
READ AND SAVE THESE INSTRUCTIONS INTENDED FOR DOMESTIC COOKING ONLY WARNING TO REDUCE THE RISK OF FIRE, ELECTRIC SHOCK, OR INJURY TO PERSONS, OBSERVE THE FOLLOWING: 1. Use this unit only in the manner intended by the manufacturer. If you have questions, contact the manufacturer at the address or telephone number listed in the warranty. - Page 3 The motor will restart when it cools down. If the motor continues to shut off and restart, have the hood serviced. 8. For best capture of cooking impurities, the bottom of the hood should be a minimum of 24" and a maximum of 30" above the cooking surface.
-
Page 4: Prepare The Hood
PREPARE THE HOOD Unpack hood and check contents. 1 - Hood 1 - Hardware Bag (B08084041) containing: 4 - Mounting Screws (4,2 x 20 mm Pan Head) 1 - Parts Bag (B08084042) containing: 1 - Junction Box 1 - Junction Box Cover 2 - Cover Screws (3,9 x 6 Flat Head) 4 - Washer 2 - Mounting Screws (3,9 x 9,5mm Pan Head) -
Page 5: Install The Ductwork
MOUNTING SCREWS Non-Ducted configuration (shown in Fig.1b): MOUNTING SCREWS (3.9x9.5mm) (3.9x9.5mm) nstall a decorative grill (not supplied by Best). You may need to purchase a metal round-to- rectangular transition depending on your application. REMOVE THE TAPE REMOVE THE TAPE Fig.2... -
Page 6: Install The Hood
3. Insert the hood in the cabinet and lock into position using the side spring. 4. Use the holes in the hood, secure it with (4) 19-½” For Version P195P1M52 mounting screws (B) - 3.2 x 16mm. See Fig.7 ” For Version P195PM70 Models... -
Page 7: Maintenance
Painted surfaces should be cleaned with warm water and mild detergent only. INSTALL RECIRCULATION KIT (Non-Duct Option Only) Purchase Charcoal Filter Kit Model AFCP195P52 for P195P1M52 or AFCP195P70 for P195PM70. Replace filters every 3 months. - 7 -... -
Page 8: Operation
OPERATION The hood is operated using the (5) push buttons located on the front edge of the hood. The Light Off switch turns the lights off and on. The Light Intensity switch increases and decreases the lighting level. The Blower Off/Speed switch turns the blower off and changes blower speed to four different speed settings: high, medium-high, medium-low and low speed. -
Page 9: Halogen Bulbs
ONE YEAR LIMITED WARRANTY FOR BEST PRODUCTS Broan-NuTone LLC (Broan-NuTone) warrants to the original consumer purchaser of Best products that such products will be free from defects in materials or workmanship for a period of one year from the date of original purchase. THERE ARE NO OTHER WARRANTIES, EXPRESS OR IMPLIED, INCLUDING, BUT NOT LIMITED TO, IMPLIED WARRANTIES OR MERCHANT ABILITY OR FITNESS FOR A PARTICULAR PURPOSE. -
Page 10: Service Parts
SERVICE PARTS KEY No. PART No. DESCRIPTION B003100148 FRAME - ONLY FOR P195P1M52 MODEL B003100147 FRAME - ONLY FOR P195PM70 MODELS B02011013 SPRING B08087694 GREASE FILTER - ONLY FOR P195P1M52 MODEL B08087527 GREASE FILTER - ONLY FOR P195PM70 MODELS B02300985... - Page 11 LISEZ ET CONSERVEZ CES INSTRUCTIONS POUR USAGE DOMESTIQUE SEULEMENT AVERTISSEMENT AFIN DE RÉDUIRE LES RISQUES D’INCENDIE, D’ÉLECTROCUTION OU DE BLESSURES CORPORELLES, SUIVEZ LES INSTRUCTIONS SUIVANTES : 1. N’utilisez cet appareil que de la façon prévue par le fabricant. Pour d’autres renseignements, contactez le fabricant à...
- Page 12 AVERTISSEMENT AFIN D’ÉVITER TOUS RISQUES DE BLESSURE LORS D’UN FEU DE CUISINIÈRE, OBSERVEZ LES INSTRUCTIONS SUIVANTES* : 1. ÉTOUFFEZ LES FLAMMES à l’aide d’un couvercle hermétique, une plaque à biscuits ou un plateau en métal, puis éteignez le brûleur. ATTENTION DE NE PAS VOUS BRÛLER.
-
Page 13: Préparation De La Hotte
PRÉPARATION DE LA HOTTE Retirer la hotte de l’emballage, puis vérifier le contenu. 1 - Hotte 1 - Sac de visserie (B08084041) comprenant : 4 - Vis de montage (4,2 x 20 mm à tête ronde) 1 - Sac de pièces (B08084042) comprenant: 1 - Boîte de jonction 1 - Couvercle de la boîte de jonction 2 - Cache-vis (3,9 x 6 mm à... - Page 14 VIS DE MONTAGE (3.9x9.5mm) (3.9x9.5mm) Pour les hottes à recirculation (voir Fig1b): Installer une grille décorative (non fourni par Best). Vous devrez peut-être acheter une transition ronde en mètal à rectangulaire en fonction de votre application. RETIRER LE RUBAN RETIRER LE RUBAN Fig.2...
-
Page 15: Installation De La Hotte
à l’aide du ressort latéral. 4. Utilisez les trous dans le hotte, fixez-le X= 19-½ avec (4) vis de montage (B) - 3.2 x 16mm. PO - Pour modéle P195P1M52 Voir Fig.7 X= 26- 5/8 PO- Pour modeles P195PM70... -
Page 16: Entretien
Nettoyer les surfaces peintes uniquement à l’eau tiède avec un détergent doux. KIT D’INSTALLATION DE RECIRCULATION (seulement pour l’option sans conduits) Achat Model Kit filtre à charbon AFCP195P52 pour P195P1M52 ou AFCP195P70 pour P195PM70. Remplacer les filtres tous les 3 mois. - 16 -... -
Page 17: Détecteur De Chaleur
FONCTIONNEMENT La hotte s'utilise à l'aide des (5) boutons-poussoirs situés sur le devant de la hotte. Le commutateur Arrêt lumière active et désactive les lumières. Le commutateur Intensité luminèuse augmente et diminue le niveau d’éclairage. Le commutateur Extinction/vitesse soufflante permet d'éteindre la soufflante ou de régler sa vitesse sur quatre positions : haute, moyenne-haute, moyenne-basse et basse. -
Page 18: Garantie
GARANTIE LIMITEE DE UN AN DE BEST Broan-NuTone LLC (Broan-NuTone) garantit à l'acheteur original que les produits BEST vendus en vertu de la présente sont libres de tout vice de matériau ou de fabrication pour une période de un an à compter de la date d'achat originale. CETTE GARANTIE NE COMPORTE AUCUNE AUTRE GARANTIE, EXPRESSE OU TACITE, Y COMPRIS, MAIS SANS S'Y LIMITER, LES GARANTIES TACITES DE VALEUR MARCHANDE OU D'ADAPTATION À... -
Page 19: Liste Des Pièces De Rechange
SAC DE PIÈCES B08084040 DOCUMENTATION B06108781 ENSEMBLE DE BOÎTIER ELECTRIQUE - SEULEMENT POUR LE MODELE P195P1M52 - (Comprend les repères N° 38, 39, 151, 166, 208) B06108782 ENSEMBLE DE BOÎTIER ELECTRIQUE SEULEMENT POUR MODELES . 38, 39, 151, 166, 208) P195PM70 - Comprend les repères N°... - Page 20 LEA Y CONSERVE ESTAS INSTRUCCIONES INDICADO PARA EL USO EN COCINAS DOMESTICAS ADVERTENCIA PARA EVITAR EL RIESGO DE INCENDIO, CORTOCIRCUITO O DAÑO PARA LAS PERSONAS, OBSERVE ATENTAMENTE LAS SIGUIENTES NORMAS: 1. Use esta unidad solamente de la manera indicada por el fabricante; si tiene dudas, póngase en contacto con éste a la dirección o teléfono indicados en la garantía.
- Page 21 ADVERTENCIA 1. Para uso en interiores. 2. Para reducir el riesgo de incendios y para evacuar correctamente los humos, asegurarse de haber realizado una conducción del aire hasta el exterior. No expulsar los humos en espacios cerrados por paredes o techos, áticos, espacios angostos o garajes. 3.
-
Page 22: Prepare La Campana
PREPARE LA CAMPANA Sacar la campana de l’embalaje y controlar el contenido. 1 - Campana 1 - Bolsita (B08084041) con: 4 - Tornillos de montaje (4,2 x 20mm cabeza redonda) 1 - Parts Bag (B08084042) con: 1 - Caja de conexiónes 1 - Tapa de la caja 2 - Tornillo de la tapa (3,9 x 6 cabeza plana) 4 - Arandelas... - Page 23 Versión sin conducto (Ver Fig.1b): Instale una rejilla decorativa (no suministrado por Best). Puede que tenga que comprar un QUITAR LA CINTA QUITAR LA CINTA metal redondo a rectangular transición en Fig.2...
-
Page 24: Instalacion Electrica
3. Introducir la campana en lo armario y bloquearlo por medio del enganche laterale. 4. Utilizar los agujeros de la campana, fijarla definitivamente por medio de 6 tornillos de = 19- Por el modelo P195P1M52 1/2” = 26- Por los modelos P195PM70 montaje (B) - 3.2x16mm). -
Page 25: Mantenimiento
Las superficies lacadas deben limpiarse solamente con agua tibia y detergente no muy fuerte. INSTALACION DEL KIT RECIRCULACION (Opción únicamente sin conducto) Compre un juego de filtros Modelo AFCP195P52 por el modelo P195P1M52 o AFCP195P70 por los modelos P195PM70 a su proveedor. Sostituya los filtros cada 3 meses. - 25 -... -
Page 26: Mando A Distancia
FUNCIONAMIENTO La campana se opera mediante los 5 botones pulsadores que se encuentran en el frontal de la campana. El interruptor de apagado de la luz se enciende y apaga las luces. El interruptor de intensidad de la luz aumenta y disminuye el nivel de iluminación. El interruptor de apagado/velocidad del ventilador apaga el ventilador y cambia su velocidad a cuatro ajustes: alta, mediana-alta, mediana-baja y baja. - Page 27 GARANTIA BEST POR UN AÑO Broan-NuTone LLC (Broan-NuTone) garantiza al consumidor-comprador de sus productos BEST que dichos productos no tendrán defectos en los materiales o fabricación, durante un periodo de un año a partir de la fecha de la compra.NO HAY OTRO TIPO DE GARANTIAS QUE INCLUYAN O SE LIMITEN EXCLUSIVAMENTE A GARANTIAS IMPLICITAS O DE CAPACIDAD COMERCIAL O CONVENIENCIA PARA UN PROPOSITO ESPECIFICO.
-
Page 28: Piezas De Servicio
JUEGO DE INSTRUCCIONES PARA INSTALLACIÓN B06108781 CONJUNTO DE LA CAJA DE INSTALLACIÓN ELÉCTRICA- SÓLO PARA EL MODELO P195P1M52 - (INCLUYE LAS CLAVES N° 38, 39, 151, 166, 208) B06108782 CONJUNTO DE LA CAJA DE INSTALLACIÓN ELÉCTRICA - SÓLO PARA LOS MODELOS P195PM70 - (INCLUYE LAS CLAVES N° 38, 39, 151, 166, 208) - Page 29 SEVICE PARTS - PIÈCES DE RECHANGE - PIEZAS DE SERVICIO Model - Modèle - Modelo P195P1M52 - 29 -...
- Page 30 SEVICE PARTS - PIÈCES DE RECHANGE - PIEZAS DE SERVICIO Model - Modèle - Modelo P195P1M70 - 30 -...
- Page 31 SEVICE PARTS - PIÈCES DE RECHANGE - PIEZAS DE SERVICIO Model - Modèle - Modelo P195P2M70 - 31 -...
- Page 32 04302501/7 99045018E...
Need help?
Do you have a question about the P195P1M52 and is the answer not in the manual?
Questions and answers