Table of Contents
Advertisement
Available languages
Available languages
INSTALLATION INSTRUCTIONS
HB0123
PK22 AND PKEX22 SERIES
INTENDED FOR DOMESTIC COOKING ONLY
!
!
READ AND SAVE THESE INSTRUCTIONS
INSTALLER: LEAVE THIS MANUAL WITH HOMEOWNER.
HOMEOWNER: USE AND CARE INFORMATION ON PAGES 11 TO 13.
BEST; Hartford, Wisconsin www.BestRangeHoods.com 800-558-1711
BEST; Drummondville, QC, Canada www.BestRangeHoods.com 866-737-7770
To register your product online or for additional information visit www.BestRangeHoods.com
SV20827 rev. 03
Advertisement
Table of Contents

Related Manuals for Best PK22 series


Summary of Contents for Best PK22 series
- Page 1 INSTALLER: LEAVE THIS MANUAL WITH HOMEOWNER. HOMEOWNER: USE AND CARE INFORMATION ON PAGES 11 TO 13. BEST; Hartford, Wisconsin www.BestRangeHoods.com 800-558-1711 BEST; Drummondville, QC, Canada www.BestRangeHoods.com 866-737-7770 To register your product online or for additional information visit www.BestRangeHoods.com SV20827 rev. 03...
-
Page 2: To Reduce The Risk Of Fire, Electric Shock Or Injury To Persons, Observe The Following
7. Do not use this unit with any solid-state speed control device. 10. To reduce the risk of fire and electrical shock, the Best models PK22 8. To reduce the risk of fire, use only metal ductwork. - Page 3 - PK22 POWER PACK SYSTEM - ODEL ODEL (10’’ R IGH CAPACITY ROOF CAP OUND WALL CAP ODEL (10” R OUND ADJUSTABLE ELBOW ODEL (10” R OUND DUCT — 2 SECTIONS ODEL (10” R OUND VERTICAL IN LINE DAMPER SUPPLIED WITH INTERNAL BLOWER POWER PACK 10”...
- Page 4 - PKEX22 POWER PACK SYSTEM - ODEL IGH CAPACITY ROOF CAP ILB9 (800 ODEL ILB11 (1100 LINE BLOWER EB12 (1200 ODEL EB6 (600 ODEL 8” 12” INCLUDES TWO EB15 (1500 EB9 (900 10’’ ROUND TRANSITIONS XTERNAL BLOWER XTERNAL BLOWER ODEL (10’’...
-
Page 5: Install Ductwork And Electrical Wiring
Use 2” metal foil duct tape to seal the joints. The minimum power pack distance above cooktop must not be less than 24’’. A maximum of 30” above cooktop is recommended for best capture of cooking impurities. Distances over 30” are at the installer and users discretion. - Page 6 2. PREPARE THE INSTALLATION ( ’ CONT Parts sold separately: - In-line blower assembly model ILB3, ILB6, ILB9 or ILB11. - External blower assembly model EB6, EB9, EB12 or EB15. - Custom hood liner model AL3036, AL3042, AL3948, AL3954, AL4554 or AL4560 (optional). - Ambient light panel model ALP36, ALP42, ALP48, ALP54 or ALP60 (optional).
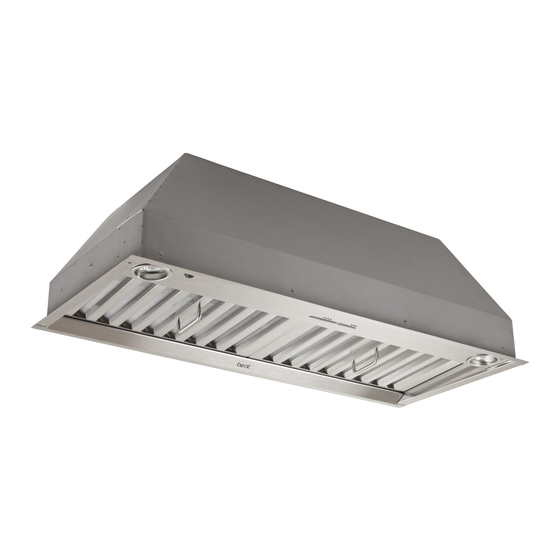
- Page 7 6. REMOVE HYBRID BAFFLE FILTERS Remove tape on filters. Remove filters from power pack and set aside. HD0499 7. REMOVE ELECTRICAL COMPARTMENT COVER (PK22 SERIES ONLY) From inside the power pack, remove the wiring cover by removing its retaining screw and set aside.
- Page 8 HJ0026 10. INSTALL 10" DAMPER (PK22 SERIES ONLY) Install 10” damper (model 421, provided with PK22 series power packs) inside the vertical ductwork that will be attached to the power pack. Do not install in a horizontal ductwork or directly on top of the adapter or it will not open and close properly.
- Page 9 12. CONNECT WIRING (ALL MODELS) WARNING Risk of electric shock. Electrical wiring must be done by qualified personnel in accordance with all applicable codes and standards. Before connecting wires, switch power off at service panel and lock service disconnecting means to prevent power from being switched on accidentally. Position the power pack below its custom hood.
- Page 10 See label inside power pack for part number. HD0501 17. CALIBRATE IQ BLOWER SYSTEM™ (PK22 SERIES ONLY) After the power pack is installed and wired, engage the calibration process (our Guaranteed Performance System Technology to ensure full-rated airflow is being delivered).
-
Page 11: Light Bulbs
NOTE: If need be, use a rubber dishwashing glove to add grip when removing the bulb; or use suction cup tool available from Best to ease removal of the bulbs. Contact Best Customer Service at 1-800-558-1711 to order suction cup tool, part number 99526707. -
Page 12: Operation
In this case, it is impossible to turn the blower OFF with blower button. If you must stop the blower on PK22 series models: set the main power switch located behind the baffle filters in OFF position, if it is possible to do safely (see illustration below). -
Page 13: Operation ( Cont ' D )
2- Press and hold power pack button E for 10 seconds. Lighting LED indicator 2 will then blink 3 times as a completion feedback. 21. WARRANTY ONE-YEAR LIMITED WARRANTY FOR BEST PRODUCTS Broan-NuTone LLC (Broan-NuTone) warrants to the original consumer purchaser of its products that such products will be free from defects in materials or workmanship for a period of one year from the date of original purchase. -
Page 14: Wiring Diagrams
22. WIRING DIAGRAMS Best PK22 series MT_T MT_T OTOR EUTRAL ED HIGH PEED ED LOW PEED PEED PEED ALIBRATION BUTTON BLDC1 BLDC2 COLOR CODE BLACK BLUE ORANGE WHITE YELLOW AIN SWITCH LINE NEUTRAL GROUND LAMP LAMP LAMP HE0156A Best PKEX22 series... -
Page 15: Service Parts
23. SERVICE PARTS Best PK22 series EPLACEMENT ARTS AND EPAIRS In order to ensure your unit remains in good working condition, you must use Broan-NuTone genuine replacement parts only. Broan-NuTone genuine replacement parts specially designed for each unit and are... - Page 16 23. SERVICE PARTS ( ’ CONT Best PKEX22 series EPLACEMENT ARTS AND EPAIRS In order to ensure your unit remains in good working condition, you must use Broan-NuTone genuine replacement parts only. Broan-NuTone genuine replacement parts specially designed for each unit and are...
-
Page 17: Guide D'installation
PROPRIÉTAIRE : DIRECTIVES D’UTILISATION ET D’ENTRETIEN EN PAGES 27 À 29. BEST; Hartford, Wisconsin www.BestRangeHoods.com 800 558-1711 BEST; Drummondville, QC, Canada www.BestRangeHoods.com 866 737-7770 Pour enregistrer votre produit en ligne ou pour obtenir plus d’information, consultez notre site www.BestRangeHoods.com SV20827 rév. 03... - Page 18 10. Afin de réduire les risques d’incendie et d’électrocution, les modèles Best de la série PK22 doivent être installés uniquement avec leurs 8. Afin de réduire les risques d’incendie, n’utilisez que des conduits ventilateurs internes intégrés et les modèles Best de la série PKEX22 de métal.
- Page 19 - SYSTÈME DE HOTTE ENCASTRABLE - SÉRIE PK22 ODÈLE ODÈLE APUCHON DE TOIT APUCHON MURAL À HAUT RENDEMENT PO ROND ODÈLE OUDE AJUSTABLE PO ROND ODÈLE ONDUIT DE PO ROND — SECTIONS DE ODÈLE OLET VERTICAL EN LIGNE DE PO ROND FOURNI AVEC LA HOTTE ENCASTRABLE À...
- Page 20 - SYSTÈME DE HOTTE ENCASTRABLE - SÉRIE PKEX22 ODÈLE APUCHON DE TOIT À HAUT RENDEMENT ENTILATEUR EN LIGNE ILB9 (800 ODÈLE ILB11 (1100 INCLUANT DEUX ENTILATEUR EXTERNE ENTILATEUR EXTERNE TRANSITIONS RONDES DE EB12 (1200 ODÈLE EB6 (600 ODÈLE PO X PO À...
-
Page 21: Préparer L'installation
1. INSTALLER LES CONDUITS ET LE CÂBLAGE ÉLECTRIQUE Les hottes encastrables de série PKEX22 doivent être munies d’un ventilateur externe ou en ligne. Elles doivent être installées avec un ventilateur de modèle ILB3, ILB6, ILB9, ILB11, EB6, EB9, EB12 ou EB15 seulement. Aucun autre ventilateur ne peut être utilisé (ventilateurs vendus séparément). - Page 22 2. PRÉPARER L’INSTALLATION ( SUITE Pièces vendues séparément : - Ventilateur en ligne modèle ILB3, ILB6, ILB9 ou ILB11. - Ventilateur externe modèle EB6, EB9, EB12 ou EB15. - Revêtement d’armoire, modèle AL3036, AL3042, AL3948, AL3954, AL4554 ou AL4560 (optionnel). - Panneau d’éclairage d’ambiance modèle ALP36, ALP42, ALP48, ALP54 ou ALP60 (optionnel).
- Page 23 5. DÉCOUPER LE TROU DANS LA BASE DE L’ARMOIRE Si ce n’est pas déjà fait, découper le trou dans la base de l’armoire selon les dimensions indiquées ci-dessous. ARGEUR DE LA HOTTE ENCASTRABLE ⁄ ⁄ ⁄ ⁄ HD0496F 6. RETIRER LES FILTRES À CHICANE HYBRIDES Retirer le ruban adhésif des filtres.
- Page 24 9. INSTALLER L’ADAPTATEUR DE 10 PO (SÉRIE PK22 SEULEMENT) À l’aide de 2 vis n° 8 x 3/8 po fournies dans le sac de pièces, assembler l’adaptateur sur le dessus de la hotte encastrable. Sceller les joints avec du ruban adhésif de métal pour éliminer les MPLACEMENTS VIS DE MONTAGE fuites d’air.
- Page 25 12. BRANCHEMENT ÉLECTRIQUE (TOUS LES MODÈLES) AVERTISSEMENT Risque d’électrocution. Le raccordement électrique doit être effectué par du personnel qualifié conformément aux codes et aux standards. Avant d’effectuer le branchement, coupez l’alimentation électrique au panneau de distribution et verrouillez-le pour éviter une mise en marche accidentelle. Placer la hotte encastrable sous son armoire.
- Page 26 15. INSTALLER LE VENTILATEUR (SÉRIE PKEX22 SEULEMENT) AVERTISSEMENT Ne jamais brancher ensemble le fil du ventilateur au fil d’alimentation de la hotte. Pour installer le ventilateur, voir les instructions comprises avec celui-ci. Une fois le ventilateur installé, brancher le fil du ventilateur à la prise à 2 alvéoles (B) et le fil d’alimentation électrique de la hotte (A) à...
-
Page 27: Entretien
NOTE : Si nécessaire, utiliser un gant à vaisselle pour obtenir une meilleure prise de l’ampoule lors de son retrait ou utiliser la ventouse de Best pour faciliter le retrait HO0090 des ampoules. - Page 28 20. FONCTIONNEMENT Toujours mettre en marche le ventilateur avant de commencer la cuisson afin d’établir une circulation d’air dans la cuisine. Aussi, laisser le ventilateur fonctionner quelques minutes après l’arrêt de la cuisinière afin d’aérer. A) Bouton d’arrêt différé B) Bouton de mise en marche/ ITESSE NTENSITÉ...
-
Page 29: Garantie
3 fois en guise de confirmation. 21. GARANTIE GARANTIE LIMITÉE DE UN AN DES PRODUITS BEST Broan-NuTone LLC (« Broan-NuTone ») garantit à l’acheteur consommateur initial de ses produits qu’ils sont exempts de tout défaut dans les matières premières ou la main-d’œuvre, pour une période de un an à compter de la date d’achat par le consommateur initial. IL N’Y A PAS D’... -
Page 30: Schémas Électriques
22. SCHÉMAS ÉLECTRIQUES Best série PK22 MT_T MT_T OTEUR AUTE EUTRE HAUTE ITESSE BASSE ITESSE ASSE ITESSE ITESSE OUTON AMPE DE CALIBRAGE ASSE TENSION C EUTRE BLDC1 BLDC2 CODE DE COULEUR BLANC BLEU JAUNE NOIR ORANGE NTERRUPTEUR ROUGE PRINCIPAL LIGNE NEUTRE MISE À... -
Page 31: Pièces De Remplacement
23. PIÈCES DE REMPLACEMENT Best série PK22 IÈCES DE REMPLACEMENT ET SERVICE Pour assurer le bon fonctionnement votre appareil, vous devez toujours utiliser des pièces d’origine provenant de Broan-NuTone. Les pièces d’origine de Broan-NuTone sont spécialement conçues pour satisfaire toutes les normes de certification de sécurité... - Page 32 23. PIÈCES DE REMPLACEMENT ( SUITE Best série PKEX22 IÈCES DE REMPLACEMENT ET SERVICE Pour assurer le bon fonctionnement votre appareil, vous devez toujours utiliser des pièces d’origine provenant de Broan-NuTone. Les pièces d’origine de Broan-NuTone sont spécialement conçues pour satisfaire toutes les normes de certification de sécurité...
-
Page 33: Instrucciones De Instalación
PROPIETARIO: INFORMACIÓN SOBRE UTILIZACIÓN Y CUIDADO EN LAS PÁGINAS 43 A 45. BEST; Hartford, Wisconsin www.BestRangeHoods.com 800-558-1711 BEST; Drummondville, QC, Canada www.BestRangeHoods.com 866-737-7770 Para registrar su producto en línea o para obtener más información, visitar nuestro sitio www.BestRangeHoods.com SV20827 rev. 03... - Page 34 EB6, de instalación y/o de certificación mas estrictas, susodichas exigencias EB9, EB12 o EB15 de Best, o con los modelos de ventiladores en prevalecen sobre aquellas en este documento y el instalador acepta línea ILB3, ILB6, ILB9 o ILB11 de Best.
- Page 35 - SISTEMA CON EL GRUPO DE ALIMENTACIÓN - PK22 ODELO ODELO APUCHÓN DE ALTA CAPACIDAD APUCHÓN MURAL 10”) PARA TEJADO REDONDO DE ODELO ODO AJUSTABLE 10”) REDONDO DE ODELO 10” , UBO REDONDO DE SECCIONES DE PIES ODELO 10” ISPOSITIVO DE CIERRE REDONDO VERTICAL Y EN LÍNEA DE PROVISTO CON EL GRUPO DE ALIMENTACIÓN DE VENTILADOR INTERNO EVESTIMIENTO DE LA CAMPANA...
- Page 36 - SISTEMA CON EL GRUPO DE ALIMENTACIÓN - PKEX22 ODELO CAPUCHÓN DE ALTA CAPACIDAD PARA TEJADO ENTILADOR EN LÍNEA MODELO ILB9 (800 ILB11 (1100 COMPRENDE DOS ENTILADOR EXTERNO ENTILADOR EXTERNO CAMBIOS DE SECCIÓN EB12 (1200 MODELO EB6 (600 MODELO 8” 12”...
-
Page 37: Preparación De La Instalación
1. INSTALACIÓN DE LOS TUBOS Y DE LAS CONEXIONES ELÉCTRICAS Para el grupo de alimentación de la serie PKEX22 debe utilizarse un ventilador externo o en línea. El grupo de alimentación de la serie PKEX22 debe instalarse únicamente con los modelos de ventilador ILB3, ILB6, ILB9, ILB11, EB6, EB9, EB12 o EB15. Estos ventiladores no pueden sustituirse por otros (los ventiladores se venden aparte). - Page 38 2. PREPARACIÓN DE LA INSTALACIÓN ( CONTINUACIÓN Piezas vendidas aparte: - Conjunto de ventilador en línea, modelo ILB3, ILB6, ILB9 o ILB11. - Conjunto de ventilador externo, modelo EB6, EB9, EB12 o EB15. - Revestimiento de la campana, modelo AL3036, AL3042, AL3948, AL3954, AL4554 o AL4560 (opcional). - Tablero de luz ambiental, modelo ALP36, ALP42, ALP48, ALP54 o ALP60 (opcional).
- Page 39 5. CORTE UN ORIFICIO EN LA BASE DE LA CAMPANA Si no está hecho, corte un orificio en la base de la campana, utilizando las dimensiones que aparecen a continuación. NCHURA DEL GRUPO DE ALIMENTACIÓN 30" ⁄ " 39" ⁄ "...
- Page 40 9. INSTALACIÓN DEL ADAPTADOR DE 10" (SERIE PK22 ÚNICAMENTE) Utilice 2 tornillos n.° 8 x 3/8” de la bolsa de piezas para instalar el adaptador en la parte superior del grupo de alimentación. Precinte todas las juntas con cinta adhesiva metálica para tubos para BICACIÓN DE LOS TORNILLOS DE INSTALACIÓN que no se escape el aire.
- Page 41 12. CONEXIÓN DEL CABLEADO (TODOS LOS MODELOS) ADVERTENCIA Riesgo de choque eléctrico. La conexión eléctrica debe hacerla personal competente con arreglo a los códigos y normas en vigor. Antes de conectar los hilos, corte la alimentación en el tablero de servicio y bloquee los medios de desconexión para impedir que la corriente se conecte accidentalmente.
- Page 42 15. INSTALACIÓN DEL VENTILADOR (SERIE PKEX22 ÚNICAMENTE) ADVERTENCIA No enchufe un cable en el otro. Para instalar el ventilador, véanse las instrucciones que vienen con él. Enchufe el cable con el enchufe de tres patillas que viene de la placa del ventilador en el conectador macho de tres patillas dentro del grupo de alimentación (A) y el cable con conectador macho de dos patillas que viene de la placa del ventilador en el enchufe de dos patillas dentro del grupo de alimentación (B).
-
Page 43: Uso Y Cuidado
NOTA: De ser necesario, utilice un guante de caucho de lavar los platos para sujetar mejor la bombilla y sacarla, o utilice la herramienta con ventosa de Best para quitar HO0090 fácilmente las bombillas. Comunique con Servicio al cliente de Best en el teléfono 1-800-558-1711 para pedir esta herramienta (n.°... - Page 44 20. FUNCIONAMIENTO Ponga en marcha siempre el ventilador antes de empezar a cocinar para generar una corriente de aire en la cocina. Deje en marcha el ventilador durante unos minutos para renovar el aire una vez que haya apagado la cocina. A) Interruptor de retardo del ventilador ELOCIDAD NTENSIDAD DE LA LUZ...
-
Page 45: Garantía Limitada De Un Año
(b) Dar el número de modelo y el número de identificación de la pieza y (c) Describir el tipo de defecto en el producto o pieza. En el momento de solicitar un servicio cubierto por la garantía, deberá presentar una prueba de la fecha de compra original. Estados Unidos - Best ®... -
Page 46: Diagramas Eléctricos
22. DIAGRAMAS ELÉCTRICOS Series PK22 de Best MT_T MT_T OTOR EUTRAL ALTA ELOCIDAD BAJA ELOCIDAD ELOCIDAD ELOCIDAD OTÓN ÁMPARA DE CALIBRACIÓN AJA TENSIÓN EUTRAL BLDC1 BLDC2 ÓDIGO DE COLORES AMARILLO AZUL BLANCO NARANJA NEGRO ROJO NTERRUPTOR PRINCIPAL 120 VAC LÍNEA... - Page 47 23. PIEZAS Series PK22 de Best USTITUCIÓN DE PIEZAS Y REPARACIÓN Para que la unidad se conserve en buen estado, debe usar repuestos genuinos Broan-NuTone únicamente. Estas piezas se han diseñado especialmente para cada unidad y se han fabricado conforme a las normas de certificación aplicables...
- Page 48 23. PIEZAS ( CONTINUACIÓN Serie PKEX22 de Best USTITUCIÓN DE PIEZAS Y REPARACIÓN Para que la unidad se conserve en buen estado, debe usar repuestos genuinos Broan-NuTone únicamente. Estas piezas se han diseñado especialmente para cada unidad y se han fabricado conforme a las normas de certificación aplicables...
Need help?
Do you have a question about the PK22 series and is the answer not in the manual?
Questions and answers
Light switch is non-op
The light switch on the Best PK22 series may not be working due to the following reasons:
1. Power Supply Issue – Ensure the unit is properly connected to power and the main power switch behind the filters is turned on.
2. Burnt-Out Bulbs – The halogen bulbs may need replacement if they have burned out.
3. Faulty Switch – The light switch itself may be damaged or malfunctioning.
4. Control Lock or Delay Function – If the unit has a delay function activated, pressing the switch may not immediately turn the lights on.
5. Electrical Issue – A wiring problem or loose connection inside the unit could be preventing the switch from functioning.
Check these potential issues to determine the cause of the malfunction.
This answer is automatically generated