Table of Contents
Advertisement
smartPRINTER Operating Instructions
Contents
1.
General Information ......................................................................................................................... 3
1.1
Information about These Instructions ...................................................................................... 3
2.
Guidelines, Standards and Approvals ............................................................................................. 4
2.1
Declaration of Conformity ........................................................................................................ 4
3.
Liability/Warranty ............................................................................................................................. 5
3.1
Liability .................................................................................................................................... 5
3.2
Warranty .................................................................................................................................. 5
3.3
Product Monitoring .................................................................................................................. 5
3.4
Language of the Instructions ................................................................................................... 5
3.5
Copyright ................................................................................................................................. 5
4.
Use/Operating Personnel ................................................................................................................ 6
4.1
Intended Use ........................................................................................................................... 6
4.2
Who Is Permitted to Operate This Printer? ............................................................................. 6
5.
Safety Information ............................................................................................................................ 7
5.1
Safety Markings....................................................................................................................... 7
5.2
Symbols and Information on the Type Plate ........................................................................... 8
Type plate information ..................................................................................................................... 8
5.3
Safety Information ................................................................................................................... 9
5.4
Special Safety Information ...................................................................................................... 9
6.
Product Information ........................................................................................................................ 10
6.1
Function ................................................................................................................................. 10
6.2
Printer Description ................................................................................................................. 10
Printer Description - Housing/Control Panel/Interfaces .................................................... 10
6.2.1
Printer Description - Part Names, Interior View ................................................................ 11
6.2.2
6.3
Technical Data ...................................................................................................................... 13
6.4
Print Media ............................................................................................................................ 15
6.4.1
Basic Requirements of the Ink Ribbon .............................................................................. 15
6.4.1
Ink Ribbon Storage ............................................................................................................ 15
6.4.2
Preparing the Ink Ribbon ................................................................................................... 15
6.4.3
Inserting the Ink Ribbon ..................................................................................................... 16
6.5
Print Materials ....................................................................................................................... 17
6.5.1
Label Roll Storage ............................................................................................................. 17
6.5.2
Storage of Markers/WMB Inline......................................................................................... 17
6.5.3
Storage of Marking Strips .................................................................................................. 17
6.5.4
Processing Label Rolls ...................................................................................................... 18
6.5.5
Processing Markers/WMB Inline ....................................................................................... 18
6.5.6
Processing Marking Strips ................................................................................................. 18
smartPRINTER Operating Instructions 003/10.2017
1
Advertisement
Table of Contents

Subscribe to Our Youtube Channel
Related Manuals for WAGO smartPRINTER


Summary of Contents for WAGO smartPRINTER
-
Page 1: Table Of Contents
Label Roll Storage ......................17 6.5.2 Storage of Markers/WMB Inline..................17 6.5.3 Storage of Marking Strips ....................17 6.5.4 Processing Label Rolls ...................... 18 6.5.5 Processing Markers/WMB Inline ..................18 6.5.6 Processing Marking Strips ....................18 smartPRINTER Operating Instructions 003/10.2017... - Page 2 Type plate information ........................33 Technical data ..........................33 Hard- und Software requirements ....................34 Connection to the printer ....................... 34 WAGO Printer Settings - Activate the cutter .................. 35 Approved print material to be cut ....................35 Commissioning and Installation .................... 36 7.3.1 Stand-alone Operation of the Printer .................
-
Page 3: General Information
Operating Instructions General Information Information about These Instructions These instructions are only valid for the smartPRINTER described. These instructions will support you in • avoiding hazards, • preventing downtimes and • ensuring or increasing the service life of this product. -
Page 4: Guidelines, Standards And Approvals
EN 55024: 2010 LVD Standard: EN 60950-1: 2006 /A11:2009 /A1:2010 /A12:2011 /A2:2013 The requirements for CE marking are met. This declaration loses its validity if the machine or purpose of use changes without coordination with WAGO. smartPRINTER Operating Instructions 003/10.2017... -
Page 5: Liability/Warranty
Operating Instructions Liability/Warranty Liability WAGO GmbH & Co. KG accepts no liability in the event of structural modifications by third parties. The manufacturer’s declaration becomes invalid. Only original parts may be used for repairs and maintenance. WAGO GmbH & Co. KG accepts no liability for replacement parts not tested and approved by WAGO GmbH &... -
Page 6: Use/Operating Personnel
Who Is Permitted to Operate This Printer? Anyone who has read and understood these instructions is permitted to operate the printer. The printer must not be operated by children or by frail or infirm persons without supervision. smartPRINTER Operating Instructions 003/10.2017... -
Page 7: Safety Information
Failure to pay attention to them can lead to personal injury or faults in this printer or the environment. Warning against dangerous location Warning against high voltage Warning against hot surface Do not touch! Warning against hand injuries smartPRINTER Operating Instructions 003/10.2017... -
Page 8: Symbols And Information On The Type Plate
In some EU countries such as Germany, this symbol is not required for devices only used commercially (B2B devices), but WAGO uses it uniformly throughout Europe. This symbol means that the device must not be disposed of at public collection sites. -
Page 9: Safety Information
In such cases it is up to the user to take all appropriate measures to prevent/eliminate this interference. Improper use and failure to follow these application notes will render the warranty or guarantee null and void. smartPRINTER Operating Instructions 003/10.2017... -
Page 10: Product Information
Operating lever to open the printer housing Back view Detail View from below Connections/interfaces USB host Ethernet port Print material feed-through Serial interface USB port Cover for module Connection socket Auto-calibration button connections for power supply smartPRINTER Operating Instructions 003/10.2017... -
Page 11: Printer Description - Part Names, Interior View
Label roller holder Latch Latch for locking the label roller holder Housing cover Printing mechanism Printer top lock button Media guide Illustration without hold-down Front panel Roller assembly Label sensor assembly Roller Locking Label sensor Guide smartPRINTER Operating Instructions 003/10.2017... - Page 12 Operating Instructions Printing mechanism Ink ribbon rewinder Rotating wheel, green, Ø 40 mm Ø 40 mm Cardboard core holder Ink ribbon unwinder Print head Ink ribbon spool holder Rotating wheel, white, Ø 30 mm Ø 30 mm smartPRINTER Operating Instructions 003/10.2017...
-
Page 13: Technical Data
90°, 180°, 270° rotatable Bitmap fonts individual characters rotatable by 90°, 180°, 270° Loadable fonts 90°, 180°, 270° rotatable Asian fonts horizontally and vertically scalable by a factor of eight Scalable fonts 90°, 180°, 270° rotatable smartPRINTER Operating Instructions 003/10.2017... - Page 14 BMP and PCX can be stored directly in the printer. Color TFT LCD Control panel Directional pad On/off button Real-time clock Standard External unwinder for printer materials on roll Accessories maximum roll diameter: 250 mm Cutting unit for automatic cutting of print materials with in-feed smartPRINTER Operating Instructions 003/10.2017...
-
Page 15: Print Media
Print Media 6.4.1 Basic Requirements of the Ink Ribbon Only use ink ribbons from the WAGO product portfolio. Only these products have been comprehensively tested and optimized for use with print materials, the smartPRINTER and the printing software. Ink ribbon product information: 258-5005... -
Page 16: Inserting The Ink Ribbon
The paper core for rewinding the ink ribbon is now correctly inserted. Turn the green rotating wheel in the direction of the arrow until the black ink ribbon is wound one full turn onto the cardboard core. Abb. EF5 Abb. EF3 Abb. EF4 smartPRINTER Operating Instructions 003/10.2017... -
Page 17: Print Materials
They contain product-specific software and hardware settings. You can find the handling instructions at: www.wago.com/smartprinter Only use print materials from the WAGO product portfolio. Only these products have been comprehensively tested and optimized for use with the smartPRINTER and the printing software. -
Page 18: Processing Label Rolls
Remove the outer layer of the marking strips when accessing broken print material or print material without outer packaging. Removing the outer layer prevents contamination from being deposited on the print head and the roller. smartPRINTER Operating Instructions 003/10.2017... -
Page 19: Inserting Label Rolls
The following information will help you use you smartPRINTER safely. The details of the graphical illustrations may differ from those of the current model. Open the smartPRINTER. Tilt the top of the printer (print mechanism and housing cover) up until it locks firmly in place. - Page 20 8. The label roll must not rest on the printer housing. The side of the print media that is to be printed on must face upwards. Close the smartPRINTER. Hold the lock button down. Guide the printer top onto the printer bottom. Press the top until the housing parts lock audibly, which is signaled by a click.
-
Page 21: Using Markers/Wmb Inline
If the printer and print material in the external unwinder are not aligned with each other, this leads to errors in the transport of the print material and the printed image. Open the smartPRINTER. Tilt the top of the printer (print mechanism and housing cover) up until it locks firmly in place. ... -
Page 22: Calibrate Print Materials
The program file GoDoctor.exe can be found in the smartSCRIPT installation directory on your PC / laptop. C:/Programme(86)/Wago/smartScript/… Auto-calibration button You can start the calibration process (measure print material) on your smartPRINTER with the auto calibration button. Press and hold the Auto-calibration button for 1 second. The printer automatically detects the print material. -
Page 23: 6.5.10 Selection Matrix - Find The Right Information On Handling Print Material
● 210-810 ● 210-811 ● 210-811/000-002 ● 210-812 ● 210-813 ● 210-831 ● 210-832 ● 210-833 ● 210-834 ● 210-847 ● 210-848 ● 210-850 ● 210-852 ● 210-854 ● 210-855 ● 210-856 ● 210-858 ● 210-860 smartPRINTER Operating Instructions 003/10.2017... - Page 24 ● 211-503/000-002 ● 211-504 ● 211-504/000-002 ● 211-505 ● 211-505/000-002 ● 211-506 ● 211-506/000-002 ● 211-811 ● 211-821 ● 211-835 ● 211-836 ● 211-836/000-002 ● 211-855 ● 211-856 ● 211-857 ● 211-861 ● 211-862 ● 211-863 smartPRINTER Operating Instructions 003/10.2017...
- Page 25 Operating Instructions ● 709-178 ● 2009-113 ● 2009-114 ● 2009-115 ● 2009-145 ● 2009-515 ● 2009-615 You can find the handling information online at: www.wago.com/smartprinter smartPRINTER Operating Instructions 003/10.2017...
-
Page 26: Stages Of Service Life
Operating Instructions Stages of Service Life Transport and Storage If the smartPRINTER is not commissioned after it is received and visually inspected, repackage it in the original packaging. Protect the printer against impacts, contamination and moisture during storage. Before commissioning, give the device time to adapt to the temperature and humidity conditions. -
Page 27: The Right Roller For The Print Medium
Description Color of the rubber coating: dark green Surface of the rubber coating: with grooves in the middle Seriess Item Number Print Medium Designation 2009-113 WMB Inline markers 2009-114 WMB Inline markers 2009-115 WMB Inline markers smartPRINTER Operating Instructions 003/10.2017... - Page 28 Table 5010: List of the Print Media for Roller 258-5010 Product Picture for Roller 258-5010 Description Color of the rubber coating: red Surface of the rubber coating: with grooves in the middle Seriess Item Number Print Medium Designation 2009-615 WMB Inline for Weidmüller terminal blocks smartPRINTER Operating Instructions 003/10.2017...
-
Page 29: Installing And Removing The Roller
The roller also must be removed for cleaning. Removing the roller: Open the smartPRINTER. Tilt the top of the printer (print mechanism and housing cover) up until it locks firmly in place. Remove any print material from the work area. - Page 30 Insert the front panel. Close the smartPRINTER. Hold the lock button down. Guide the printer top onto the printer bottom. Press the top until the housing parts lock audibly, which is signaled by a click. smartPRINTER Operating Instructions 003/10.2017...
-
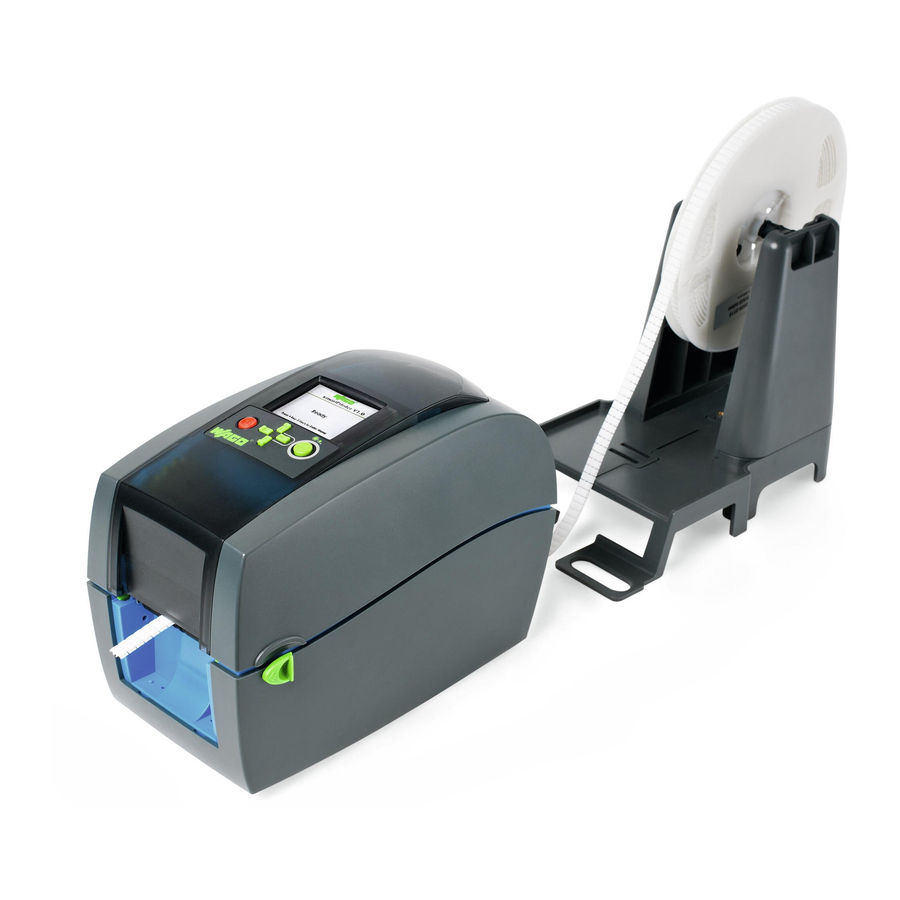
Page 31: External Unwinder
External Unwinder The external unwinder is used for suspension and uniform supply of continuous printing materials from the roll to the smartPRINTER. The unwinder is enclosed with your printer and is to be assembled as described in these instructions. Application note Fig. EA1 contains instructions for installing a print material roll. - Page 32 The external unwinder is set up behind the smartPRINTER. The external unwinder is set up on the same level as the smartPRINTER. Important: The external unwinder with the print material on the roll is positioned to allow the print material and material that runs through the printer in an imaginary line.
-
Page 33: Cutter
The cutter was developed to cut WAGO print material. The cutter is a smartPRINTER accessory and is for use with this material only. The following information will support you in operating the cutter. Only use print material approved to cut by WAGO. -
Page 34: Hard- Und Software Requirements
Deinstall existing smartSCRIPT software before carrying out a new installation. Connection to the printer Open the smartPRINTER. Fold out the of the printer (print mechanism and enclosure cover) until it locks firmly in place. Remove the front panel of the printer. -
Page 35: Wago Printer Settings - Activate The Cutter
Printer and installed cutter. Guide the print material through the cutter. Close the printer. Fig. C3 WAGO Printer Settings - Activate the cutter The use of the cutter is transferred to the smartPRINTER via the Software WAGO Printer-Settings. Start the WAGO Printer Settings: Select directory ❶. Select print material ❷. -
Page 36: Commissioning And Installation
7.3.3 Single-user Installation via USB Connect the smartPRINTER to your computer with the USB cable and to the mains power using the power cable. Switch the smartPRINTER on. Press the ON/OFF button to switch the printer on. Launch the installation software on your computer. - Page 37 Follow the instructions given in the driver installation program (Seagull Driver Wizard): Step 1: Select [Install printer driver] and Step 2: Select printer model click [Next >]. WAGO-smartPRINTER on the USB port and click [Next >] (Check the connection to the printer if the device is not displayed under “Connection.”...
-
Page 38: Network Installation Without Use Of Dhcp Server
7.3.4 Network Installation without Use of DHCP Server Connect the smartPRINTER to your server or router with the LAN cable and to the mains power using the power cable. Automatic address assignment on the network via DHCP is switched on (active) in the printer default settings. - Page 39 Press the right-hand button on the directional pad and navigate to [Standard Gateway]. [Standard Gateway]: Enter the address of the standard gateway. Press the right-hand button on the directional pad and navigate to [Static IP Address]. smartPRINTER Operating Instructions 003/10.2017...
- Page 40 Press the Enter button. All entries are saved. This concludes the settings necessary to set up the printer on a network without using a DHCP server. Switch the smartPRINTER on. Launch the installation software. Select “Install driver” from the installation menu.
-
Page 41: Network Installation With Use Of Dhcp Server
7.3.5 Network Installation with Use of DHCP Server Connect the smartPRINTER to your server or router with the LAN cable and to the mains power using the power cable. Automatic address assignment on the network via DHCP is switched on (active) in the printer default settings. - Page 42 Press the right-hand button on the directional pad and navigate to [Subnet Mask]. [Subnet Mask]: The assigned address is displayed. This address cannot be changed via the menu. Press the Enter button to exit the menu item. Switch the smartPRINTER on. Launch the installation software. Select “Install driver” from the installation menu.
-
Page 43: Installing The Wago Printer Settings
Operating Instructions 7.3.6 Installing the WAGO Printer Settings The WAGO Printer Settings software must be used prior to commissioning and each time the print material is changed. This sets the printer up for WAGO marking accessories. Select “Install Printer Settings” from the installation menu. -
Page 44: Cleaning And Maintenance By The User
Switch the printer off. Open the housing cover. Remove contamination from the label sensor. Cleaning interval: Visual inspection each time after the print material is changed If the printed image suffers smartPRINTER Operating Instructions 003/10.2017... -
Page 45: Cleaning The Print Head
Remove the ink ribbon from printer. Remove the contamination from the print head with a soft, lint-free cloth soaked in IPA. Cleaning interval: Each time after the ink ribbon is changed (printing medium) If the printed image suffers smartPRINTER Operating Instructions 003/10.2017... -
Page 46: Faq - Fault Description & Troubleshooting
Check the installed ribbon. Install the incorrectly. ribbon with the matte side out. No print media has been selected Select the print media in the WAGO- in the WAGO-Printer-Settings. Printer-Settings. The installed print cylinder does Install the right print cylinder for the print not fit the print media used. -
Page 47: Support And Repair
Return and Disposal WAGO offers you the option of returning the printer in line with our legal obligations at the end of the printer’s service life. If the printer is not returned to the manufacturer, it must be disposed of in accordance with the valid guidelines and regulations.
Need help?
Do you have a question about the smartPRINTER and is the answer not in the manual?
Questions and answers