Table of Contents
Advertisement
Quick Links
Advertisement
Table of Contents

Related Manuals for Akces-Med Racer


Summary of Contents for Akces-Med Racer
- Page 1 RACER ™ USER MANUAL...
- Page 2 5 903240 632312 CAUTION! Manufacturer takes responsibility for proper usage of the device only when the product was purchased from qualified Akces-Med employee or at specialized medical store! CAUTION! AKCES-MED Ltd. reserve the right to introduce technical and trading changes in the content of the instruction without warning.
-
Page 3: Table Of Contents
RACER CONTENTS The purpose of user manual....................6 2. Indications for use........................6 3. General characteristics of stroller..................7 3.1. Standard equipment....................7 3.2. Additional equipment....................8 4. Size table..........................12 5. Description how to assemble stroller................13 6. Detailed description how to operate stroller..............13 6.1 How to unfold stroller.....................13 6.2 How to fold stroller..................15... - Page 4 RACER 7.7 RCR_107 Pelvic belt....................25 7.8 RCR_121 Head-neck support...................26 7.9 RCR_410 Headrest cotton cover ................26 7.10 RCR_411 Cup holder....................26 7.11 RCR_412 Elastico cushion seat................27 7.12 RCR_417 Winter footmuff..................28 7.13 RCR_418 Hood for winter footmuff..............29 7.14 RCR_004 Low head supporting pannels..............30 7.15 RCR_005 High head supporting pannels...............30...
- Page 5 RACER INTRODUCTION RACER™ stroller was created with the aim to help patients with illnesses which make independent sitting and standing difficult or impossible. (It refers to triplegia, paresis and serious paraplegia) Taking sitting position by a child who is disabled from birth is highly important stage of complex rehabilitation process.
-
Page 6: The Purpose Of User Manual
The present user manual contains basic information which is essential for proper usage, preparation, maintenance, cleaning and guarantee conditions regarding RACER™ stroller. User manual should be kept in easily accessible place. It is designed for people who look after disabled children, and for both doctors as well as physiotherapists who operate the device. -
Page 7: General Characteristics Of Stroller
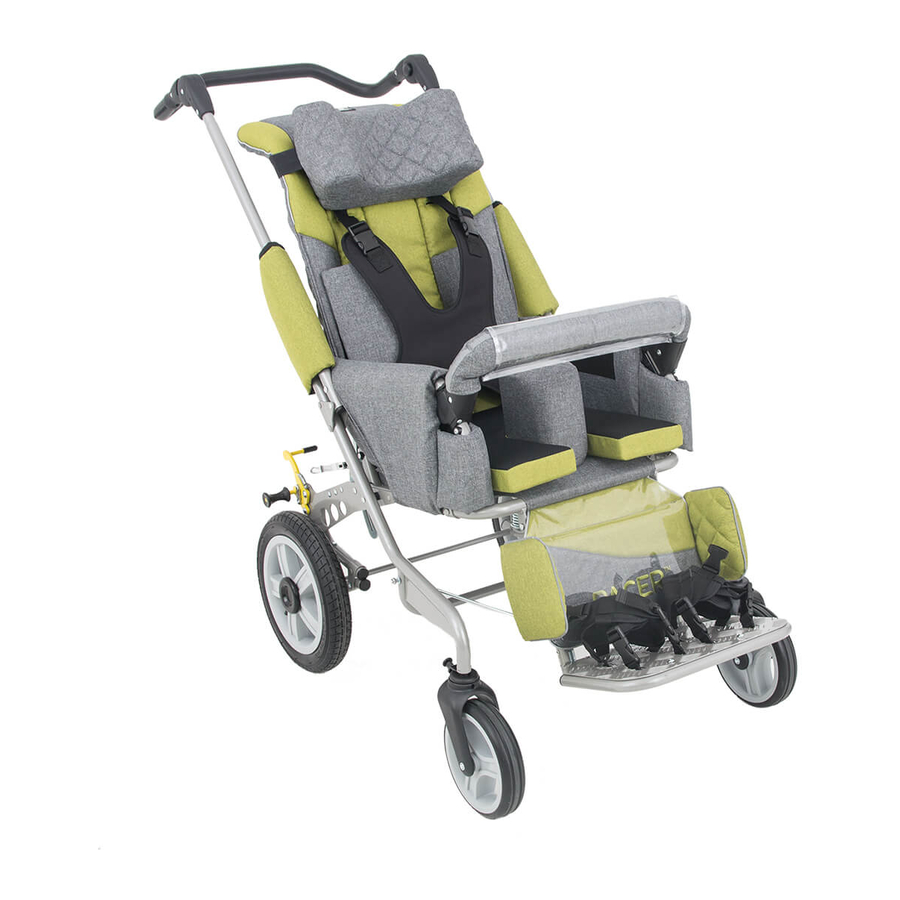
RACER GENERAL CHARACTERISTICS OF STROLLER 3.1 Standard equipment 1.Adjustable and ergonomically 11. Clip for backrest angle adjustment shaped handle 12. Folding mechanism 2. Backrest 13. Frame 3. Seat pillow 14. Cover for folding mechanism 4. Head rest 15. Calf side supporting pannels 5. -
Page 8: 3.2. Additional Equipment
RACER 3.2. Additional equipment RCR_001 RCR_002 RCR_003 LED Lights (2 pcs.) Aid for moving patients AM-P Soft cover for tray RCR_004 RCR_006 RCR_005 Low head supporting High head supporting Folding canopy with side pannels pannels covers RCR_107 RCR_101 RCR_013 Thigh abduction belts... - Page 9 RACER RCR_134 RCR_137 RCR_309 Narrowing pads 6 cm Narrowing pads10 cm Seat cushion Bodymap A RCR_313 RCR_321 RCR_310 RCR_314 RCR_322 Headrest Cover Frotte Back cushion Bodymap B Bodymap D RCR_311 RCR_311 RCR_402 RCR_315 RCR_315 RCR_323 Cover VisMemo Aerating-massaging pad Sun umbrella...
- Page 10 RACER RCR_411 RCR_412 RCR_413 Cup holder Elastico cusion seat Elastico cusion backrest RCR_414 RCR_415 RCR_416 ® Tray Plexiglas Summer footmuff Cover for wheel (4 pcs) RCR_417 RCR_418 RCR_420 Folding canopy with side covers Winter footmuff Hood for winter footmuff RCR_501...
- Page 11 RACER RCR_509 RCR_701 RCR_702 Organizer Rear inflatable wheel Rear inflatable tire RCR_703 RCR_704 RCR_700 Rear innertube Rear PU wheel Waterproof upholstery RCR_720 Breathable upholstery www.akces-med.com +48 17 864 04 77 export@akces-med.com...
-
Page 12: Size Table
RACER SIZE TABLE Size 1 Size 3 Symbol Measurement Size 2 Unit [cm] Seat width Seat depth [cm] Seat depth to the abduction block [cm] 15-18 23-26 28-32 Backrest height [cm] 50-63 60-72 66-81 Backrest width [cm] Footrests length [cm]... -
Page 13: Description How To Assemble Stroller
RACER DESCRIPTION HOW TO ASSEMBLE STROLLER Remember that stroller needs to be assembled. Manufacturer cannot assemble this stroller due to transportation issues. We will give you stroller which needs to be mounted. In order to use the stroller please follow these steps:... - Page 14 RACER STEP 2. Pull handle (1) backwards until elements of folding mechanism are slammed (12) (fig.3). It is highly important to make sure that safety rail (13) is lifted before folding mechanism is slammed. Next, move safety rail down (fig.4) once folding mechanism is slammed.
-
Page 15: 6.2. How To Fold Stroller
RACER 6.2. How to fold stroller Please follow these steps so as to fold the stroller: STEP 1. Dismantle safety rail (7) by releasing buttons that are situated on both sides of rail. Next, pull out rail from stroller frame (fig.6);... -
Page 16: Adjustment Of Footrest's Length
RACER STEP 4. Release clip from backrest's tilt angle (11) (fig.10) and push backrest (2) as forwards as possible (fig.11) fig.10 fig.11 6.3. The adjustment of footplate length (9) Please follow these steps so as to adjust footplate length: STEP 1. Remove quick couplings situated on both sides of footplate (fig.12);... -
Page 17: Adjustment Of Backrest's Tilt Angle
RACER 6.4. The adjustment of tilt angle Please follow these steps so as to adjust backrest's tilt angle: STEP 1. Loosen clip from the adjustment for backrest tilt angle (fig.14); STEP 2. Hold backrest and adjust it at your discretion;... -
Page 18: Vest
RACER fig.18 fig.19 6.8. Vest (5) Connect clamps from vest with clamps from adjustable belts that are fastened both at the bottom and top of backrest (4 pcs.) (fig.20). Next, adjust vest to patient's body with the aid of belts. -
Page 19: Side Pelottes
6.11. Wheel (19) (20) RACER stroller is equipped with pumped wheels. We can deliver back PU wheels if necessary. It is possible to dismantle back wheels for transportation. In order to do that it is essential to unscrew nuts (17) and take out wheels from axle . -
Page 20: Hand Brake
RACER CAUTION! Remember to comply with the guidelines concerning air pressure. If air pressure is not proper, it results in damages or even accident. CAUTION! Do not lubricate the wheel bearings. 6.12. Hand brake (10) Stroller is equipped with two independent brakes for rear wheels Press brake's lever (fig.25) so as to block... -
Page 21: Adjustable Handle
RACER 6.14. Adjustable handle (1) Handle can regulated by pressing the buttons situated on both sides of handle (fig.27). Release these buttons so as to block handle at chosen height. fig.27 6.15. Covers for folding mechanism (14) Covers should be fastened with the aid of zipper situated on stroller frame. -
Page 22: Assembly Of Additional Equipment
RACER ASSEMBLY OF ADDITIONAL EQUIPMENT 7.1. Thigh abduction belts RCR_101 Follow these steps in order to mount thigh abduction belts: STEP 1. Place belts on seat and insert fastening belts into hole which is situated on the corner of seat (fig.31). -
Page 23: Rcr_402 Sun Umbrella
RACER 7.2. Sun umbrella RCR_402 In order to mount sunshade it is necessary to loosen clip and place it on handle's frame (fig.35). Next, adjust its position at your discretion and unscrew knob (fig.36). If handle pannels are applied, it is possible to fasten sunshade in any place on stroller's frame. -
Page 24: Rcr_405 Canopy
RACER 7.4. Canopy RCR_405 In order to mount canopy it is necessary STEP 1. Press catches which are situated on both sides of canopy and then place canopy's catches on stroller's side frame (fig.39); fot.35 fig.39 STEP 2. Unfold canopy (fig.40);... -
Page 25: Rcr_501 Bag
RACER Back side of cover should be fastened to the back of canopy. Next, fasten back side of cover to the side of cover (fig.44, fig.45). fig.45 fig.44 fot.35 fot.35 7.6. RCR_501 RCR_501 Bag is out on stroller's handle with the aid of tapes with clasps (fot.46). -
Page 26: Rcr_121 Head-Neck Support
RACER 7.8. Head-neck RCR_121 support The headrest (fig.49) is mounted on the backrest by use of Velcro straps. The straps should be fastened behind the backrest at the desired height. 7.9. Cover for RCR_410 fig.49 fot.35 headrest Cover is made of cotton and it should be put on headrest (fig.51). -
Page 27: Rcr_412 Elastico Cushion Seat
RACER fig.53 fig.52 fot.35 fot.35 fig.55 fig.54 fot.35 fot.35 Cup holder is perfect for small and handy bottles with water (fig.56). fig.56 fot.35 7.11. Elastico cusion RCR_412 seat, ELASTICO anti bed sore cushion is made of thermo-active foam. Moreover, it is placed in cover which is made of airy material, namely ACTIV Space. -
Page 28: Rcr_417 Winter Footmuff
RACER Winter footmuff 7.12 RCR_417 In order to mount winter footmuff it is necessary to: STEP 1. Place winter footmuff on lower part of footrest plate and the fasten it with the aid of Velcro tapes (fig.58,59). fig.58 fot.35 fig.59 fot.35... -
Page 29: Rcr_418 Hood For Winter Footmuff
RACER STEP 4. Footmuff is equipped with fasteners with Velcro tapes. These Velcro tapes should be fastened on stroller's frame in a place that is created for rail. (fig.63) fot.35 fig.63 STEP 5. Upper part of footmuff should be secured by means of fastener (fig.65) -
Page 30: Rcr_004 Low Head Supporting Pannels
RACER 7.14 Low side cover RCR_004 for head In order to put low side cover for head on stroller it is necessary to place it on frame so as that middle part of cover is situated behind backrest and its endings with Velcro tapes cover side frame (fig.70). -
Page 31: Rcr_420 Canopy With Side Covers
RACER 7.17 Canopy with side covers RCR_420 In order to mount canopy with side covers it is necessary to follow these steps: STEP 1. Place its catches on side frame and then press them (fig.72); STEP 2.Unfold canopy and simultaneously block stretchers which are situated on both sides of canopy (fig.73);... -
Page 32: Rcr_126 Trunk Belt
RACER 7.18 Trunk belt RCR_126 Trunk belt (fig.76) is assembled with the aid of Velcro tapes situated behind stroller (fig.77, 78). Trunk belt can be used only when patient is wearing vest! fig.78 fot.35 fig.80 fig.79 fot.35 fot.35 Narrowing pads 10 cm 7.19... -
Page 33: Rcr_134 Narrowing Pads (Set) 6 Cm
RACER 7.20 Narrowing pads 6 cm RCR_134 Narrowing pads 6 cm (fig. 83) are really beneficial because they make it possible to adjust the width of seat to patient's measurements. Use Velcro tapes situated on stroller's upholstery so as to assemble them on seat (fig. 84). -
Page 34: Rcr_415 Calf Belt With Side Supports
RACER 7.22 Calf belt RCR_115 Calf belt is assembled on footplate Please follow these steps so as to assemble belt: fig.87 fot.35 STEP 1. Remove side calf covers which are added to stroller's standard equipment and lay calf belt covers there. Make sure that wider part of cover is placed towards the inside of stroller (fig. -
Page 35: Rcr_114 H Harness
RACER STEP 3. Fasten belt with the aid of Velcro tapes: thread belt through one of two fasteners from calf belt (fig.94). You can choose either first (fig.92) or second fastener (fig.93) - it depends which adjustment is the most comfortable. -
Page 36: Rcr_125 6 Points Harness
RACER 7.24 6 points harness, RCR_125 In order to mount 6 points vest it is necessary to: STEP 1. 6 points vest should be put on and then it is important to fasten zipper and buckle at the front of vest (fig.98- 101);... -
Page 37: Rcr_503 Lady,S Bag, Rcr_504 Bag Delux, Rcr_502 Men's Bag
RACER fig.104 fig.105 fot.35 fot.35 7.25 Torba damska RCR_503 Torba męska RCR_504 RCR_502 Torba DeLux Bags are very capacious and have a lot of useful pockets. There is possibility to attach them to the stroller or worn them on the arm thanks to the long adjustable belt. -
Page 38: Rcr_507 Oxygen Tank Holder
RACER 7.26 Oxygen tank holder RCR_507 In order to mount oxygen tank holder it is necessary to: STEP 1. Take out two belts from buckles that are situated at cover. STEP 2. Take out adjuster no.2 and buckle from belt. It is important to leave adjuster no.1 on the belt (fig 109,110) - Page 39 RACER STEP 5. Put buckle on belt and thread belt through buckle as it is presented in the picture below (fig.113, 114). The end of belt should be inserted into adjuster no. fig.114 fot.35 fig.113 fot.35 STEP 6. Second belt should be fastened on stroller's side frame as it is described in stages 2-5.
-
Page 40: Rcr_408 Rain Cover
RACER 7.27 Rain cover RCR_408 Rain cover can be put on stroller only if canopy is mounted (it concerns folding canopy with covers RCR_404, Foldin canopy RCR_405 or Folding canopy with side covers RCR_420). Follow these steps so as to mount rain cover: STEP 1. -
Page 41: Rcr_006 Side Pannels
RACER 7.28 Side pannels RCR_006 Please follow these steps so as to mount side pannels on the stroller: STEP 1. Fix pannels to stroller's frame in appropriate places. Pannels should be fixed on stroller's frame in three places (fig.122): 1) in upper part of the stroller, next to... -
Page 42: Rcr_413
RACER 7.29 Elastico backrest cushion RCR_413 In order to attach the Elastico backrest cushion to the stroller backrest it is necessary to follow these steps: STEP 1. Detach the standard 4 point vest. STEP 2. Attach the cushion to the backrest by use of Velcro straps. -
Page 43: The Use Of Stroller
Remember to use the product only with someone who is trained and knowledgeable. Do not forget to prepare both product as well as patient before using RACER™ stroller! 8.1. Preparation of the patient Before using the product, it is essential to make sure that: ·... -
Page 44: 8.2. How To Use Stroller
RACER 8.2. How to use stroller 1. Before use it is necessary to: · Unfold the device; · Place the device on even ground; · Make sure that all parts are serviceable, correctly mounted and stable; · Block brakes; ·... -
Page 45: Safety Rules
RACER SAFETY RULES CAUTION! stroller has to be used in RACER™ compliance with guidelines in this user manual. It is highly important to consult either doctor or physiotherapist in order to make right decision concerning the choice of stroller and its size. It is also essential to familiarize with the guidelines described in user manual before using the device. - Page 46 RACER 2. It is forbidden to use stroller for different purposes that it is intended to. 3. It is forbidden to use stroller when it is damaged or any part is missing. 4. It is forbidden to leave the patient unattended.
- Page 47 The weight of user should not be bigger than maximal weight described on page 12 where you will find information regarding this issue. 1) AKCES-MED Sp. z. o. o sells products free from manufacturing defects or faults. 2) Manufacturer gives the purchaser 24-month guarantee from the date of purchase.
-
Page 48: Maintenance And Cleaning
4. It is forbidden to clean upholstery with strong chemical agents such as solvent or caustic chemicals. CAUTION! Akces-MED. Sp z o. o takes no responsibility for damages caused by use of wrong clearing agent. 5. It is forbidden to soak upholstery during cleaning. Remember that upholstery has to be always dry before using. - Page 49 RACER CAUTION! Remember that upholstery has to be always dry before using! Before using it is necessary to: · clean wheels; · check if base as well as wheels are correctly mounted; check if brake stops turning wheel · make sure that all wooden parts e.g. tray don't have splinters ·...
-
Page 50: Stroller's Marking
RACER STROLLER’S MARKING The example of nameplate The example of sticker with serial number www.akces-med.com +48 17 864 04 77 export@akces-med.com... - Page 52 ORTHOPAEDIC DEVICES MANUFACTURER Akces-MED Sp. z o.o. Jasionka 955B 36-002 Jasionka tel. (17) 864 04 77 www.akces-med.com e-mail: export@akces-med.com Authorised Dealer Date of issue: 25.11.2013 The last update: 24.02.2017...
Need help?
Do you have a question about the Racer and is the answer not in the manual?
Questions and answers