Table of Contents
Advertisement
Quick Links
Advertisement
Table of Contents

Related Manuals for Yaesu VXA-200


Summary of Contents for Yaesu VXA-200
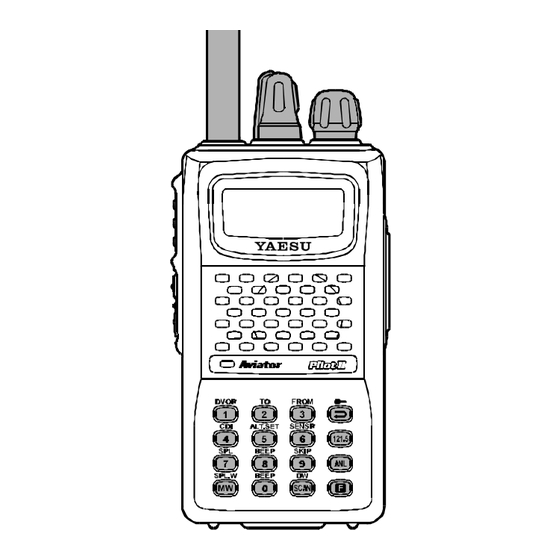
- Page 1 Operating Manual...
-
Page 2: Table Of Contents
ONTENTS Important Notice! ..........1 Transmission ............16 Introduction ............2 Reception of Weather Channel Broadcasts .... 16 Controls & Connectors ........3 Monitor Key............. 18 Top Panel ..............3 ANL (Automatic Noise Limiter) Feature ....18 LCD Display ...............4 LOCK Function ............19 Front Panel ..............5 Beep On/Off ............. -
Page 3: Important Notice
The radio is transmitting when the red LED on the top of the radio is illuminated. Y ou can cause the radio to transmit by pressing the P-T-T button. ¦ Always use Vertex Standard authorized accessories. VXA-200 A II O VIATOR... -
Page 4: Introduction
We recommend that you read this manual in its entirety, so as to understand the many features of the VXA-200 completely. Keep this manual handy, so you may use it for reference. -
Page 5: Controls & Connectors
Ω impedance on the Aircraft Communication Band. ② POWER/VOLUME Knob Turn this control clockwise to turn the radio on and to increase the volume. Counterclockwise ro- tation into the click-stop will turn the radio off. VXA-200 A II O VIATOR ILOT PERATING ANUAL... - Page 6 (activated by pressing the [ F ] key first, then the indicated key). These functions are described in detail on page 5. ⑨ Battery Pack Latch Open this latch for battery removal. VXA-200 A II O VIATOR ILOT PERATING ANUAL...
-
Page 7: Lcd Display
VOR operation. See a course from the a course to the VOR page 30. VOR station. See station. See page page 25. VXA-200 A II O VIATOR ILOT PERATING ANUAL... -
Page 8: Keypad
( Press Primary Function Memory “Write” Frequency Entry Activates “Secondary” Activates Scanning ( Press Key ) Command Digit 0 Key mode Secondary Function Split-Memory “Write” None Activates Dual Watch None Command ( Press VXA-200 A II O VIATOR ILOT PERATING ANUAL... -
Page 9: Left Side
2 seconds to activate the back- lighting lamp continuously. To turn the lamp off, press this switch again. The LAMP switch may be configured in several ways via the Menu; see page 28 for details. VXA-200 A II O VIATOR ILOT PERATING... -
Page 10: Right Side
5B External DC Cable here. Do not connect any wire to this jack if that wire is connected di- rectly to a 28-Volt DC source. Connecting the VXA-200 directly to a source which exceeds 15.0 Volts DC will result in damage to the unit. VXA-200 A... - Page 11 Belt Clip. r Although the VXA-200 is designed to be water Do not attempt to open any of the recharge- resistant, the enclosure is not “waterproof.” Do able Ni-Cd packs, as personal injury or dam-...
-
Page 12: Battery Charging
Ni-Cd battery pack and significantly shorten its useful life. r If using a charger other than the NC-77, or if using a battery pack other than the FNB-64, fol- low the appropriate instructions provided with VXA-200/NC-77 VXA-200 A II O VIATOR ILOT PERATING ANUAL... -
Page 13: Low Battery Indication
When the bat- The optional FBA-25 Battery Case allows opera- tery voltage reaches 6.0 Volts, the “ x ” icon tion of the VXA-200 using six “AA” size Alkaline will blink on the LCD display, indicating that batteries. -
Page 14: Operation
¦ If you have an optional Speaker/Microphone or headset, we recommend that it not be connected r After three “initial- until you are familiar with the basic operation of the VXA-200. ization” beeps are heard, a channel fre- quency should ap- pear on the display. - Page 15 Press [ F ] once more to resume normal channel seconds, to illumi- selection in 25-kHz steps. nate the display con- tinuously. To disable the illumination, press the LAMP but- ton momentarily. VXA-200 A II O VIATOR ILOT PERATING ANUAL...
-
Page 16: Accessing The 121.5 Mhz Emergency Frequency
PERATION r To turn the radio off, Accessing the 121.5 MHz Emergency Frequency turn the VOLUME The VXA-200 can quickly access the 121.500 MHz knob fully counter- Emergency Frequency. This function can be activated clockwise into the even when the keypad lock function is in use. -
Page 17: Tuning Methods
¦ MR (Memory Recall) the factory as appropriate The MR (Memory Re- for your country, and the VXA-200 will auto- call) mode of the VXA- matically scan this special bank when it is se- 200 provides the user lected by the user. -
Page 18: Transmission
Weather Channel mode. In the Weather Channel mode, “ " WX" ” will appear on the display. r The VXA-200 will now scan quickly through the ten standard Weather Channels, and will stop on the first active station found. r If there are two or... - Page 19 To confirm the cur- rent Weather Chan- nel frequency, press the [ )] key momentarily. The display changes to frequency indication. Press the [ )] key again to return to nor- mal display. VXA-200 A II O VIATOR ILOT PERATING ANUAL...
-
Page 20: Monitor Key
“ANL” icon will disappear from the dis- signals. play. To return to normal operation, press the MONITOR key momentarily. VXA-200 A II O VIATOR ILOT PERATING ANUAL... -
Page 21: Lock Function
)] again. If the temperature display is incorrectly, correcting r You can still access the 121.500 MHz Emergency the thermometer of the VXA-200. See page 22 for Frequency when the LOCK function is on. details. Simply press the [ 121.5 ] key momentarily (this key never locks). - Page 22 ø ABS: Automatic Battery Saver, based on activity Receive Battery Saver Setup on the receiver. An important feature of the VXA-200 is its Receive Battery Saver, which “puts the radio to sleep” for a The setting of 1:5 will promote the greatest conser- time interval, periodically “waking it up”...
-
Page 23: Beep On/Off
ETERING Beep On/Off The optional Barometric Pressure Unit (SU-1) brings to the VXA-200 the unique capability of providing The VXA-200’s key/button beeper provides conve- readout of the current barometric pressure. This in- nient audible feedback whenever a button is pressed. - Page 24 For display and the calibrated barometer display. For example, if the VXA-200 display shows “1 0 2 4 example, if the VXA-200 display shows “1 0 2 4 h P A ” and calibrated barometer indicates “1029 h P A ”...
- Page 25 (value: in °C) between the VXA-200 display and the calibrated thermometer. For ex- ample, if the VXA-200 display shows “2 4 . 5 F ” and calibrated thermometer indicates “23.0 °C,” set the Barometer offset to “ – 0 0 5 ”.
- Page 26 - B A R O - Density Altitude (Display the current (Display the current The VXA-200 provide “Dentity Altitude” meter. Temperature) Barometric Pressure) To mesuring the Density Altitude: r Press [ F ] à [ 5 ( D.ALT )] ;...
-
Page 27: Memory Operation
( SPL.W )] key, rotate the CHANNEL selector Memory System Operation knob to select the desired memory channel num- The VXA-200’s Main Memory system allows the ber for storage. user to store, label, and recall channel frequencies In order to prevent writing over memory chan- nels, a bar will appear under the hyphen (located which you may want to use frequently. -
Page 28: Recalling The Memories
O P Q R S T U V W X Y Z is active. Press the [ F ] key once more to resume nor- < > + ; : \ ` y [ | " mal channel selection in 1 channel steps. VXA-200 A II O VIATOR ILOT... - Page 29 CANNING PERATION r While the scanner remains paused on a frequency, The VXA-200 allows you to scan automatically in ø1 the VFO , Main Memory, “Book” Memory, or the decimal point of the frequency display blinks. ø2 Weather Channel modes. It pauses on signals en-...
-
Page 30: Scanning Operation
Press [ F ] à [ 9 ( SKIP )] . The “SKIP” icon will sible for manual memory selection using the CHAN- appear in the lower right corner, indicating that NEL selector knob. the channel is to be ignored during scanning. VXA-200 A II O VIATOR ILOT PERATING... - Page 31 When a signal is received on the Priority chan- or Book Memory modes). nel, operation immediately shifts to the Priority channel, the “DW” icon will blink, and the dis- play will become illuminated. VXA-200 A II O VIATOR ILOT PERATING...
-
Page 32: Dual Watch Operation
PTT switch, Priority Dual Watch will be disabled. You may then transmit on the Priority Channel. r To stop Priority Dual Watch, press [ F ] à [ SCAN ( DW )] . VXA-200 A II O VIATOR ILOT PERATING... - Page 33 VOR N AVIGATION General VOR Equipment COM BAND NAV BAND (108.000 - 117.975 MHz) (118.000 - 136.975 MHz) DVOR MODE CDI MODE VXA-200 A II O VIATOR ILOT PERATING ANUAL...
- Page 34 VOR N AVIGATION To Select the DVOR Mode r When entering the N A V band (108.000 - 117.975 MHz), the VXA-200 selects the DVOR mode automatically. The “C OURSE EVIATION NDICA ” field will appear at the upper left corner on the display, and the “TO”...
- Page 35 AVIGATION Flying to a VOR Station The Aircraft is “ON COURSE” The VXA-200 can indicate the deviation from the direct course to a VOR station. r Select a VOR station on your aeronautical chart and turn the CHANNEL selector knob (or enter the frequency directly with the keypad) to the OFF COURSE to the “right”...
- Page 36 VOR N AVIGATION The Aircraft is “ON COURSE” The Aircraft is “OFF COURSE” VXA-200 A II O VIATOR ILOT PERATING ANUAL...
- Page 37 Note 2: If the overflow indicator “u” appears on the right side, select a heading plus 10 de- The VXA-200 can also be configured to indicate the grees to the desired course; if the overflow indi- deviation from the desired course, not only the de- cator “t”...
- Page 38 Your aircraft is located at the point where the DVOR mode. The course indicator will show the lines intersect. the course deviation from the VOR radial. Note the radial you currently are on. Cross-checking Position VXA-200 A II O VIATOR ILOT PERATING ANUAL...
-
Page 39: Split Operation
Press and hold in the [ MW ( SPL.W )] key for 2 seconds to save the transmit frequency and re- turn to the N A V band frequency. VXA-200 A II O VIATOR ILOT... -
Page 40: Field Programming Mode
(label) to the memory, proceed to the next step; otherwise press and hold the [ MW ( SPL.W )] key you may want to use frequently while the VXA-200 is in the Field Programming mode. for 2 seconds to save the entry and exit. -
Page 41: Menu ("Set") Mode
(ON to OFF, etc.). until you are thoroughly familiar with the operation of the VXA-200. 5. Press the CHANNEL 1. Press the [ F ] key, then selector knob to save press the CHANNEL your new setting. -
Page 42: Menu Listing
4. Press and hold the CHANNEL selector knob for 2 seconds to exit. Important Notice: An “erased” channel cannot be restored, and “ CH"OO1 ” cannot be erased, as it is used for “Priority Channel” operation. VXA-200 A II O VIATOR ILOT PERATING... - Page 43 Default Setting: on Note: This feature does not operate during Scan or If you set this function to “on,” the lamp will be illu- Dual Watch. minated whenever the scanner stops. VXA-200 A II O VIATOR ILOT PERATING ANUAL...
- Page 44 Default Setting: KEY Default Setting: DW In the DW mode, the VXA-200 will activate the Dual In the “KEY” mode, the lamp will be activated for 5 Watch feature when you press [ F ] à [ SCAN ( DW )] .
- Page 45 14 [ TEMP ] 16 [ EMRG ] Function: Correcting the Thermometer setting Function: Emergency channel On/Off Available Values: –12.7 ~ +12.7 °C Available Values: on/oFF Default Setting: 0 °C Default Setting: on VXA-200 A II O VIATOR ILOT PERATING ANUAL...
-
Page 46: Specifications
Better than ±10 ppm (–10 °C to +60 °C) Modulation System: Low Level Amplitude Modulation Spurious Emission: > 60 dB below carrier Int. Microphone Type: Condenser Ext. Mic. Impedance: 150 Ohms Specifications are subject to change without notice or obligation. VXA-200 A II O VIATOR ILOT PERATING ANUAL... - Page 47 “U” suffix is for use with 230 VAC. Availability of accessories may vary. Some accessories are supplied as standard per local requirements, while others may be unavailable in some regions. Consult your Yaesu Dealer for details regarding these and any newly-available options.
- Page 48 17210 Edwards Rd., Cerritos, CA 90703, U.S.A. International Division 8350 N.W. 52nd Terrace, Suite 201, Miami, FL 33166, U.S.A. No portion of this manual may be YAESU EUROPE B.V. reproduced without the permission of P.O. Box 75525, 1118 ZN Schiphol, The Netherlands VERTEX STANDARD CO., LTD.
Need help?
Do you have a question about the VXA-200 and is the answer not in the manual?
Questions and answers