Advertisement
Available languages
Available languages
UHF FM TRANSCEIVER
VX-246
Operating Manual
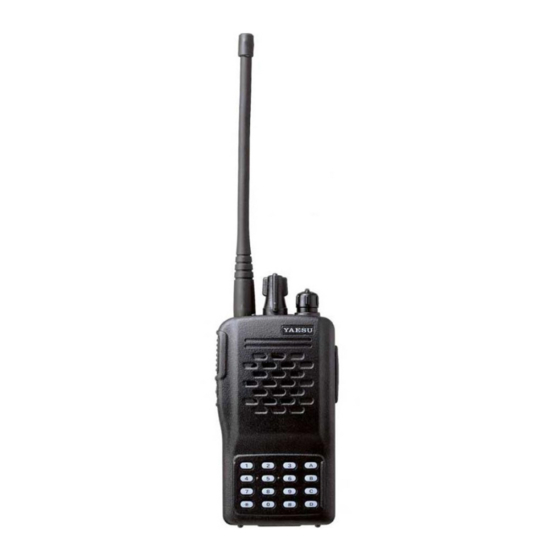
LED Indicator
PTT Button
MONI Button
List of the practicable area
AUT
BEL
DNK
FIN
FRA
DEU
GRC
ISL
IRL
ITA
LIE
LUX
NLD
NOR
PRT
ESP
SWE
CHE
GBR
Battery Pack Latch
I
MPORTANT
Please read this manual carefully to become familiar with the features of this transceiver.
Do not hold the transceiver so that the antenna is very close to (or touching exposed parts of) the
body, especially the face or eyes, while transmitting. The transceiver will perform best if the micro-
phone is 3 to 5 cm away from the mouth and the transceiver is vertical.
Do not expose the transceiver to long periods of direct sunlight, nor place it close to heating appli-
ances.
Do not place the transceiver in excessively dusty, humid, or wet areas, nor on unstable surfaces.
Do not modify this transceiver for any reason.
Refer service of this apparatus to qualified technicians only.
B
P
ATTERY
ACK
When using the FNB-64 Ni-Cd Battery Pack
To install the battery, hold the transceiver with your hand,
so your palm is over the speaker and your thumb is on
the top of the Belt Clip. Insert the battery pack into the
battery compartment on the back of the radio while tilt-
ing the Belt Clip outward, then close the Battery Pack
Latch until it locks in place with a "click."
To remove the battery, turn the radio off and remove any protective cases. Open the Battery Pack Latch on
the bottom of the radio, then slide the battery downward and out from the radio while tilting the Belt Clip
upward slightly.
Battery Charging
Install the FNB-64 Ni-Cd battery pack onto the transceiver. Ensure that the transceiver is switched off.
Plug the NC-76 into the AC line outlet.
Insert the transceiver into the NC-76; the antenna jack should be at the left side when viewing the charger
from the front.
If the transceiver is inserted into the NC-76 correctly, the RED indicator will glow. A fully-discharged pack
will be charged completely in 15 hours.
When using the optional FBA-25 Battery Case
The FBA-25 Battery Case allows operation of the VX-246 using six "AA" size Alkaline batteries. When install-
ing batteries, inset the (–) end first, then press in the (+) end so the battery snaps into place. Always replace all
six batteries at the same time.
To install the Battery Case into the transceiver, follow the same procedure as used for the Ni-Cd Battery Pack,
described previously.
Note: The FBA-25 must not be used with rechargeable cells of any kind.
VX-246 D
S
EFAULT
ETTING
Channel
Frequency
CTCSS/DCS
Tone No. Frequency Tone No. Frequency Tone No. Frequency Tone No. Frequency Tone No. Frequency
DCS ( 114 )
1
446.00625 MHz
01
67.0 Hz
DCS ( 115 )
2
446.01875 MHz
02
71.9 Hz
DCS ( 023 )
3
446.03125 MHz
03
74.4 Hz
DCS ( 025 )
4
446.04375 MHz
04
77.0 Hz
5
446.05625 MHz
DCS ( 026 )
05
79.7 Hz
DCS ( 071 )
6
446.06875 MHz
06
82.5 Hz
DCS ( 072 )
7
446.08125 MHz
07
85.4 Hz
DCS ( 073 )
8
446.09375MHz
08
88.5 Hz
DCS ( 152 )
9
446.00625MHz
DCS ( 155 )
10
446.01875MHz
DCS ( 156 )
11
446.03125MHz
DCS DCS DCS DCS DCS DCS DCS DCS DCS DCS DCS DCS DCS DCS DCS DCS DSC DCS
DCS ( 162 )
12
446.04375MHz
No. Code No. Code No. Code No. Code No. Code No. Code No. Code No. Code No. Code
DCS ( 165 )
13
446.05625MHz
001 023 013 071 025 143 037 225 049 266 061 356 073 452 085 532 097 703
DCS ( 205 )
14
446.06875MHz
002 025 014 072 026 145 038 226 050 271 062 364 074 454 086 546 098 712
DCS ( 212 )
15
446.08125MHz
003 026 015 073 027 152 039 243 051 274 063 365 075 455 087 565 099 723
DCS ( 223 )
16
446.09375 MHz
004 031 016 074 028 155 040 244 052 306 064 371 076 462 088 606 100 731
005 032 017 114 029 156 041 245 053 311 065 411 077 464 089 612 101 732
F
N
REQUENCY
UMBER
006 036 018 115 030 162 042 246 054 315 066 421 078 465 090 624 102 734
Number
Frequency
007 043 019 116 031 165 043 251 055 325 067 413 079 466 091 627 103 743
1
446.00625 MHz
008 047 020 122 032 172 044 252 056 331 068 423 080 503 092 631 104 754
2
446.01875 MHz
009 051 021 125 033 174 045 255 057 332 069 431 081 506 093 632 000 DCS
3
446.03125 MHz
010 053 022 131 034 205 046 261 058 343 070 432 082 516 094 654
4
446.04375 MHz
011 054 023 132 035 212 047 263 059 346 071 445 083 523 095 662
5
446.05625 MHz
012 065 024 134 036 223 048 265 060 351 072 446 084 526 096 664
6
446.06875 MHz
7
446.08125 MHz
8
446.09375 MHz
CH knob
VOL Control
Speaker
MIC/EAR Jack
Microphone
Keypad
N
OTICE
I
R
NSTALLATION AND
EMOVAL
Close the Battery Pack Latch
CTCSS T
N
ONE
UMBER
09
91.5 Hz
17
118.8 Hz
25
156.7 Hz
10
94.8 Hz
18
123.0 Hz
26
162.2 Hz
11
97.4 Hz
19
127.3 Hz
27
167.9 Hz
12
100.0 Hz
20
131.8 Hz
28
173.8 Hz
13
103.5 Hz
21
136.5 Hz
29
179.9 Hz
14
107.2 Hz
22
141.3 Hz
30
186.2 Hz
15
110.9 Hz
23
146.2 Hz
31
192.8 Hz
16
114.8 Hz
24
151.4 Hz
32
203.5 Hz
DCS S
N
IGNALING
UMBER
Switch on the transceiver by rotating the VOL control clockwise out of the click-stop. For now, adjust the VOL
control to about mid-position (12-o'clock); later you can adjust the level to suit the operating environment.
Rotate the CH knob to select a channel for operation.
To transmit, press the PTT (Push-To-Talk) button. Hold the radio 3 ~ 5 cm from your mouth, and speak in a
normal voice into the microphone.
Note: While you are transmitting, the LED indicator will glow red continuously. Do not transmit on a BUSY
channel (where the LED indicator is blinking green); wait until the channel is clear (no blinking green LED).
To receive weak stations better, disable the squelch momentarily by pressing and holding in the MONI
button on the side of the radio for one second. With the squelch disabled, the LED indicator will blink green
and channel noise and weak stations will be heard. To quiet the radio again, press and hold in the MONI
button for one second.
When your communication session is finished, switch off the radio by rotating the VOL control to the fully
counter-clockwise position (into the click-stop).
Note: The VX-246 can be programmed for DTMF Paging operation (this requires the optional FVP-25 Encryp-
tion/DTMF Pager Unit), and also for CTCSS and DCS operation. Each of these modes provides different
levels of selective calling. Refer to the "Changing the Channel Data" section for details.
DTMF Pager ON/OFF (requires optional FVP-25 Encryption/DTMF Pager Unit)
DTMF Pager operation allows paging and selective calling, using a user-programmed DTMF tone sequence. When
your radio is paged by a station bearing a tone sequence which matches yours, your radio's squelch will open.
To enable or disable the DTMF Pager, press and hold in the [ A ] key for two seconds;
When you hear a "low tone" beep followed by a "high tone" beep, the DTMF Pager is now activated.
When you hear a "high tone" beep followed by a "low tone" beep, the DTMF Pager is now disabled.
CTCSS/DCS Bell Operation
When this feature is activated, the Bell will ring when a station calls you whose transceiver is sending a
CTCSS tone or DCS code which matches that set into your Decoder.
To enable or disable the CTCSS/DCS Bell Operation, press and hold in the [ B ] key for two seconds;
When you hear a"low tone" beep followed by a "high tone" beep, CTCSS/DCS Bell Operation is now
activated.
When you hear a "high tone" beep followed by a "low tone" beep, CTCSS/DCS Bell Operation is now
disabled.
Voice Encryption (requires optional FVP-25 Encryption/DTMF Pager Unit)
When the optional FVP-25 is installed, the VX-246 can be operated using voice encryption for privacy during
communications.
To enable/disable the voice encryption feature, press and hold in the [ C ] key for two seconds;
When you hear a "low tone" beep followed by a "high tone" beep, voice encryption is now activated.
When you hear a "high tone" beep followed by a "low tone" beep, voice encryption is now disabled.
Keypad Locking
The VX-246's keypad may be locked out to prevent accidental changing of its settings.
To lock out the keypad, press and hold in the [ D ] key for two seconds;
When you hear a "low tone" beep followed by a "high tone" beep, the keypad is now locked out.
When you hear a "high tone" beep followed by a "low tone" beep, the keypad locking is now canceled.
How to activate the Programming mode.
1. Turn the radio off by rotating the VOL control fully counterclockwise (into the click-stop).
2. Press and hold in the [ A ] key; while holding it in, turn the radio on.
3. Press the key the function of which you wish to change, then program the new setting according to the
procedures described below.
4. When re-programming is finished, turn the radio off by rotating the VOL control fully counter-clockwise (into
the click-stop).
DTMF Paging
Programming Your ID Code
Your radio's ID code is the three-digit code which your radio will send out when paging another radio.
1. Activate the Programming mode.
2. Press the [ A ] key.
3. If you wish to enable the Auto-Respond Paging feature, press the [ ] key. If you wish to disable the Auto-
Respond Paging feature, press the [ # ] key.
4. Enter the three digit code that you want to use for your radio's ID from the keypad.
Programming DTMF Paging Code
The "DTMF Paging Code" is the three-digit code of the station you wish to page, which your radio will send out
during Pager operation. Ten different Paging Codes may be stored into Paging Memory registers, allowing you
to page ten different stations (or groups of stations).
1. Activate the Programming mode.
2. Press the [ A ] key, then enter the DTMF Paging Code memory number ("0" ~ "9") to be programmed from
the keypad.
3. Enter the three digit code Paging Code from the keypad.
Operating Channel
You may change the operating frequency (from among the eight available channel frequencies) of the channel
selected by the CH knob. This function may be useful if you wish to change the order in which the frequencies
are selected by the CH knob.
1. Activate the Programming mode.
2. Rotate the CH knob to select the channel on which you wish change the operating frequency.
3. Press the [ B ] key, then enter the frequency number from the keypad.
CTCSS Operation
"CTCSS" is a selective calling system which uses a continuous, very-low-frequency tone that is filtered out so
as not to be heard. If many stations are using the same channel frequency, CTCSS will keep your radio's
receiver squelched until a CTCSS tone is received matching the CTCSS tone you have selected for your
33
210.7 Hz
radio. If CTCSS is turned off, any signal received can open your radio's squelch.
34
218.1 Hz
1. Activate the Programming mode.
35
225.7 Hz
2. Rotate the CH knob to select a channel on which you wish change the CTCSS configuration.
36
233.6 Hz
3. Press the [ C ] key, then enter the two-digit CTCSS Tone number from the keypad.
37
241.8 Hz
38
250.3 Hz
DCS and ARTS* Operation
00
CTCSS
"DCS" is similar in use to CTCSS, except DCS uses digital codes for more reliable operation. "ARTS" is a
Off
transponder feature, available when DCS is engaged, which will alert two ARTS-equipped radios when an "Out
of Range" condition exists. The stations can then move to a better location to re-establish communications.
1. Activate the Programming mode.
2. Rotate the CH knob to select a channel on which you wish change the DCS configuration.
3. Press the [ D ] key.
4. If you wish to enable ARTS operation, press the [ ] key. If you wish to disable ARTS operation (DCS
operation only), press the [ # ] key.
5. Enter the three-digit DCS signaling number from the keypad.
This procedure initializes the transceiver into its factory-default configuration (the settings installed before you
used if for the first time). In the event of erratic behavior, resetting the microprocessor may clear up any corrupt
Off
date, often restoring normal operation. However, any customized settings will have to be re-programmed.
1. Turn the transceiver off.
2. Press and hold in the [ A ] and [ D ] keys while turning the transceiver on.
3. Press the MONI button to initialize the transceiver.
B
O
ASIC
PERATION
A
O
DVANCED
PERATION
P
C
D
ROGRAMMING THE
HANNEL
ATA
R
T
ESETTING THE
RANSCEIVER
Advertisement
Table of Contents

Subscribe to Our Youtube Channel
Related Manuals for Yaesu VX-246


Summary of Contents for Yaesu VX-246
- Page 1 When you hear a “high tone” beep followed by a “low tone” beep, CTCSS/DCS Bell Operation is now disabled. Voice Encryption (requires optional FVP-25 Encryption/DTMF Pager Unit) When the optional FVP-25 is installed, the VX-246 can be operated using voice encryption for privacy during communications. Battery Pack Latch To enable/disable the voice encryption feature, press and hold in the [ C ] key for two seconds;...
- Page 3 Quand vous entendez un beep “aigu” suivi d’un beep “grave”, la fonction sonnerie CTCSS/DCS est désactivée. Brouilleur de parole (nécessite le Module Pager DTMF/brouilleur de parole optionnel FVP-25) Lorsque le FVP-25 optionnel est installé, le VX-246 peut fonctionner en utilisant un brouilleur de parole pour la confidentialité Loquet du Pack Batterie des communications.
- Page 5 Fermaglio pacco batterie Codifica del parlato Quando è installato il modulo opzionale FVP-25 il VX-246 può codificare la voce a garantire riservatezza nelle comunicazioni. Per attivare o disattivare il circuito di codifica premere per due secondi il tasto [ C ] : NOTA IMPORTANTE quando il cicalino emette una nota grave seguita da una acuta significa che è...
- Page 6 4-8-8 Nakameguro, Meguro-Ku, Tokyo 153-8644, Japan VERTEX STANDARD US Headquarters 10900 Walker Street, Cypress, CA 90630, U.S.A. YAESU EUROPE B.V. P.O. Box 75525, 1118 ZN Schiphol, The Netherlands YAESU UK LTD. Unit 12, Sun Valley Business Park, Winnall Close Winchester, Hampshire, SO23 0LB, U.K.
Need help?
Do you have a question about the VX-246 and is the answer not in the manual?
Questions and answers