Table of Contents
Advertisement
Advertisement
Table of Contents

Related Manuals for Silver Cross SLEEPOVER


Summary of Contents for Silver Cross SLEEPOVER
- Page 1 S L E E P O V E R IMPORTANT: KEEP THESE INSTRUCTIONS FOR FUTURE REFERENCE...
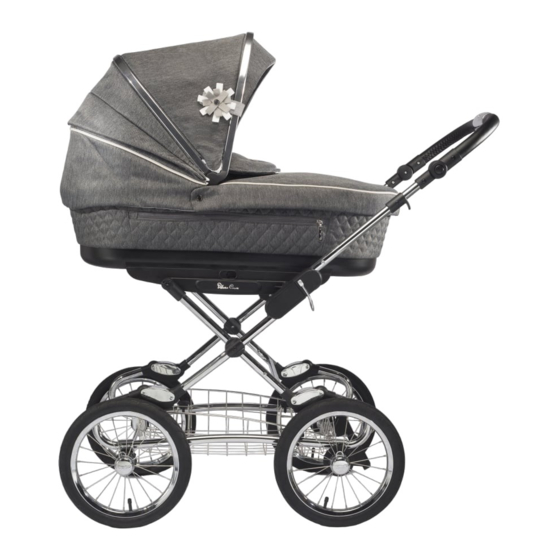
- Page 2 This Sleepover 3-in-1 pushchair is a high quality Silver Cross product that meets current safety standards; regular care and light maintenance will ensure its long service.
- Page 3 Using your Sleepover from Birth with the Carrycot. First erect the carrycot body. Lay the carrycot outer down with frame upper most. Using the 2 webbing loops that are attached to the metal bars, pull the top metal bars into the locators on the internal base of the carrycot.
- Page 4 When the carrycot is attached, zip the handles back into the side pockets. The hood can now be raised. WARNING: WHEN ATTACHING, DETACHING AND HAND CARRYING THE SLEEPOVER CARRYCOT, THE HOOD MUST BE IN THE LOWEST POSITION. WARNING: DO NOT LEAVE FLEXIBLE CARRYING HANDLES INSIDE THE...
- Page 5 Detaching the Carrycot from your chassis. Before detaching the carrycot from the chassis, lower the hood to the lowest position. Remove the handles from the side pockets of the carrycot. When standing behind the chassis handle, slide the RIGHT HAND SIDE release lever away from you until it clicks into place.
- Page 6 A FIRM, HORIZONTAL LEVEL AND DRY SURFACE. WARNING: B OTH HANDLES MUST BE HELD SECURELY TOGETHER WHEN ATTACHING AND DETACHING THE SLEEPOVER CARRYCOT FROM THE CHASSIS. YOU MUST NOT LET GO OF THE HANDLES UNTIL THE CARRYCOT IS EITHER SECURELY FASTENED...
- Page 7 Simply hold the front bar and gently lift and lower. To remove the hood, firstly, undo the 4 press studs from the Sleepover hood - two at the back and one at each side. Locate the hood release buttons...
- Page 8 The ventilation can be opened and closed by moving the lever left or right. Carrycot rocking feature The Sleepover carrycot base has a gentle rocking feature. The rocking feature is prevented or allowed by lowering or raising the four feet on the carrycot base.
- Page 9 Using your Sleepover from 6 Months as a Pushchair. Attaching the seat unit to the chassis. The Sleepover seat unit can be used in forward facing and rearward facing mode. Position the seat unit so the four locking catches on the base are directly over the top of the support bars on your chassis.
- Page 10 Sleepover seat unit. Gently grip the inner release catch, and slide the release handle towards the foot end of the Sleepover seat unit. Squeeze to release the locking catches. The seat unit will now lift clear of the chassis.
-
Page 11: Using The Harness
Using the harness. 10.1 10.1 To fasten the harness insert both buckle clips into each side of the buckle. Listen for the ‘click’. 10.2 To release the harness press the centre and pull apart. The shoulder straps can be unhooked from the buckle if required. -
Page 12: Fitting The Footmuff
Operating the bumper bar. 11.1 11.1 The bumper bar on the Sleepover seat unit can be removed for easier access or cleaning. Press the button underneath each side of the bumper bar and simultaneously pull the bumper bar out from the body arms. - Page 13 13.2 To remove the hood, firstly, undo the 4 press studs from the Sleepover hood - two at the back and one at each side. Press the button on the Sleepover seat unit arms and lift the hood out.
-
Page 14: Operating The Footrest
Operating the footrest. 14.1 14.1 To lower the footrest, reach underneath the footrest and locate the flattened strip. Pull this down to lower the rest. 14.2 The footrest will also fold away to give more leg room for toddlers and when using the footmuff. - Page 15 Operating the backrest recline. 15.1 15.1 The Sleepover seat unit has four backrest positions, from lie flat to upright. 15.2 To adjust the backrest, place the palm of your hand on the adjustment handle at the back of the body. Grip and release the catch, then either lift or lower to the desired position.
- Page 16 Fitting the Raincover to the 16.1 Carrycot / Seat Unit. 16.1 Fit the hood section of the raincover over the hood first and then gently pull the elasticated edge over the toe end. Note: When using the raincover on the carrycot, fasten the excess fabric at the toe-end by gathering together and using the Velcro tabs to hold in place.
-
Page 17: Safety Notes
THIS SEAT UNIT IS NOT SUITABLE Safety Notes FOR CHILDREN UNDER 6 Your Sleepover 3-in-1 is a high quality Silver MONTHS. Cross product. The seat unit complies with BS EN: 1888:2012 and BS EN: 1466:2014, and THE CARRYCOT IS ONLY... -
Page 18: Care And Maintenance
LOAD = 1KG (SOLD SEPARATELY) manual. The child should always wear a safety Please read these instructions carefully before using your new Silver Cross Product harness complying with BS6684. “D” rings and keep for future reference. are provided for the attachment of an additional harness. -
Page 19: Consignes De Sécurité
D’ENLEVER L’ENFANT. Consignes de sécurité VÉRIFIER QUE LES Votre landau Sleepover 3 en 1 est un produit Silver Cross de haute qualité. Le siège est DISPOSITIFS DE FIXATION conforme à la norme BS EN: 1888:2012 DE LA NACELLE, DU et la nacelle est conforme à la norme BS SIÈGE OU DU SIÈGE AUTO... - Page 20 LES FOYERS OUVERTS, LES RÉGULIÈREMENT LES FEUX ALIMENTÉS AU GAZ, POIGNÉES ET LA PARTIE ETC, À PROXIMITÉ DE LA INFÉRIEURE DE LA NACELLE NACELLE. DE DÉTECTER D’ÉVENTUELS DOMMAGES OU SIGNES CONTRÔLER D’USURE. RÉGULIÈREMENT LES L’ENFANT NE DOIT JAMAIS POIGNÉES ET LA PARTIE INFÉRIEURE DE LA NACELLE ÊTRE INSTALLÉ...
-
Page 21: Nettoyage Et Entretien
N’essayez jamais de plier la poussette Sleepover lorsque votre enfant est assis Eléments textiles et siège dedans, car il pourrait rester coincé. Si Pour les instructions d’entretien du tissu, vous rencontrez des difficultés pour plier... -
Page 22: Norme Di Sicurezza
NON LASCIARE CHE Norme di sicurezza ALTRI BAMBINI GIOCHINO Sleepover 3 in 1 è un prodotto Silver Cross INCUSTODITI NELLE VICINANZE di alta qualità. Il sedile è conforme alla DELLA CULLA PORTATILE. norma BS EN: 1888:2012 e la culla portatile è... - Page 23 ESSERE CONTROLLATI REGOLARMENTE PER DANNI E Non tentare mai di ripiegare il passeggino USURA. Sleepover quando il bambino è seduto, perché potrebbe rimanere intrappolato. LA TESTA DEL BAMBINO NELLA In caso di problemi durante la chiusura CULLA PORTATILE NON DEVE o l’apertura del passeggino, non forzare,...
-
Page 24: Cura E Manutenzione
Portabibite: carico massimo = 340g manuale delle istruzioni. Utilizzare solo accessori e parti di ricambio Leggere attentamente le istruzioni prima approvate da Silver Cross. di utilizzare il nuovo passeggino Sleepover e conservarle per future consultazioni. Cura e manutenzione www.silvercrossbaby.com Telaio Verificare sempre che sul passeggino non siano presenti segni di usura. -
Page 25: Notas De Seguridad
CON ESTE PRODUCTO. Notas de seguridad NO DEJE QUE LOS NIÑOS La silla Sleepover es un producto de JUEGUEN CERCA DEL CAPAZO gran calidad de Silver Cross. Cumple la normativa BS EN: 1888:2012 y, si la SIN SUPERVISIÓN. utiliza adecuadamente y realiza un buen ESTE ASIENTO NO ES APTO PARA mantenimiento, le proporcionará... - Page 26 Asegúrese EL MANILLAR Y LA PARTE de que el freno esté accionado. INFERIOR DEL CAPAZO DEBEN Nunca intente plegar su Sleepover cuando REVISARSE PERIÓDICAMENTE el niño esté sentado, ya que es posible PARA DETECTAR DETERIORO Y que quede atrapado.
-
Page 27: Cuidado Y Mantenimiento
Compruebe que haya total libertad de Lea detenidamente estas instrucciones movimiento en todos los dispositivos de antes de utilizar su nueva silla Sleepover y inmovilización. Abrillante el metal con un consérvelas para consultarlas en el futuro. paño limpio y seco. - Page 28 安全注意事项 婴儿想睡觉,应将其放入舒适的婴儿 Sleepover三合一婴儿推车是Silver 车、小床或婴儿床。 Cross生产的一款优质产品。座椅符合 婴儿车手柄和/或座椅靠背和/或婴儿车 BS EN:1888:2012,便携式婴儿睡蓝 两侧如果有任何负重均会影响婴儿车的 符合 BS EN:1466:2014。通过正确的 稳定性。保护婴儿的安全是您的责任。 使用和维修,可提高婴儿推车的使用 仅可使用 SILVER CROSS 批准的更换件 体验。然而,如果您的 Sleepover 三 和配件。 合一婴儿推车有何问题,请联系您的 应定期检查便携式婴儿睡篮的手柄和底 Silver Cross零售商,零售商将采取 部,注意是否存在破损或磨损。 适当的措施。 婴儿睡在携式婴儿睡篮时,头部绝不能 低于身体。 警告: 除所提供的褥子外,请勿添加任何褥 婴儿乘坐时,必须有人看护。 子。 为了避免伤到婴儿,在折起或打开本产 请勿在所提供的褥子上面再加一层褥 品时请不要让孩子靠近。 子。 使用推车前确保所有锁定装置均处于锁 使用过程中,必须将手柄放置在拉链式...
- Page 29 如果除您之外的其他人(比如孩子的爷 未来参考。 爷奶奶,保姆等) 要使用婴儿车,请 www.silvercrossbaby.com 向他们演示正确的操作方法。 注意:在进行调节时,孩子应远离运转 中的零件。 请勿将您的孩子留在整体安装防雨罩 的折叠式婴儿车中,正常户外使用除 外。 婴儿车手柄和(或)座椅靠背和( 或)婴儿车两侧如果有任何负重均会 影响婴儿车的稳定性。保护婴儿的安 全是您的责任。 整理包:最大容量 = 1kg(选购配件) 杯架:最大承重量 = 340g 只可使用 Silver Cross 提供或推荐 的配件或备件。 保养与维修 底盘 要经常检查折叠式婴儿车是否有磨损 迹象。定期润滑所有运转零件。检查 所有锁定装置的运动灵活性。用干 净、干爽的抹布擦拭金属部件。 织物和座椅 织物洗涤护理说明细节详见婴儿车附 带的洗涤护理标签。请勿将产品置于 直接热源或日照强烈的地方。随着长 期使用,产品可能出现某种程度上的 褪色。请勿机洗、烘干、熨烫或漂 白。 请勿将配件如遮阳罩或防雨罩放在高...
- Page 30 Примечания по безопасности ДАННОЕ ИЗДЕЛИЕ ПРЕДНАЗНАЧЕНО Коляска Sleepover 3 в 1 – это ТОЛЬКО ДЛЯ ДЕТЕЙ, КОТОРЫЕ НЕ высококачественное изделие компании МОГУТ СИДЕТЬ САМОСТОЯТЕЛЬНО. Silver Cross. Сиденье соответствует нормам МАКСИМАЛЬНЫЙ ВЕС РЕБЕНКА – 9 КГ Британского института стандартов BS EN: ВСЕГДА...
- Page 31 Регулируя положение деталей коляски, всегда держите ее за сиденье. Убедитесь, что тормоз включен. Ни в коем случае не пытайтесь сложить коляску Sleepover с находящимся в ней ребенком: коляска может его защемить. Складывая и раскладывая коляску, не прикладывайте излишних усилий. Вы...
- Page 32 Silver Cross (UK) Ltd, Micklethorn, Broughton, Skipton, North Yorkshire, BD23 3JA silvercrossbaby.com...
Need help?
Do you have a question about the SLEEPOVER and is the answer not in the manual?
Questions and answers