
Subscribe to Our Youtube Channel
Related Manuals for Falcon FalconEye 1296P


Summary of Contents for Falcon FalconEye 1296P
- Page 1 FalconEye 1296P Dash Cam Manual Please read this manual thoroughly before operating the device, and keep it for future reference. V 1.2 - 1 -...
- Page 2 Introduction: Thank you for purchasing this FHD Digital Car driving recorder. This product is based on maintaining the original appearance of the original car, and hard evidence for today's traffic accident specially developed a fashion, beautiful, convenient and durable multi-vehicle driving recorder, can record your life lit by lit and it’s the best choice for escort for your trip.
- Page 3 Content Guide (A)Unit Structure chart (B)Button and Interface Instruction (C)Charge and Power on/off instruction (D)Photograph/Video/Playback basic operation instruction (E)Menu Setting Instruction (F)Product Specification (G)Frequently Asked Questions - 3 -...
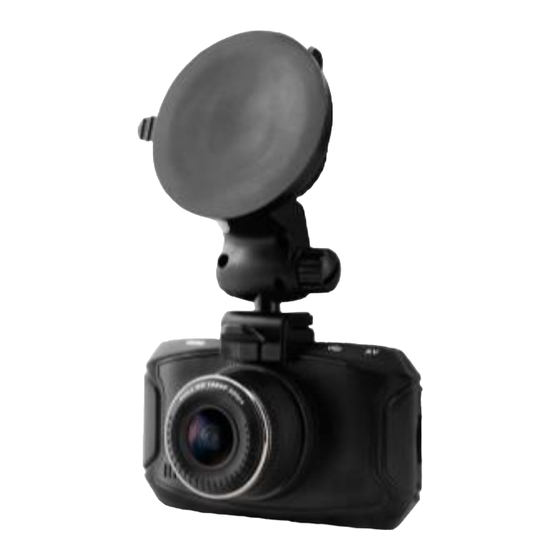
- Page 4 A. Unit Structure chart 1)TV-OUT or GPS 2)USB Interface 3)Holder Connector 4)HDMI 5)HD Cameras 6)Power Button 7)UP Button 8)MENU Button 9)OK Button 10)MODE Button 11) DOWN Button 12)Reset 13)Power Indication Light 14)SOS Emergency Button 15)LCD 16)TF Slot 17)MIC 18)Speaker - 4 -...
- Page 5 B:Button and Interface Instruction: Button Name Button Function Instruction for Use 1.Power on : Short press to turn on and the red indication lamp light. Power Power on/off 2. Power off : Long press to turn off and the red indication lamp out.
- Page 6 C.Charge and Power on/off instruction: 1. Charge Method: 1.1: Charge by connecting the cigarette lighter 1.2: Charge by connecting the computer via USB data cable The blue indication light will on when charging, and need about 120 minutes to be full, after it’s full the indication light will off. 2), Charge with the charger: Connect the charger base by USB data cable, then make the charger plug into an electrical outlet, it charges, and the blue indicator light will on, after the battery is full ,the blue indicator light will off.
- Page 7 3. Before installation, operate instructions by hand: 3.1. Power on/off by hand Short press Power button, the red indication lamp will be light up. Enter the video mode, Long repress Power button again , the red indication lamp will be off. Attention: the device will be turn off automatically after a warning of low battery when the power is very low.
- Page 8 Photo Mode: Short press mode button to switch to photo mode, there is a photo shooting icon shown on the top left corner of the LCD, short press OK button to shooting, when photography is finished, the LCD will be flash one time. Attention:1.
- Page 9 Video/Photo Playback Short press Mode button twice to switch playback mode, the playback icon will be shown on the LCD top left corner: 1.Short press up/down button to selecting the file section(locked section/ regular file section); 2.Short press OK button to enter the playback section, then short press up/down button to selecting the file, press OK button again to enter single file playback(press OK button again to start playback the video)。...
- Page 10 setting, the video icon will be shown on the LCD top right corner: there are 4 setting options at the first page( Video resolution, Image quality, Time Lapse Setting, Metering mode setting); there are 4 setting options at the second page (Frequency, Image label setting, circulate video setting, LDWS Detection)...
- Page 11 Frequency:Three modes:Auto/60Hz/50 Hz , the default is 50 Hz Image label setting:Three modes:date/time/car driver no. the default is off circulate video setting:Three modes:1minute/3 minutes /5 minutes the default is 5 minutes LDWS Detection:on/off the default is off.(only suitable for chipset A7LA50/A7LA70) LDWS Calibration:...
- Page 12 Parking Monitor: on/off, the default is off System setting: After power on enter the video mode, the video icon will be shown on the LCD top left corner: short press MENU button twice to switch the system setting, the video icon will be shown on the LCD top right corner: there are 4 setting options at the first page( Language setting, Card Capacity, System format, Car driver no.);...
- Page 13 Language setting:English//Simplified Chinese/Traditional Chinese/Russian/Polish…etc Card Capacity:Three modes:total capacity /usage /surplus System format:NTSC/PAL the default is PAL Car driver no.:set1-9 9 positions Time setting:set year/month/date/time Format:choose √ or ×,choose √ means format, choose × means no; Default setting: choose √ or ×,choose √ means reset, choose × means no; Auto Power off setting:Four modes:off/1 minute /3 minutes/5 minutes the default is off;...
- Page 14 Backlight setting: Four modes: off/1 minute /3 minutes/5 minutes the default is 3 minutes; Delay power off:Four modes:off/15 seconds /30 seconds /1minute the default is 15 seconds; GPS setting:on/off(only for the unit with GPS function) Beep Sound setting:on/off the default is on; Version information:view the version information;...
- Page 15 Photo resolution:Three modes:4M(2688×1512 16:9)/9M(4000×2250 16:9)/13M(4800×2700 16:9) the default is 4M Image quality:Three modes: superior/good/general the default is superior Image label setting:Three modes:date/time/car driver no. the default is off Playback setting After power on, short press MODE button twice to switch the playback setting, the photo icon will be shown on the LCD top right corner, press MENU button one time to enter setting, there are 2 setting options (Play mode setting, Delete the file);...
-
Page 16: Product Specification
F. Product Specification: Product Feature HD Camera, HD Recording Built-in(to save the file emergency, and cannot be deleted anymore if the G-sensor collision of vehicles happen) LCD Size 2.7LTPS 16:9 Lens 170 Degree A+ HD ultra wide angle Russian/English/Simplified Chinese/Traditional Chinese/Polish…etc Language Video Format MOV. - Page 17 GPS player software Installation and Using Instruction(Only suitable for the units with GPS function) If need check the GPS information , the professional player must be installed firstly 1.Please install the file provided in the unit: 2.Please copy the file to computer and install.
- Page 18 G.Frequently Asked Questions Under normal operating conditions, if there is problems with the device, please refer to the following methods to solve. Cannot take picture and record Please check whether there is enough space for of TF card, or if it is locked. Stopping automatically while recording Due to the huge amount of HD video data, please use high-speed C10 TF card with SDHC compatible, there will bethemarkofC10 on the TF card.
Need help?
Do you have a question about the FalconEye 1296P and is the answer not in the manual?
Questions and answers