Advertisement
Quick Links
Model: PC600
Batch: PR3496
POWER:1000W AC220-240V, 50/60Hz
For your safety, always read the instruction book carefully before using.
Introduction----------------------------------------------------------------------------------------------- 1
Important safeguards------------------------------------------------------------------------------ 1-3
Parts---------------------------------------------------------------------------------------------------------- 3
Instructions for use---------------------------------------------------------------------------------- 3-5
Operating instructions----------------------------------------------------------------------------- 5-6
Cleaning--------------------------------------------------------------------------------------------------- 6
Troubleshooting--------------------------------------------------------------------------------------- 7
Features---------------------------------------------------------------------------------------------------- 7
Advertisement

Related Manuals for Kogan PC600


Summary of Contents for Kogan PC600
-
Page 1: Table Of Contents
Model: PC600 Batch: PR3496 POWER:1000W AC220-240V, 50/60Hz For your safety, always read the instruction book carefully before using. Introduction----------------------------------------------------------------------------------------------- 1 Important safeguards------------------------------------------------------------------------------ 1-3 Parts---------------------------------------------------------------------------------------------------------- 3 Instructions for use---------------------------------------------------------------------------------- 3-5 Operating instructions----------------------------------------------------------------------------- 5-6 Cleaning--------------------------------------------------------------------------------------------------- 6 Troubleshooting--------------------------------------------------------------------------------------- 7 Features---------------------------------------------------------------------------------------------------- 7... -
Page 2: Introduction
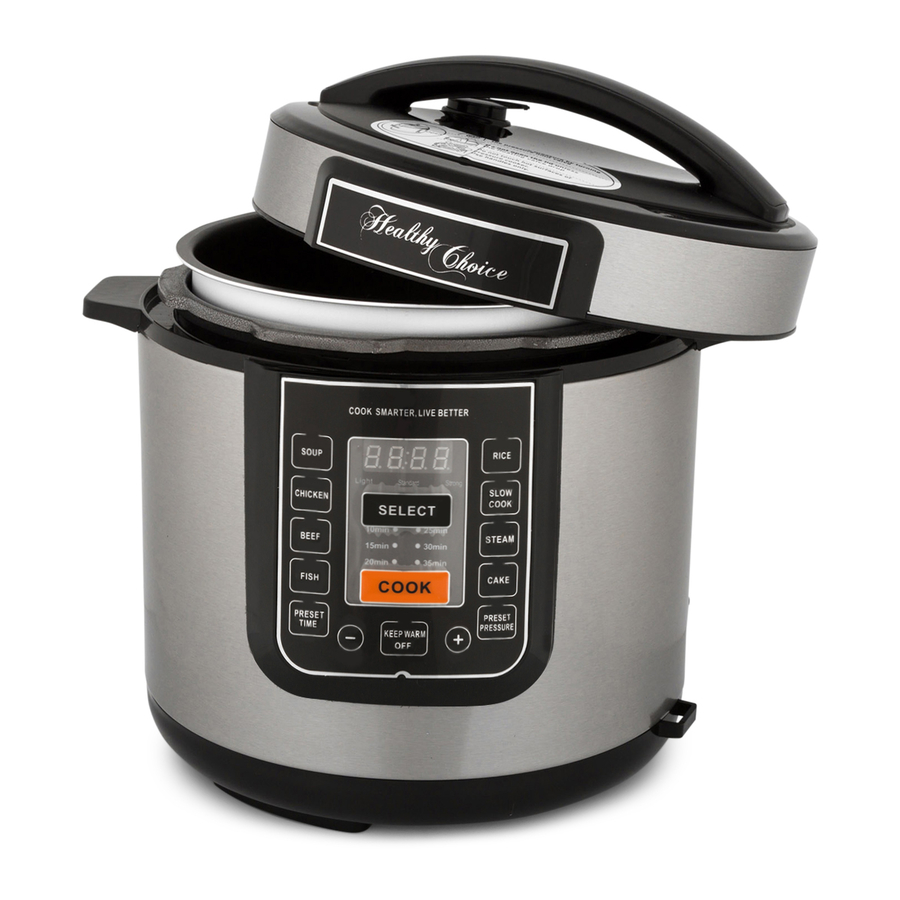
Introduction 1. Multi-functions, convenient to use 1) Soup, Chicken, Beef, Fish, Rice, Slow Cook, Steam and Cake preset buttons. 2) Press a preset button to enter an automatic cooking process. When finished, an alert signal will sound and the appliance will go into keep warm mode. 3) The appliance features a 24-Hour countdown timer function;... - Page 3 ■ Using accessories or replacement parts that are not recommended or not sold by the manufacturer may cause damage to the appliance. ■ Always unplug the appliance and let it cool down before cleaning and removing parts. Keep it unplugged when not in use. ■...
-
Page 4: Parts
■Ensure that steam never comes out where the lid meets the appliance body. ■Never exert force to open the appliance lid- the inner pressure in the pot must be equal to the atmosphere pressure before opening the lid. ■Only open the lid if the float valve is in a low position, when pressure inside has become normal and safe. - Page 5 2. Remove the inner cooking pot from the appliance and add the food and liquids as the recipe directs. Note: The total volume of food and liquid must not exceed 80% of the capacity of the cooking pot. (Figure C). For foods such as dried vegetables and beans, or rice and grains, the total volume must not exceed 60% capacity.
-
Page 6: Operating Instructions
8. With the appliance switched on and the LED display on, press the preset buttons to select the desired cooking function. The function light will flash. The preset buttons are Soup, Chicken, Beef, Fish, Rice, Slow Cook, Steam and Cake. 9. -
Page 7: Cleaning
Refer to the chart below for different cooking options. SOUP CHICKEN BEEF FISH RICE SLOW COOK STEAM CAKE Default pressure time - Light 1 hour Default pressure time - Standard 2 hours Default pressure time - Strong 3 hours Pressure range – manually set 10-50 5-30 1-30... -
Page 8: Troubleshooting
Troubleshooting Problem Possible Cause Solution The ring is not properly installed. Reinstall the ring. Lid does not lock. The float is seized by the push rod. Push the rod with hands. Lid won’t open after the air The float is still up. Press the float down.