Table of Contents
Advertisement
Advertisement
Table of Contents

Related Manuals for Garmin Tri-Tronics PRO70


Summary of Contents for Garmin Tri-Tronics PRO70
-
Page 2: Getting Started
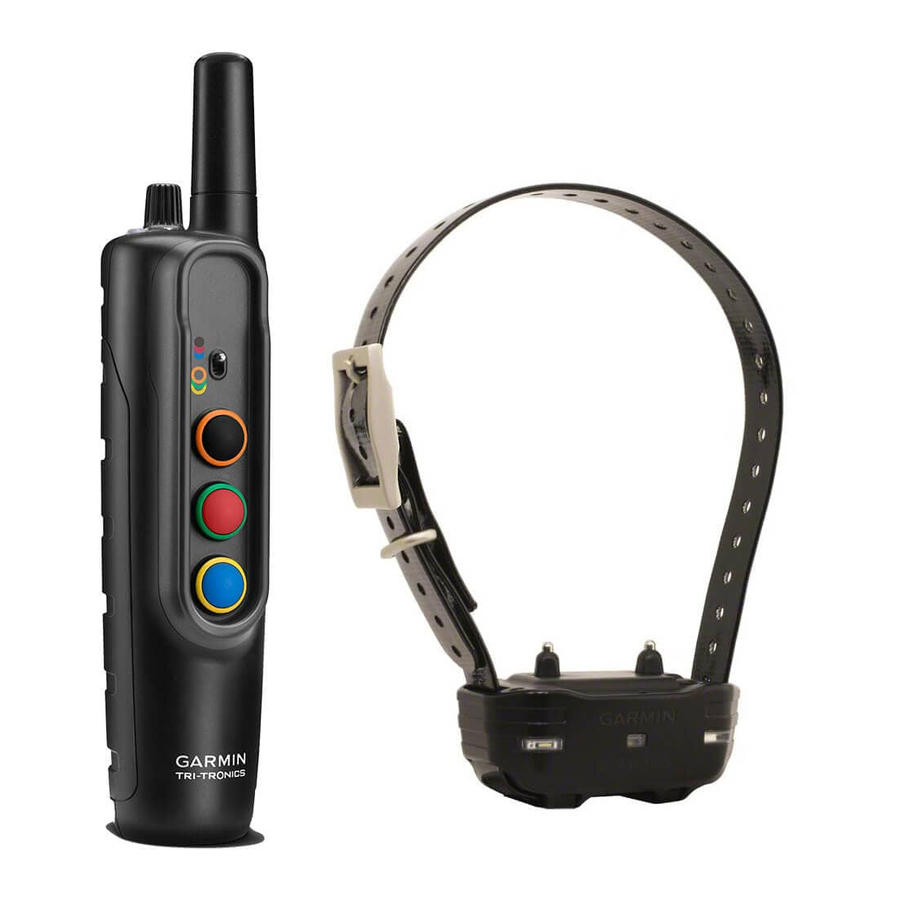
Getting Started Device Overviews Pro 70 Handheld Device WARNING See the Important Safety and Product Information guide in the product box for product warnings and other important information. Setting Up the Pro 70 System Before you can use the Pro 70 system, you must set up the devices. -
Page 3: Attaching The Dog Collar Device To The Collar Strap
Pro 70 Dog Device Insert the end of the collar strap through the slot on the opposite à side of the device. Pull the strap until it is tight across the front of the device. Charging the Handheld Device Power key À... -
Page 4: Charging The Collar
Charging the Collar NOTICE To prevent corrosion, thoroughly dry the contacts on the collar and the surrounding area before connecting the charging clip. You should fully charge the battery before you use the device for the first time or whenever the battery is low (page 11). It is normal for the battery to discharge in approximately 7 to 10 weeks when the device is not in use. -
Page 5: Turning On The Dog Collar Device
• On the dog collar device, hold the power key until the status LED turns yellow to enter pairing mode (page 5). Turning Off the Device On the dog collar device, hold the power key until the red LED appears. Release the power key. -
Page 6: Dog Training
package, the devices are paired from the Select the color: factory. • To select the button color, move On the handheld device, move the the dog collar device toggle switch toggle switch and select a key to choose the color associated with the •... -
Page 7: Selecting And Installing The Contact Points
In order to properly correct the dog, the collar and device must fit the dog properly. If the collar is too loose or positioned incorrectly, corrections may be inconsistent. This can delay or prevent successful training. Place the collar around the middle of the dog's neck. -
Page 8: Training Intensities And Methods
Select the correct contact point length Tone: Activates an audible tone instead for your dog's coat type: of stimulation. A tone can be used as either a positive or negative training • For dogs with thicker coats, use cue, depending on your training the longer contact points. -
Page 9: Bark Odometer
You do not need to, and should not, apply Green, amber, Motion was detected, and no this intensity selection test again. or red flash correction was applied. Blue flash A bark was detected, and a After you begin training, the dog’s correction was applied. -
Page 10: Device Information
Checking the Bark Odometer Operating From -4° to 140°F Remove the device from the dog. temperature range (from -20° to 60°C) Charging temperature From 32° to 104°F Position the device so that you can range (from 0° to 40°C) see the status LED. Storage temperature From -4°... -
Page 11: Pro 70 Battery Replacement Instructions
Pro 70 Battery Replacement Charging From 32° to 104°F (from temperature range 0° to 40°C) Instructions Storage From -4° to 122°F (from WARNING temperature range -20° to 50°C) (up to 1 month) This product contains a lithium-ion battery. To prevent the possibility of Storage From -4°... - Page 12 Pro 70 Handheld Device Components You can purchase a replacement battery at http://buy.garmin.com. You should use only an official Garmin ® replacement part. Remove the eight security screws from the back of the device. Lift up the back plate. Grip the battery connector wires close...
- Page 13 Install the new battery into the back Verify the back plate and the device plate with the label side up, using the are aligned with no gaps. same orientation as the old battery. Tighten the screws evenly. The battery orientation is noted Verify the gasket is not sticking out of graphically inside the back plate.
- Page 14 You can purchase a replacement battery at http://buy.garmin.com. You should use only an official Garmin replacement part. Remove the six screws from the top plate, and remove the top plate. Remove the two screws from the battery plate, and remove the battery plate.
-
Page 15: Getting More Information
Verify the gasket is not sticking out of the device. Getting More Information You can find more information about this product on the Garmin website. • Go to www.garmin.com/outdoor. • Go to www.garmin.com /learningcenter. • Go to http://buy.garmin.com, or... - Page 16 Garmin ® and the Garmin logo are trademarks of Garmin Ltd. or its subsidiaries, registered in the USA and other countries. BarkLimiter™ and Bark Odometer™ are trademarks of Garmin Ltd. or its subsidiaries. These trademarks may not be used without the...
Need help?
Do you have a question about the Tri-Tronics PRO70 and is the answer not in the manual?
Questions and answers