Table of Contents
Advertisement
Quick Links
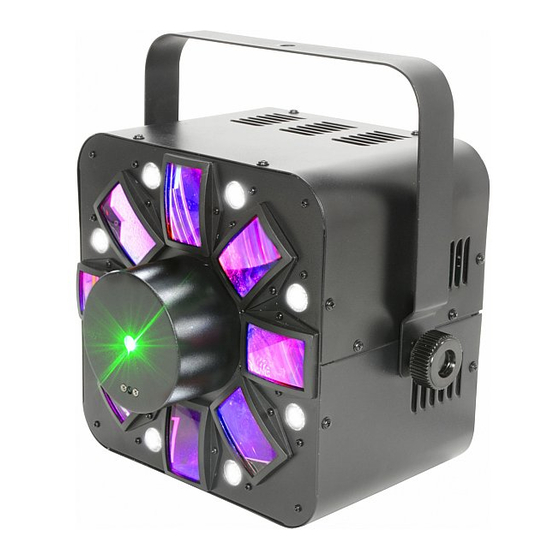
HADRON ECO
3-in-1 LED Light Effect
Please read through this manual thoroughly
before use, any damage caused by misuse of
the product will not be covered by the warranty.
fantastic 3-in-1 light effect combining an LED
projector, strobe and laser in one compact unit.
This brilliant effect covers a large area and can be
operated by built-in auto or sound-to-light
programs for an easy plug and play show. Multiple
Hadron Eco effects can be connected together
using the master/slave function with DMX to create
a fantastic synchronised light show. A great all-in-
one unit perfect for mobile DJs, performers or small
nightclubs or venues.
5 single colour bright 3W LEDs in red, green,
•
blue, white and amber produce the classic
Derby effect
8 bright 1W white LEDs create strobe effect
•
70mW green and 100mW red lasers create firefly, firework and star cluster effects
•
9 preset auto programs for different effect combinations
•
Auto, sound-to-light, DMX or master/slave controls
•
4 or 8 channel DMX control
•
We recommend that this product is used within the guidelines HSG95
•
Specifications
Power supply
100-240Vac, 50/60Hz
Power
60W
Fuse rating
3A
Effect LEDs
5 x 3W (R,G,B,W,A)
Strobe LEDs
8 x 1W white
Red laser
100mW, 635nm
Green laser
70mW, 532nm
In the box
1 x HADRON ECO unit with bracket, 1 x UK IEC mains lead, 1 x wireless remote and 1 x
manual.
Item ref: 150.471UK
A
Laser class
3B
Beam angle
90°
DMX channels
4 or 8
DMX connection XLRM in, XLRF out
Dimensions
295 x 225 x 285mm
Weight
4.5kg
Laser safety standard
User Manual
BSEN62471:2008
Advertisement
Table of Contents

Related Manuals for Qtx HADRON ECO 150.471UK


Summary of Contents for Qtx HADRON ECO 150.471UK
-
Page 1: Specifications
HADRON ECO Item ref: 150.471UK 3-in-1 LED Light Effect User Manual Please read through this manual thoroughly before use, any damage caused by misuse of the product will not be covered by the warranty. fantastic 3-in-1 light effect combining an LED projector, strobe and laser in one compact unit. - Page 2 Laser safety function The laser will only function when the laser safety key switch is turned to the “ON” position. When in the “OFF” position, the HADRON will only use strobe and derby for all settings. The remote socket below the key switch serves a similar function; the laser function will be disabled when the two connections of this socket are connected.
-
Page 3: Manual Control Menu
Sound sensitivity rotary adjustment Laser key switch Microphone LED display with 4 button controls (menu, up, down and enter) DMX signal in DMX signal out I-bolt for secondary flying point IEC mains in Earth binding (DO NOT UNSCREW) Manual control menu Press the “menu”... - Page 4 Mode Program Description Speed (SPEd) SP 1—SP9 Speed value for program adjustable Sensitivity (SEnS) Se 1—Se9 MIC value adjustable Silent Scene The fixture is open light on music by Sound program (SILE) The fixture is closed light on music by Sound program Wireless Remote Enable unit to receive IR remote signal...
- Page 5 171~180 Blue + White + Amber 181~190 Green + White + Amber CH1 cont. 191~200 Red + White + Amber LED effect lighting 201~210 Green + Blue + White+ Amber (RGBWA) 211~220 Red + Blue + White+ Amber 221~230 Red + Green + White + Amber 231~240 Red + Green + Blue + Amber 241~250...
- Page 6 8 channel DMX value reference 0~10 No function 11~20 21~30 Green 31~40 Blue 41~50 White 51~60 Amber 61~70 Red + Green 71~80 Red + Blue 81~90 Red + White 91~100 Red + Amber 101~110 Green + Blue 111~120 Green + White LED effect lighting 121~130 Green + Amber...
-
Page 7: Troubleshooting
101~110 #2 & #6 111~120 #3 & #7 121~130 #4 & #8 131~140 #1 & #2 141~150 #3 & #4 151~160 #5 & #6 CH5 cont. 161~170 #7 & #8 White LED’s 171~180 #1 & #8 181~190 #4 & #5 191~200 #1 #3 #5 &... -
Page 8: Ir Remote Control
IR Remote Control BLACK OUT Mode Press BLACK OUT off existing modes, Press again BLACK OUT return the last mode. AUTO Mode Automatic mode will enable you to run the automatic programs on the product. To turn on Automatic mode: 1.