
Related Manuals for Rigel MULTI-FLO


Summary of Contents for Rigel MULTI-FLO
- Page 1 Innovating Together RIGEL MULTI-FLO infusion pump analyser Copyright © 2016 SEAWARD GROUP Instruction Manual Last Update: 25th May 2016 385A550 Revision 2.7...
- Page 2 Calibration Statement The Rigel Multi-Flo Infusion Device Analyser is fully calibrated and found to be within the specified performance and accuracy at the time of production. The Seaward Group provides its products through a variety of channels; therefore it may be possible that the calibration date on the provided certificate may not represent the actual date of first use.
- Page 3 © Copyright 2016 All rights reserved. Nothing from this edition may be multiplied, or made public in any form or manner, either electronically, mechanically, by photocopying, recording, or in any manner, without prior written consent from the SEAWARD GROUP. This also applies to accompanying drawings and diagrams.
- Page 4 Disposal of old product The Rigel Multi-Flo has been designed and manufactured with high quality materials and components, which can be recycled and reused. Please familiarise yourself with the appropriate local separate collection system for electrical and electronic products or contact your local supplier for further information.
- Page 5 As the manufacturer of the apparatus listed, we declare under our sole responsibility that the product: Rigel Multi-Flo (1,2 and 4 channel) – Infusion Pump Analyser Conforms with the relevant Directives and conformity is indicated by the symbol , i.e.
-
Page 6: Table Of Contents
Safety Notes........................6 Multi-Flo Overview ..................... 7 Getting Started ....................8 Before you switch On! ..................... 8 Turning the Multi-Flo On and Off ................8 Home screen ......................8 Connecting to your Multi-Flo Analyser ..............9 Priming the Channels..................... 10 Draining the Channels ................... - Page 7 Test Sequences ..................... 52 Memory Options ....................52 Pressure Measurement Unit .................. 55 Languages ......................56 About Menu ....................... 57 Maintaining the Rigel Multi-Flo ................59 Cleaning the Analyser .................... 59 User Maintenance ....................59 Firmware Upgrade ....................60 Return Instructions ....................63 Optional Accessories .....................
-
Page 8: Introduction
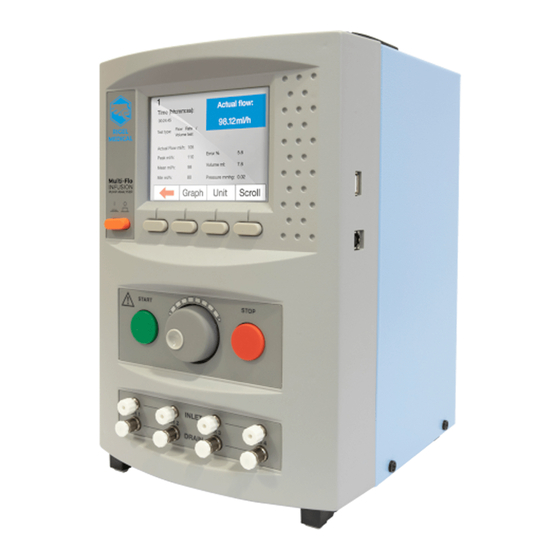
Measuring flow rates, volume and pressure, the Multi-Flo is available in 1, 2 and 4 channel configuration which can be upgraded in the future to include additional channels up to a maximum of 4 channels. The Multi-Flo will ensure it meets your current and future requirements. -
Page 9: Unpacking The Multi-Flo
Unpacking the Multi-Flo Carefully unpack all items from the box and ensure the following items are included: Rigel Multi-Flo Infusion Device Analyser Mains Power Lead Multi-Flo Quick Start Guide Utilities Disc USB Cable 5 | Page Rigel Medical Multi-Flo User Manual V2.7... -
Page 10: Warnings And Cautions
Safety - Ensure that only accessories supplied by the manufacturer or accessories that meet the manufacturer’s specification are used. Safety - Where safe operation of the Multi-Flo is no longer possible it should be immediately shut down and secured to prevent accidental operation. -
Page 11: Multi-Flo Overview
Function keys F1 - F4 Start button Rotary encoder Stop/End button. Channel inlet connectors. Channel drain connectors. Folding legs Type A USB connection Type B USB connection IEC mains power lead connection Auxiliary output connection 7 | Page Rigel Medical Multi-Flo User Manual V2.7... -
Page 12: Getting Started
Ensure that the Multi-Flo is operated with the distilled or de-ionised water only. The Rigel Multi-Flo has two legs on the front base of the unit. These are designed to raise the front of the unit to improve the viewing angle of the colour graphic display. -
Page 13: Connecting To Your Multi-Flo Analyser
2. To prevent the formation of microscopic air bubbles in the pump chamber, keep the Multi-Flo unit primed unless draining is absolutely necessary. 3. If the Multi-Flo has been drained, to clear any microscopic air bubbles in the pump and pipework that could affect results, prime with 25ml Isopropyl Alcohol, followed by 50ml deionised water to flush the alcohol from the system. -
Page 14: Priming The Channels
Ensure that the length of outlet tubing is kept as short as reasonably practicable. 1.5 Priming the Channels Upon power-up the Multi-Flo is in automatic priming mode however, should priming be required at any stage, select PRIME F2 from the Main Menu;... -
Page 15: Draining The Channels
Once the fluid has been drained, press F1 to stop the draining process and return to the Main Menu. Warning; Once the fluid is drained, do not leave the drain pump facility running longer than necessary. 11 | Page Rigel Medical Multi-Flo User Manual V2.7... -
Page 16: Manual Mode
Highlight TEST TYPE and push the rotary encoder to select. This will allow you to toggle between Flow / Volume Test, Occlusion Test and PCA Test. 12 | Page Rigel Medical Multi-Flo User Manual V2.7... - Page 17 Once a test has finished the ELAPSED time will indicate COMPLETED in blue. Press F1 to go back to the Test Summary screen where the final results and time should be indicated and Duration set to READY in black for the next test. 13 | Page Rigel Medical Multi-Flo User Manual V2.7...
-
Page 18: Flow Rate / Volume Test
2.1 Flow Rate / Volume Test The Rigel Multi-Flo is capable of measuring the instantaneous flow at a resolution of 10µl/hr. In addition, the flow rate can be viewed based over an average period (user selectable) as well as detecting peak and minimal flow rates. - Page 19 Flow/Volume Test screen, or to exit back to the Summary Test screen. Setup your infusion device to the same settings as entered into the Multi-Flo and start the infusion. Press the green START button on the Multi-Flo to begin the test.
- Page 20 Pressing CH F4 enables the user to switch between channels which are running simultaneously. NOTE: The GREEN and RED buttons on the Multi-Flo are inactive when on the Graph screen. 16 | Page Rigel Medical Multi-Flo User Manual V2.7...
-
Page 21: Occlusion Test
Using the rotary encoder select OCCLUSION and press to enter. This will take you to the Occlusion Setup screen. Use the rotary encoder to determine the: Infusion Pump Type Upper Pressure Limit Lower Pressure Limit. 17 | Page Rigel Medical Multi-Flo User Manual V2.7... - Page 22 The MANUAL setting refers to an infusion device that does not provide for an automatic back-off of pressure. As such, the green START button on the Multi-Flo, must be pressed as soon as the occlusion alarm sound to record the occlusion.
- Page 23 During the Occlusion test select GRAPH F2 to view the graph of pressure against time Pressing CH F4 enables the user to switch between channels which are running simultaneously. NOTE: the GREEN and RED buttons on the Multi-Flo are inactive when on the Graph screen. 19 | Page...
-
Page 24: Patient Controlled Analgesia (Pca) Test
Once in the Test Setup highlight TEST TYPE and press the rotary encoder to confirm. Using the rotary encoder select PCA Test and press to confirm. This will take you to the PCA Setup screen 20 | Page Rigel Medical Multi-Flo User Manual V2.7... - Page 25 PCA test summary screen, or to exit without saving. Set up your infusion device to the same settings as entered into the Multi-Flo and start the infusion. Press the GREEN START button on the Multi-Flo to begin the test.
-
Page 26: Saving Manual Results
Pressing CH F4 enables the user to switch between channels which can run simultaneously. NOTE: the GREEN and RED buttons on the Multi-Flo are inactive when on the Graph screen. 2.4 Saving Manual Results Once a test has completed press... - Page 27 F4 to save the results under the inserted asset details. A dialog box will appear to confirm the results have saved. Select OK using the rotary encoder to go back to the Test Summary screen. 23 | Page Rigel Medical Multi-Flo User Manual V2.7...
-
Page 28: Auto Mode
(note that the enter key is not required). When using the barcode scanner, ensure the barcode scanner is paired with the Rigel Multi-Flo, see Chapter 6. When the barcode is ready to scan, the word “OK” will appear in the asset ID field. - Page 29 For the User test, either press PASS F4 or the GREEN button to continue, or the RED button to indicate that the user test could not be completed. If it is not completed the Failure menu would appear, see Chapter 3.1 for more details. 25 | Page Rigel Medical Multi-Flo User Manual V2.7...
- Page 30 PCA Test. Once the PCA Test has completed the test will indicate COMPLETED in blue. This test is then followed by an Occlusion test. 26 | Page Rigel Medical Multi-Flo User Manual V2.7...
-
Page 31: Abort/Failure Menu
Once the Occlusion test has successfully finished COMPLETED will be indicated in Blue and the Multi-Flo will go to the Summary Test screen indicating COMPLETED and SAVING in green to indicate the end of the sequence. -
Page 32: Test Sequences
Select KEYBOARD to change the format from QWERTY to ABCD style; Press the GREEN button to confirm or RED button to cancel. The new sequence name should now appear in the Test Sequence Menu. 28 | Page Rigel Medical Multi-Flo User Manual V2.7... - Page 33 Press the INSERT F2 button to open the sequence for editing and start adding individual tests to the test sequence by pressing the button. 29 | Page Rigel Medical Multi-Flo User Manual V2.7...
- Page 34 Repeat the above steps until the required test sequence is completed. Additional tests can be inserted in the test sequence by highlighting the position in the sequence and press the ADD F2 button. The test will be inserted AFTER the highlighted position. 30 | Page Rigel Medical Multi-Flo User Manual V2.7...
- Page 35 Edit individual tests by selecting the required test and press EDIT F2 on the Edit Test Sequence Menu. Once the selected criteria have been set, confirm by pressing NOTE: To change the pressure unit measurement please refer to Chapter 7.4. 31 | Page Rigel Medical Multi-Flo User Manual V2.7...
- Page 36 In case the user test requires data entry such as a result, the user test can also include an engineer unit such as Ohms, Watts, and Celsius etc. Confirm the entry by pressing the confirm by pressing 32 | Page Rigel Medical Multi-Flo User Manual V2.7...
- Page 37 F1 from the edit test sequence menu and confirm the changes by pressing the rotary encoder when the save changes dialog box appears The new test sequence has now been added to the test library; 33 | Page Rigel Medical Multi-Flo User Manual V2.7...
- Page 38 Menu F4 to copy or delete the individual test. To copy, rename or delete a Test Sequence; from the Test Sequences menu, highlight the sequence required using the rotary encoder and select MENU F4. 34 | Page Rigel Medical Multi-Flo User Manual V2.7...
- Page 39 (starting from 2). All Copied test Sequences can be edited. Deleted Sequences will remove the highlighted test sequence from the memory of the Rigel Multi-Flo. 35 | Page Rigel Medical Multi-Flo User Manual V2.7...
-
Page 40: Remote Control Mode
4 Remote Control Mode The Rigel Multi-Flo can be operated using a computer running Med-eBase software V2.4 Remote control allows the user to control and set up test sequence from or higher. a PC connected to the analysing device via a USB cable. - Page 41 During the first connection the gadget serial driver needs to be installed. Please see Chapter 10.1 of the MedeBase User Manual for details of this process. NOTE: The Multi-Flo need to be in the Remote Control Menu before trying to connect to remote control on the Med-eBase Software as Gadget serial is only activated when Multi-flo is in remote control mode.
-
Page 42: Data
Stored data, using both manual and auto testing modes, can be viewed by selecting VIEW F2 from the DATA screen as shown above. Data can be sorted using the SORT F4 key which will sort on: Asset Number Date (Ascending or Descending) 38 | Page Rigel Medical Multi-Flo User Manual V2.7... -
Page 43: Transfer Data
DELETE F4 button. 5.2 Transfer Data The Rigel Multi-Flo is able to transfer data to and from the PC. From the Data screen select TRANSFER F3 to go to the Data Transfer Screen. Change the data format type by pressing the OPERATION F2 button between: ... - Page 44 If multiple file types are on the memory stick a message indicating ‘Incorrect file format’ may appear on the Multi-Flo as the unit tries to import all files with that same extensive thinking that they are the same file type. If this message appears it will be associated with the wrong type of file e.g.
-
Page 45: Download Data (Export)
Multi-Flo screen with OK to select ONLY ONCE the transfer is complete from the PC/Memory stick. In the Transfer Ready screen connect the Rigel Multi-Flo to the PC using a USB cable. The Multi-Flo will act as a REMOVABLE DISC data storage device. The data file can be... - Page 46 5.3.2 USB Memory Stick When using a USB memory stick it needs to be inserted into the Multi-Flo USB connection prior to selecting START F4 on the Data Transfer screen. The Memory stick acts as a REMOVABLE DISC data storage device. The data file is copied from the Multi-Flo onto the drive.
- Page 47 5.3.3 Bluetooth Before selecting to download via Bluetooth the Multi-Flo needs to have stored the PC Bluetooth as a Bluetooth Favourite. See Chapter 6 for Bluetooth Favourites. From the Data Transfer screen select PORT Bluetooth and OPERATION either Export results/CSV.
- Page 48 Bluetooth. 5.3.4 CSV Summary CSV Summary can be downloaded straight from the Multi-Flo as a text file; however, this is only a summary of the test and final results screen. CSV Full Export function is available from the Med-eBase software ONLY. Results therefore have to download into Med-eBase in SSS format and then export as a CSV file.
-
Page 49: Upload Data
(removable disc that is the Multi-Flo) when the multi-flo is connected to a PC. Alternatively the files can be stored on a USB stick and then plugged into the Multi-Flo. Using Med-eBase Software, Test Sequence can also be created and uploaded. To create and upload sequences from Med-eBase please see the MedeBase manual Chapter 8. -
Page 50: Transfer Test Sequences
Test sequences can be created on the Rigel Multi-Flo and in the Med-eBase Software. Sequences can then be shared across a number of Rigel Multi-Flo’s in order to have identical configuration of Test Sequences or shared with colleagues at different locations. - Page 51 NOTE: When uploading Sequence to the Multi-Flo make sure that only the type of file required is on the memory stick or in the removable drive as the Multi-Flo cannot distinguish between results and sequence files as they both have the rmfl extension.
-
Page 52: Bluetooth Favourites
6 Bluetooth Favourites In order for the Rigel Multi-Flo to automatically connect to the correct Bluetooth accessory, details of that accessory must be entered into the Bluetooth Favourites list on the Rigel device. The Bluetooth Favourites list comprises of two sub-lists (device types), each of which can store up to 3 accessories of the same type: ... - Page 53 Favourites. Turn off or disable unused Bluetooth devices when configuring Favourites. Note Seaward and Rigel accessories do not require a PIN. When the PC requires an authorisation (some Windows version might ask), enter 0000 (four zero’s) 49 | Page Rigel Medical Multi-Flo User Manual V2.7...
-
Page 54: Setup
7 Setup To enter the Setup mode, select Setup from the Main Menu using the rotary encoder. The setup menu allows the user to customise the Rigel Multi-Flo: View, edit or create test sequences (see Chapter 7.1) Configure the local time and date settings, (see Chapter 7.2) ... -
Page 55: Time / Date
Press 12/24 to toggle between 12 (am/pm) and 24 hour clock mode. Press FORMAT to toggle between DDMMYYYY and MMDDYYYY date format. Press F4 to save the changes, then F1 to exit. 51 | Page Rigel Medical Multi-Flo User Manual V2.7... -
Page 56: Test Sequences
7.2 Test Sequences The Rigel Multi-Flo can be set-up to perform automatic test sequences. These can be created by the user and can be specific to for example; manufacturers recommendations. The total number of possible test sequences is 100. From SETUP menu, select the Test Sequence option. See Chapter 3 Auto Mode on how to create test sequences. - Page 57 The user is given an option to select which part of the memory is being restored to the factory default. To restore the Multi-Flo to factory settings select Memory from the Main Menu and then RESTORE F4.
- Page 58 Warning: Restore Factory Settings cannot be undone and will remove all the customised items described above. Individual assets can be deleted from the view data menu, see Chapter 5.1 View Data 54 | Page Rigel Medical Multi-Flo User Manual V2.7...
-
Page 59: Pressure Measurement Unit
Once a selection has been made select F1 to exit. To confirm that the Multi-Flo has been converted to this pressure unit requested go back to the Main Menu and select TEST F1 and then MANUAL F4. Check that the pressure limits and values in the test configuration screen are for the unit measurement selected. -
Page 60: Languages
7.5 Languages Provides the ability to change the default language in the Rigel Multi-Flo. From the Main Menu, use the rotary encoder to highlight SETUP. Press the rotary encoder to enter the Setup Menu. Within the Setup Menu select LANGUAGES. -
Page 61: About Menu
The About screen shows the firmware versions and serial number of your device. Each active channel will have an individual serial number. Ensure you have this information available when contacting Rigel Medical for Technical Support or Service. See Chapter 9.3 for more information on Service and Calibration. - Page 62 Press F4 to view the Service and Calibration contact information. 58 | Page Rigel Medical Multi-Flo User Manual V2.7...
-
Page 63: Maintaining The Rigel Multi-Flo
Avoid using solvents and abrasive scouring agents to clean the external case of the Rigel Multi-Flo. If the Multi-Flo is subject to liquid ingress in a manner other than intended, the unit should be returned for repair, stating clearly the cause for repair. -
Page 64: Firmware Upgrade
The firmware is installed using a PC via the USB port or via a USB stick. To obtain the latest firmware, the Rigel Multi-Flo will need to be registered; this will also provide automatic upgrade alerts to the user. Please see the link below to register your product online. - Page 65 9.3.2 Stage 2 – Multi-Flo Library and Firmware Update This will need to be run to update libraries for the latest release of the Multi-Flo Firmware to work correctly and also includes the remote control firmware NOTE: When updating Stage 2 you will need to check that the upgrade has completed for the Active Channels ONLY within your Multi-Flo.
- Page 66 Multi-Flo cannot select between multiple firmware files with the same extension. Turn on the Multi-Flo while pressing the power button and holding the F1 button (refer to section 1.6 to identify the F function keys) until the Seaward Firmware Update Application screen appears.
-
Page 67: Return Instructions
When asking for a Returns Number, please quote: Instruments name, make and model Serial number Firmware version 9.5 Optional Accessories The 1 and 2 channel Multi-Flo configurations are field upgradeable to a maximum of 4 channels. USB keyboard ... -
Page 68: Specifications
PCA / Bolus measurements (Volume) Display Range 0.1 to 100ml Measuring Range 0.5 to 100ml Accuracy ± 1% of the reading Max. resolution 10µl Basal flow rate 1ml to 30ml/h Pressure Max. 2500mmHg 64 | Page Rigel Medical Multi-Flo User Manual V2.7... -
Page 69: General Specifications
LCD colour graphic display ¼” VGA Display 10.3 Environmental Conditions The Rigel Multi-Flo has been designed to perform tests and measurements in a dry environment. Maximum barometric elevation for making measurements is 2000m. Protective system IP40 according to IEC 60529. -
Page 70: Support
CalibrationHouse Tel: +44 (0) 191 587 8739 11 Bracken Hill Fax: +44 (0) 191 518 4666 South West Industrial Estate Email: info@calibrationhouse.com Peterlee, County Durham SR8 2SW, United Kingdom Part of 66 | Page Rigel Medical Multi-Flo User Manual V2.7...
Need help?
Do you have a question about the MULTI-FLO and is the answer not in the manual?
Questions and answers