Table of Contents
Advertisement
Voice Control Speaker with Camera
VC-FLX
Instruction Manual
Cautions and Disclaimers .......................................2
Safety Precautions .....................................................2
Disclaimers, Trademarks, etc. ...................................4
Parts Name ...............................................................6
Light Ring Status .......................................................8
Preparation and Setup ............................................9
Initial Setup and Pairing ........................................10
Items on Home Screen ..........................................13
Setting Manager Screen ..........................................14
Sensors Manager screen .........................................15
Rules Manager Screen ............................................18
History Screen .........................................................19
Using the unit .........................................................20
Enjoying Audio Source ............................................20
Live Video ................................................................21
Amazon Alexa ..........................................................22
Sensors on the unit ..................................................22
Troubleshooting ....................................................23
Specifications ........................................................24
En
Advertisement
Table of Contents

Related Manuals for Onkyo VC-FLX


Summary of Contents for Onkyo VC-FLX
-
Page 1: Table Of Contents
Voice Control Speaker with Camera VC-FLX Instruction Manual Cautions and Disclaimers ........2 Safety Precautions .............2 Disclaimers, Trademarks, etc........4 Parts Name ...............6 Light Ring Status ............8 Preparation and Setup ..........9 Initial Setup and Pairing ........10 Items on Home Screen ..........13 Setting Manager Screen ..........14... -
Page 2: Cautions And Disclaimers
ARISING OUT OF THE USE OF THE PRODUCT IN ANY The rating plate is on the bottom of the product. CRITICAL APPLICATIONS. IF YOU USE THE PRODUCT IN A CRITICAL APPLICATION, YOU, AND NOT ONKYO WARNING: Corporation, ASSUME FULL RESPONSIBILITY FOR TO REDUCE THE RISK OF ELECTRIC SHOCK, DO NOT SUCH USE. - Page 3 Changes or modifications made to this equipment not expressly approved by ONKYO Corporation or parties PRECAUTIONS authorized by ONKYO Corporation could void the user's authority to operate the equipment. Notes on handling 0 When shipping the product, the original shipping carton FCC Radiation Exposure Statement and packing materials come in handy.
-
Page 4: Disclaimers, Trademarks, Etc
Onkyo is not responsible for, and Toshiba and Amazon may change their services, their Terms of Service and their respective Privacy Policies from time to time, and may limit or discontinue providing their services in their sole discretion. - Page 5 Third party internet services are not provided by ONKYO Corporation, may change or be discontinued at any time and may be subject to internet service provider restrictions. ONKYO Corporation makes no warranties, representations, or assurances about the content, accuracy, availability or functionality of third- party content The Wi-Fi CERTIFIED Logo is a certification mark of Wi-Fi or services.
-
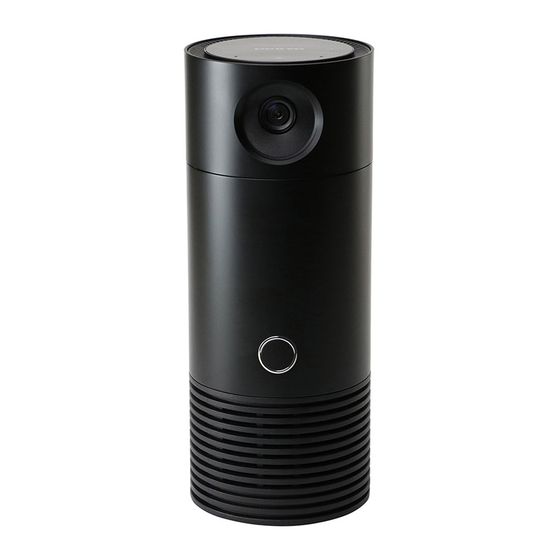
Page 6: Parts Name
Parts Name Front Back 1. Network/Pairing button ® Press briefly to activate Bluetooth pairing mode. Press and hold for about 5 seconds to activate Wi-Fi pairing mode. Note 0 Each pairing mode is activated for 60 seconds. 2. USB terminal The USB terminal is for service use only. - Page 7 Accessory AC adapter...
-
Page 8: Light Ring Status
Light Ring Status This unit’s light ring lights up/flashes in different colors to indicate its status. Ring LED color and status Status of unit Lights up white. This unit has been turned on. Ready for initial setup. Successful Wi-Fi setup. This unit is requesting the invitation code. -
Page 9: Preparation And Setup
Preparation and Setup Follow the steps below to use the unit. 1. Placement of your unit. Because this unit includes a home monitoring camera, you should place it where the camera can see what you want to monitor. On a shelf or on the kitchen counter are great options. -
Page 10: Initial Setup And Pairing
Initial Setup and Pairing Follow the steps below to perform initial setup and pairing the 3. Tap Initial Setup. unit with Toshiba Smart Home app. Before performing initial setup, check the OS version of your smartphone. You can use Toshiba Smart Home app on the following OS. - Page 11 7. When the screen below appears, tap the wireless router to 11. Log in to Amazon Alexa. connect from the list. 12.Select a zone which the paired this unit covers. Enter the password for the selected wireless router and tap Done. 8.
- Page 12 Important 0 When you select a zone where water may splash (e.g. kitchen), do not place your unit at a place subject to water. 13.Tap Done on the Zone Select screen. Initial setup is now complete. Adding another smartphone to this unit Follow the steps below to add another smartphone to this unit.
-
Page 13: Items On Home Screen
Items on Home Screen device in the Central Static Controller Role type. 0 When receiving Basic Command, this product ignores it and do nothing, since it is not supported or mapped to any commands. 0 Regarding the Z-Wave Web UI with Z-Wave detailed function, refer to the Z-Wave Web UI User Guide. -
Page 14: Setting Manager Screen
10. Alexa Skills Setup information will be transferred to a website of the service Tap to display the login page to Toshiba skill. supplier. Please note that ONKYO Corporation bears no 11. Loud Noise Detection responsibility for issues regarding your personal Tap to adjust the noise detection level. -
Page 15: Sensors Manager Screen
Sensors Manager screen Tapping Sensors on the Setting Manager screen displays the Sensors screen below. Sensors registered by default are shown on the screen. In addition, you can add/remove/delete/edit sensors. Up to 40 sensors can be registered. Regarding the sensor, it corresponds to standard products of ZigBee and Z-Wave for US market. Important 0 Do not use a sensor of countries other than that of the US market. - Page 16 Adding a sensor Follow the steps below to add a sensor. 1. Tap on the Home screen. Sensors 5. Tap Done 2. Tap Add Sensor The sensor has been added to the app. Removing a sensor Follow the steps below to remove a sensor. 3.
- Page 17 The screen below appears and the app starts removing The sensor has been deleted. the sensor. Editing a sensor On the screen, you can edit following items. Edit Sensor 0 Product name of the sensor 0 Zone where the sensor is placed 0 Name of each sensor class to control 0 Design of icon to display on the Home screen Edit Sensor...
-
Page 18: Rules Manager Screen
Rules Manager Screen 2. Tap Add New Rules Follow the instructions on the displayed screen. Editing Rules 1. Tap an item to edit on the screen. Rules Manager screen appears. Edit Rule 2. Tap an item to edit on the Edit Rule screen. -
Page 19: History Screen
History Screen Recording history on the cloud is displayed on the History screen. Up to 64 Notification History will be stored. In addition, you can change order of the list according to the cause of recording. * The screen appearance is subject to change without notice. Important 0 Cloud recording is executed only for users who purchase account services. -
Page 20: Using The Unit
Using the unit Enjoying Audio Source 2. Press the Network/Pairing button once to activate Wi-Fi pairing mode (AP mode) on your unit. Connect your smartphone to the unit via wireless connection The Light ring LED flashes in white fast. (Bluetooth or Wi-Fi) to enjoy audio source on your 3. -
Page 21: Live Video
Live Video Follow the steps below to use live video function of this unit. 1. Open the Toshiba Smart Home app. The home screen appears. 2. Select a this unit to use from on the Device Setting screen. Manager Setting Manager Screen ( P14) 3. -
Page 22: Amazon Alexa
Amazon Alexa Sensors on the unit This unit is compatible with Amazon Alexa, which allows you This unit is equipped with the sensors below. to control this unit by talking to it. Temperature sensor Before using Amazon Alexa, make sure initial setup is You can monitor the room temperature using the Toshiba completed and you are signing in to Amazon Alexa. -
Page 23: Troubleshooting
Troubleshooting Problems with Pairing : Make sure this unit is plugged in. Check1 : Make sure this unit is in the pairing mode. Check2 : Place your wireless router or device closer to this Check3 unit. : Make your smartphone’s battery is sufficiently Check4 charged. -
Page 24: Specifications
Humidity sensor (range: 10 - 80 %, resolution: d4%) Illuminance sensor (range: 0 - 3,000 lux, resolution: 0.4lux) Internal mics 2 mics (Top) Acoustic echo canceller Beamforming Sound detection Internal speaker 5 W (5 ohm) x 1 ONKYO system speaker (enclosure), Siren... - Page 25 The above-mentioned information is subject to change without prior notice. Visit the Onkyo web site for the latest update. F1708-0 (C) Copyright 2017 Onkyo & Pioneer Corporation Japan. All rights reserved. http://www.onkyo.com/privacy/ * 2 9 4 0 3 1 9 9 *...
Need help?
Do you have a question about the VC-FLX and is the answer not in the manual?
Questions and answers