
Related Manuals for Leica HistoCore PERMA S


Summary of Contents for Leica HistoCore PERMA S
- Page 1 HistoCore PERMA S Slide Printer Instructions for Use - English Order No.: 14 0606 80101 – Revision A Always keep this manual with the instrument. Read carefully before working with the instrument.
- Page 2 Manufactured by: Primera Technology, Inc. Two Carlson Parkway North, Suite 375 Plymouth, MN 55447-4446 U.S.A. Distributed by: Leica Biosystems Nussloch GmbH Heidelberger Straße 17-19 DE-69226 Nussloch Germany...
- Page 3 ALL LABORATORIES MUST PERFORM THEIR OWN TESTS TO ENSURE THAT THE INK IS RESISTANT AGAINST THE VARIOUS REAGENTS THE SLIDES WILL SUBSEQUENTLY BE EXPOSED TO A WIDE RANGE OF FACTORS BEYOND LEICA'S CONTROL CAN HAVE NEGATIVE EFFECTS ON THE RESULTS. THE LABORATORY OPERATING THE UNIT SHALL BEAR FULL RESPONSIBILITY FOR THE LEGIBILITY OF THE IMPRINT AFTER PROCESSING WITH REAGENTS.
- Page 4 Všechny laboratoře musejí provádět své vlastní testy, aby zajistily, že použitá tiskařská barva bude odolná vůči různým činidlům, jejichž působení budou sklíčka následně vystavena. Výsledky může negativně ovlivnit široká škála faktorů, na které nemá společnost Leica vliv. Za ostrost tisku po jeho zpracování pomocí činidel plně zodpovídá laboratoř, která tuto jednotku provozuje.
- Page 5 Existe uma vasta gama de fatores fora do controlo da Leica, que poderão afetar negativamente os resultados. O laboratório que operar o aparelho, após o processamento com os reagentes, assumirá toda a responsabilidade pela legibilidade da impressão.
- Page 6 Tous les laboratoires doivent effectuer leurs propres tests pour s'assurer que l'encre est résistante aux divers réactifs auxquelles les lames seront ensuite exposées. De nombreux facteurs hors du contrôle de Leica peuvent avoir des effets négatifs sur les résultats. L'entière responsabilité de la lisibilité de l'empreinte suite au traitement avec des réactifs incombe au laboratoire chargé...
- Page 7 Svi laboratoriji moraju provesti vlastita ispitivanja kako bi se uvjerili da je tinta otporna na razne reagense kojima će stakalca naknadno biti izložena. Na rezultate mogu negativno utjecati raznorazni čimbenici koje tvrtka Leica ne može predvidjeti. Laboratorij u kojem se jedinica rabi u potpunosti odgovara za čitljivost ispisa nakon obrade reagensima.
- Page 8 Er zijn vele factoren die van negatieve invloed zijn op de uitkomsten, en die buiten de macht van Leica vallen. Het laboratorium waar het apparaat wordt gebruikt is als enige verantwoordelijk voor de leesbaarheid van de afdruk na bewerking met reagentia.
- Page 9 Ogni laboratorio deve eseguire i propri test per assicurarsi che l'inchiostro sia resistente ai vari reagenti a cui i vetrini saranno esposti. Esiste un gran numero di fattori al di fuori del controllo di Leica che possono influire negativamente sui risultati. La responsabilità della leggibilità della stampa dopo l'esposizione ai reagenti è...
- Page 10 Все лаборатории обязаны самостоятельно выполнять тесты по устойчивости чернил различным реагентам, воздействую которых будут подвергаться стекла. Негативное воздействие на конечный результат может оказывать широкий спектр факторов, не зависящих от Leica. Лаборатория, выполняющая работу, несет полную ответственность за читаемость отпечатка после взаимодействия с реагентами.
- Page 11 ανθεκτικό στα διάφορα αντιδραστήρια στα οποία εκτίθενται ακολούθως τα πλακίδια. Υπάρχουν πολλοί παράγοντες τους οποίους δεν μπορεί να ελέγξει η Leica και οι οποίοι μπορούν να έχουν αρνητική επίδραση στα αποτελέσματα. Την ευθύνη για την αναγνωσιμότητα του αποτυπώματος μετά την...
-
Page 12: Table Of Contents
Table of Contents Section 1: Getting Started ................13 A. Choosing a Good Location ............13 B. Unpacking and Inspection ............. 14 C. Identifying the Parts ................15 D. Slide Specifications ................. 17 E. Connect Power ..................18 F. Load a Ribbon ................. 19 G. - Page 13 This page is intentionally left blank.
-
Page 14: Section 1: Getting Started
To begin using your device, please read this manual carefully. This instructions for use is a guide to the HistoCore PERMA S Slide Printer only. There are other accessories and software that work with the HistoCore PERMA S Slide Printers. Those items are purchased separately and include their own instructions for use. -
Page 15: Unpacking And Inspection
While unpacking your Printer, inspect the carton to ensure that no damage has occurred during shipping. Make sure that all supplied accessories are included with your unit. The following items should be included: • HistoCore PERMA S Slide Printer • Power cord • Power converter •... -
Page 16: Identifying The Parts
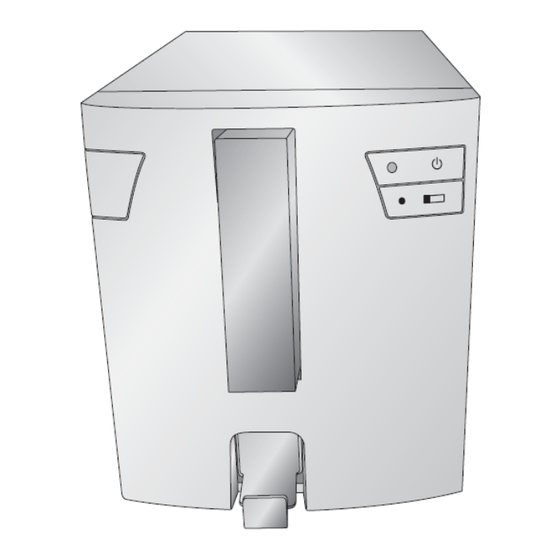
C. IDENTIFYING THE PARTS The following illustrations show the various parts of the printer. These parts will be referred to throughout this manual so return here if you ever encounter a term that is unfamiliar to you. Power Button Slide Button Slide Cartridge Cover Release Slide Bin... - Page 17 Rear View Rear Access Power Panel...
-
Page 18: Slide Specifications
Slides must have a coated color frosting. The coating must be of uniform thickness across the entire width of the slide. The HistoCore PERMA S Slide Printer uses thermal transfer print technology. This print technology requires stricter standards on the surface finish and cleanliness of the slide's frosted coating compared to slides that are used with ink jet technology printers. -
Page 19: Connect Power
E. CONNECT POWER Attach the power cord to the Power brick. Plug the power cord into a grounded outlet and the 5 mm barrel connector to the back of the printer. The power converter is a universal 100V-240V input and a 12V output. DO NOT CONNECT USB UNTIL THE PRINTER DRIVER HAS BEEN INSTALLED. -
Page 20: Load A Ribbon
F. LOAD A RIBBON The HistoCore PERMA S Slide Printer uses either a Black ribbon (5000 prints) or a CMYK Color ribbon (1000 prints). You must use Leica ribbons to print with the HistoCore PERMA S Slide Printer. Remove a Color or Black Ribbon from its packaging. - Page 21 Remove the ribbon from its shrink wrapped packaging. Hold the take up (back) ribbon core with your left hand. Hold the supply (front) ribbon with your right hand. Install the take up ribbon by depressing the spring loaded hub inside the printer. Snap the take up ribbon core into place.
- Page 22 Rotate the hubs until the tabs on the right side hubs match the notches on the ribbon. Manually turn the take up core until the ribbon is taut.
-
Page 23: Load A Slide Cartridge
G. LOAD A SLIDE CARTRIDGE Remove the empty blue slide cartridge by pulling up and out. Open the blue side cartridge. Locate the 100 pack slide box. - Page 24 Place the slides next to the blue side cartridge so that the printable surface is on the TOP of the slide with the orientation shown below. Note: To achieve the proper orientation, it may be necessary to replace the box top, flip the box over and remove the other side of the box.
- Page 25 Once the slides are in place, straighten any that did not properly fall in the cartridge and ensure the printable surface is facing up and near the front of the cartridge as it is placed in the printer. Important Note! To prevent Printable Surface feeding problems, a).
-
Page 26: Install The Printer Driver
H. INSTALL THE PRINTER DRIVER To connect the printer with your computer, please follow these instructions. Insert the installation USB stick. DO NOT PLUG IN THE USB CABLE UNTIL PROMPTED BY THE INSTALLER. Follow the prompts in the installer to install the printer driver. -
Page 27: Scanner Zebra Ds6707 Configuration For Ptlab
_______________________________________________________________ I. SCANNER ZEBRA DS6707 CONFIGURATION FOR PTLAB Before using the Scanner in PTLab follow the instructions from below: 1. Install the scanner driver via the installer from the USB flash drive 2. After successful installation and restart scan the Barcode from below to simulate the CDC Host Mode 3. -
Page 28: Section 2: Printing Slides
Section 2: Printing Slides You may use the Leica PTLAB software to print to the HistoCore PERMA S Slide Printer. The PTLab software has its own instructions for use. Please refer to it for detailed capabilities. A. PRINTING FROM OTHER PROGRAMS Printing to the Slide Printer from other software can be accomplished by using the standard Windows driver. - Page 29 Paper Size: Default paper size is set to the maximum. Edit these settings if you are printing to slides with a smaller printable area. Orientation: Change the orientation to Portrait or Landscape. Print Heat: Increase or decrease the Print Heat from 1-255. Increase to print heat to improve print quality.
-
Page 30: Section 3: Maintenance And Troubleshooting
Section 3: Maintenance and Troubleshooting A. INDICATOR LIGHTS AND ERROR CODES Power light on Steady - Ready to receive Print. Slide Cartridge light ON Power light on Steady - No ribbon installed and/ Slide Cartridge light OFF or No Slide Cartridge Installed. Flashing Slide Cartridge light An error is present. -
Page 31: Cleaning The Print Head
Slide Cartridge Invalid 80 0 Ribbon PWM 40 0 Head Load 20 0 Input Empty 10 0 Input Jam 08 0 Ribbon Advance Error 04 0 Ribbon Invalid 02 0 Lifter Not Functioning 01 0 Ribbon Out 00 01 Ribbon Break 00 02 Output Full 00 08... -
Page 32: Intensive Print Head Cleaning
Locate the Print head mounted to the underside of the cover. Burn Line Important Note: To prevent damage to print head, do not touch the burn line with a finger ring containing diamond or metal. Clean the print head using the print head pen. Swipe the tip across the burn line 1 or 2 times. -
Page 33: Replacing The Print Head
D. REPLACING THE PRINT HEAD Vertical Line in Print If cleaning the print head (Section 3B) does not resolve a quality problem such as a vertical line through the entire print, it may be time to replace the print head. Print heads are designed to last tens of thousands of prints. -
Page 34: Troubleshooting Print Quality
Connect the new print head. Rotate the printhead 180 degrees and push it back into the metal housing. IMPORTANT! Find the Resistance value printed on the printhead. Example: R= 3180 Resistance Value Printed Here Before printing, enter this value in the advanced settings area of the PTLab software. - Page 35 Vertical Line. A line vertically through the entire print is cause by dust or debris on the print head burn line or blown pixel on the print head. See Section 3B for cleaning instructions and 3C for print head replacement instructions.
-
Page 36: Repairing/Preventing Ribbon Breaks
Random Missing Area (Printable Surface Missing). If the printable surface is missing or scratched off, the printer cannot print in these areas. Low quality slides, defective slides or mishandling of slides may be the cause of this problem. Rounding at the leading edge. Rounding at the leading edge of any new color on a slide is typically caused by low quality slides or slides that are not thermal printable (inkjet). -
Page 37: Retrieving A Broken Or Stuck Slide
Feed the supply side of the ribbon under the take up roll. Tape the supply ribbon to the take-up roll. Manually turn the take-up roll several complete rotatations to prevent the tape from coming loose. Close the Cover. G. RETRIEVING A BROKEN OR STUCK SLIDE If a slide is broken or stuck in the system there are two access panels that can be used to retrieve the slide. - Page 38 Remove the slide cartridge. In the slide cartridge compartment check near the bottom roller for a slide. Check under the ribbon. Use the Power and Slide buttons to move the slide to a position where you can remove it. Tip! Once the slide is on the rubber belts near the back, you can close the cover and press the slide button to advance the slide down the slide chute.
-
Page 39: Cartridge Or Ribbon Recognition Problems
Finally if the slide is broken you can remove it using the bottom catch bin. Pick up the slide printer and rotate it in multiple directions until all of the pieces are in the bin. Now pull out the bin and empty it into the trash. Catch Bin H. -
Page 40: Service Information
I. SERVICE INFORMATION If you are in need of technical customer support or spare parts, please contact your Leica representative or the Leica dealer where you purchased the instrument. Please provide the following information: - Model name and serial number of the instrument. -
Page 41: Section 4: Technical Specifications
Section 4. Technical Specifications Printing technology: Thermal transfer Print speed: Up to 9 slides/minute (monochrome) Up to 5 slides/minute (solid colors) Up to 4 slides/minute (process colors) 300 Print resolution: Ink type: Resin thermal transfer Ribbon types: Color: 1000 prints Black: 5000 prints Printable colors: 8 solid colors...
Need help?
Do you have a question about the HistoCore PERMA S and is the answer not in the manual?
Questions and answers
Monitor crashed but with lights on power and lights button. also wand wont turn on
our monitor crushed, wand is not working