Behringer FCB1010 User Manual
Hide thumbs
Also See for FCB1010:
- Using manual (38 pages) ,
- User manual (16 pages) ,
- Quick start manual (12 pages)
Table of Contents
Advertisement
Advertisement
Table of Contents

Related Manuals for Behringer FCB1010


Summary of Contents for Behringer FCB1010
- Page 1 User’s Manual Version 1.2 September 2001...
-
Page 2: Safety Instructions
MIDI FOOT CONTROLLER FCB1010 SAFETY INSTRUCTIONS CAUTION: To reduce the risk of electric shock, do not remove the cover (or back). No user serviceable parts inside; refer servicing to qualified personnel. WARNING: To reduce the risk of fire or electric shock, do not expose this appliance to rain or moisture. - Page 3 I would like to thank all people whose help on “Project FCB1010” has made it a reality. Everybody has made very personal contributions, from the designers to many staff members, and finally to you, the user of BEHRINGER products.
- Page 4 Ultra-flexible MIDI FOOT CONTROLLER with two expression pedals and MIDI merge function s 10 banks of presets, each with 10 fully user-editable presets customized for BEHRINGER amplifiers s Two expression pedals with freely assignable MIDI channel, controller number and range...
-
Page 5: Table Of Contents
2.4.4 Programming the NOTE function and/or SWITCHES ............13 2.4.5 TAP-TEMPO function ......................14 2.5 Data storage ..........................15 2.5.1 Saving the FCB1010 memory with the help of SysEx dumps ..........15 2.5.2 Receiving SysEx dumps ..................... 15 2.6 Restoring all original settings ......................16 3. -
Page 6: Introduction
1.2 Before you begin Your FCB1010 was carefully packed in the factory and the packaging is designed to protect the unit from rough handling. Nevertheless, we recommend that you carefully examine the packaging and its contents for any signs of physical damage, which may have occurred during transit. -
Page 7: Control Elements
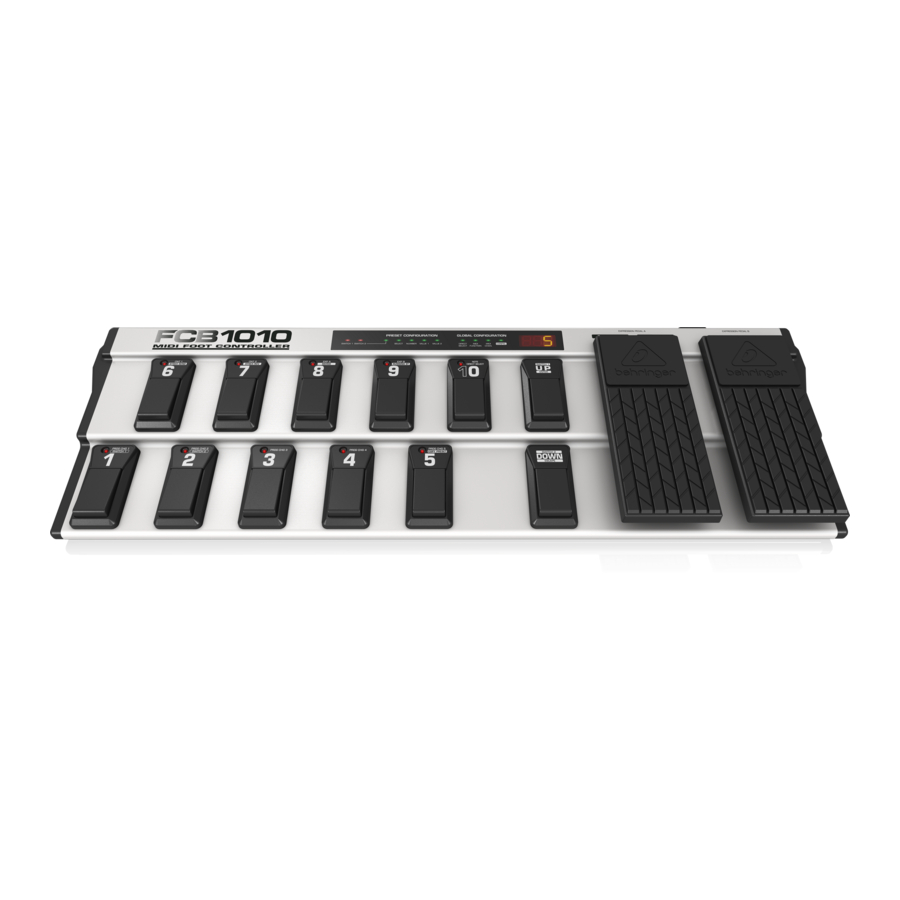
1.3.1 Front panel Fig. 1.1: Front panel control elements The foot switches 1 through 10/0 allow you to select PRESETS, program your FCB1010 and enter data in programming mode. The UP/DOWN switches are used to scroll through the various BANKS and programming levels. In programming mode, UP and DOWN are your ENTER and ESCAPE keys respectively. -
Page 8: Rear Panel
2. PROGRAMMING THE FCB1010 In this chapter you will learn to program your FCB1010 and adapt it to your specific MIDI set-up. But don’t worry, you won’t have to learn a programming language before you could give your FCB1010 a single MIDI command. - Page 9 MIDI FOOT CONTROLLER FCB1010 Fig. 2.1: PRESET selection with DIRECT SELECT disabled Step 1: Use the UP/DOWN switches to go to the BANK that contains the PRESET of your choice (here: BANK #3). Step 2: Select the PRESET you wish to use (here: PRESET #1).
-
Page 10: Global Setup
In the GLOBAL SETUP menu you can set the parameters that apply to both the PRESETS and FUNCTIONS of your FCB1010 (e.g. MIDI channel selection, SYSEX SEND & RCV, DIRECT SELECT etc.). s Keep the DOWN switch pressed during power-up for about 2.5 s to enter GLOBAL SETUP mode. The DIRECT SELECT LED in the display lights up. -
Page 11: Quick Start Guide For Preset Programming
MIDI FOOT CONTROLLER FCB1010 Basically, functions in the CONFIGURATION mode are activated as soon as the LED of the respective foot switch lights up. s Press UP/ENTER to return to point 2 (DIRECT SELECT), or DOWN to return to point 6 (MIDI channel selection). -
Page 12: Detailed Preset Programming
MIDI FOOT CONTROLLER FCB1010 2) If you selected CNT1 or CNT2, you can now enter the number of the controller to be sent (0 through 127) when you press the corresponding foot switch. After confirming your selection with UP/ENTER you can now select a controller value (0 through 127). -
Page 13: Programming Expression Pedal A/B And/Or Switches
Use the foot switches 1 through 10/0 or EXPRESSION PEDAL A to enter the MAX. value (this is the value the FCB1010 transmits when the pedal is pressed down completely). s Confirm your selection with UP/ENTER. The SELECT LED lights up. -
Page 14: Tap-Tempo Function
2.4.5 TAP-TEMPO function In addition to the NOTE function, which is used by many effects devices to “tap” the song tempo, the FCB1010 offers you another way to reach this goal: the TAP-TEMPO function also allows you to enter the song tempo, however, transmits a FCB1010-generated controller value to the controlled effects device, in order to adjust the delay time. -
Page 15: Data Storage
To use the tap-tempo feature, press the foot switch (which selects the PRESET just programmed) twice in the rhythm of the music, e.g. every crotchet or quaver note. The FCB1010 will calculate the delay time and send it to the receiving device, by means of the controller you selected before. If the interval between the two foot switch presses is greater than the maximum NOTE/NUMBER value, the FCB1010 will divide the time by 2 until it is equal to or smaller than the maximum value. -
Page 16: Restoring All Original Settings
At the heart of this network you could use your FCB1010 to control all of your amplifiers, effects and peripheral devices. Live on stage and in the studio you could control your entire equipment in real time. MIDI control data can be stored and edited on a computer, so that you can also use your FCB1010 to enter controller and program change information into your computer. -
Page 17: Midi Data Format
4.2 MIDI data format Although the FCB1010 is very easy to operate, it does make sense to know a few things about the format of MIDI data. Each MIDI command or message consists of up to three bytes (1 byte = 8 bits). There’s a difference between status bytes and data bytes: status bytes define the type of a specific MIDI message, i.e. -
Page 18: Running Status
Running Status the data amount can be reduced by 7 times 8 bits, i.e. 56 bits. As a consequence, the overall data amount produced by the scale mentioned above is only 136 bits. With the FCB1010 you are free to switch the Running Status feature on or off. 5. APPENDIX 5.1 MIDI Implementation... -
Page 19: Specifications
3.5 kg BEHRINGER is constantly striving to maintain the highest professional standards. As a result of these efforts, modifications may be made from time to time to existing products without prior notice. Specifications and appearance may differ from those listed or illustrated. -
Page 20: Warranty
BEHRINGER Spezielle Studiotechnik GmbH. BEHRINGER is a registered trademark. ALL RIGHTS RESERVED. BEHRINGER Instrument Amplification is a Division of BEHRINGER. © 2001 BEHRINGER Spezielle Studiotechnik GmbH.
Need help?
Do you have a question about the FCB1010 and is the answer not in the manual?
Questions and answers