Table of Contents
Advertisement
Quick Links
Quick Start Guide
Version 1.1
This Quick Start Guide is intended to help you quickly get your unit unpacked, mounted, and
connected. For detailed instructions, see the SATABoy/SASBoy Installation and
Maintenance Manual or the Nexsan User Manual.
Taking Delivery
Upon receipt of your SATABoy/SASBoy, inspect the packaging for damage that may have been
sustained in transit. If there is visible damage on the packaging, contact your shipper before
proceeding.
Unpacking the Unit
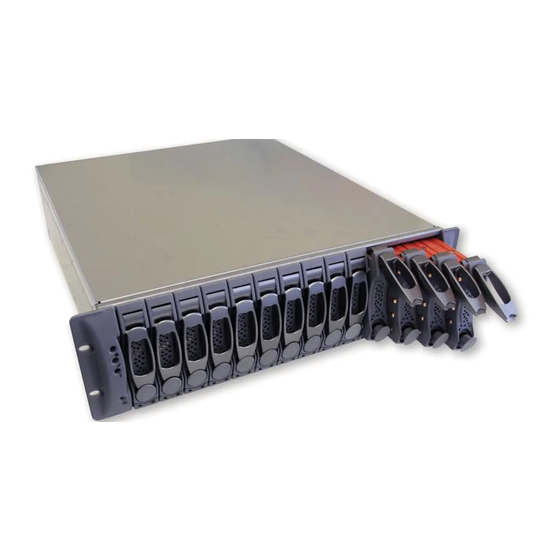
Carefully unpack your SATABoy/SASBoy and inspect each item before installation:
1. Carefully cut the tape holding the box closed.
2. Remove the cardboard spacers and the disk box from the outer box.
3. Inspect the items in the foam spacer. The accessories should include:
•
rack-mounting hardware: two (2) rails, one left and one right; two (2) rail mounting brackets, one
left and one right; four (4) large screws for securing the rail mounting brackets to the rack; four
(4) flanged screws for securing the rails to the rail mounting brackets; eight (8) screws and eight
(8) washers for securing the rails to the chassis; four (4) rack bolts and four (4) cage nuts for
securing the SATABoy/SASBoy to the rack
•
other accessories: two (2) power cables; disposable ESD strap; serial cable; any additional items
that may have been ordered, such as Fibre Channel cables
4. Open the disk box and make sure that the proper number of disk drives is included.
5. Remove the accessories from the foam spacer, then remove the foam spacer from the box.
6. With the help of a second person, carefully lift the SATABoy/SASBoy unit out of the packaging.
The packaging that the unit ships in is reusable and should be retained for future re-shipment. Be sure
to keep all packaging components.
Before You Begin
Required Tools and Equipment
To perform the installation, you will need the following tools and equipment:
•
a suitable equipment rack with sufficient load capacity to hold the SATABoy/SASBoy
•
a size P1 Phillips-head screwdriver
•
enough CAT6 Ethernet cable to connect the SATABoy to the local area network (LAN)
•
enough CAT6 Ethernet cable, fibre-optic cable, or twisted-pair copper cable to connect the SATABoy
to the storage area network (SAN)
Prepare the Site
Before installing the SATABoy/SASBoy, prepare the installation site and rack. See Safety Information
for critical site and rack preparation information.
/
1
Advertisement
Table of Contents

Subscribe to Our Youtube Channel
Related Manuals for Nexsan SATABoy


Summary of Contents for Nexsan SATABoy
-
Page 1: Quick Start Guide
5. Remove the accessories from the foam spacer, then remove the foam spacer from the box. 6. With the help of a second person, carefully lift the SATABoy/SASBoy unit out of the packaging. The packaging that the unit ships in is reusable and should be retained for future re-shipment. Be sure to keep all packaging components. - Page 2 Attach Rack Mounting Hardware 1. At a suitable location in the front of the rack, insert the cage nuts. 2. Loosely attach the rear mounting brackets to the rear of the rack, then screw two flanged-head screws into the sides of each bracket. Be sure to leave approximately 1mm of thread showing. Prepare the Unit Remove the PSUs and RAID Controllers from the unit: 1.
- Page 3 CAUTION: Only support the unit by placing hands under the metal chassis. Do NOT attempt to lift the unit by any plastic parts or module handles. 3. With the help of a second person, lift the SATABoy/SASBoy unit and insert it between the left and right rack sections.
- Page 4 5. While still supporting the unit, insert the four front mounting bolts through the holes in the chassis ears and secure them into the cage nuts. 6. Tighten the screws holding the rear mounting brackets to the rack, then tighten the screws on the sides of the mounting brackets to secure the mounting rails.
-
Page 5: Attach Cables
The Nexsan Product ID is located on the bottom left of the rear panel. Go to http://register.nexsan.com to register your product. Once the unit has finished booting up, follow the instructions in Chapter 1, Basic Setup of the Nexsan User Manual to get your SATABoy/SASBoy system up and running. -
Page 6: Safety Information
, SASBoy and the Nexsan logo are trademarks or registered trademarks of Nexsan Corporation. All other trademarks and registered trademarks are the property of their respective owners. NEXSAN 1445 Lawrence Drive, Thousand Oaks, CA 91320 | p. 866.4.NEXSAN | www.nexsan.com...
Need help?
Do you have a question about the SATABoy and is the answer not in the manual?
Questions and answers