Advertisement
Quick Links
Warning:
WARNING FOR YOUNG CHILDREN - This product contains small
components, please ensure that they are kept away from small
children. Children under the age of 6, small infants and babies must not
sleep on this bed for safety reasons. To prevent injury and damage to
this unit, PROHIBIT jumping on it.
This product is designed for home use and not intended for commercial
use.
THIS INSTRUCTION BOOKLET CONTAINS
IMPORTANT SAFETY INFORMATION. PLEASE
READ AND KEEP FOR FUTURE REFERENCE.
Please Recycle
Recicle Por Favor
29986 59844
0
8
Se localizan las traducciones españolas en el centro de este
manual.
5984303WCOM
DO NOT RETURN PRODUCT TO THE STORE
STOP
Individual stores do not stock parts.
Date of Purchase
___ / ___ / ___
If a part is missing or damaged, visit our website or call our toll-free
customer service line. We will gladly ship your replacement parts
FREE of charge.
Need Parts or Assistance?
WWW.AMERIWOOD.COM/PARTS
or call toll free:
1-800-489-3351
For prompt, reliable service please have your assembly manual ready.
Recommended # of people needed for assembly: 2
(however it is always better to have an extra hand.)
Estimated assembly time is 2 hours.
B345984303WCOM 0
Advertisement

Related Manuals for Ameriwood HOME 5984303WCOM


Summary of Contents for Ameriwood HOME 5984303WCOM
- Page 1 5984303WCOM 29986 59844 DO NOT RETURN PRODUCT TO THE STORE STOP Individual stores do not stock parts. Date of Purchase ___ / ___ / ___ If a part is missing or damaged, visit our website or call our toll-free customer service line. We will gladly ship your replacement parts FREE of charge.
- Page 3 Parts Parts List Parts shown are the base cabinet of your model. Please note, most parts are ITEM PART NUMBER DESCRIPTION labeled with a sticker or have a letter stamped on a raw edge. 35984303010 SIDE A 35984303020 SIDE B 35984303050 LEFT HEADBOARD PANEL 35984303060...
- Page 4 Parts Metal frame parts will be packaged in its own box. rail A Piezas de marco de metal serán embalados en su propia caja. #A97020-1 Qty: 2 rail B #A97020-2 Qty: 2 center rail #A97020-3 Qty: 1 assembled frame marco ensamblado cross bar #A97020-4 1/4-20 x 1-1/4"...
- Page 5 Parts HARDWARE COMPARTMENT LAYOUT 1/4-20 x 1" bolt cam lock connector bolt #A19420 1-1/4" screw #A22570 #A22910 Qty: 4 #A13010 Qty: 2 Qty: 5 Qty: 12 (silver) straight bracket cam bolt #A53820 2" cross dowel bolt cross dowel fastener #A22510 connector Qty: 2 #A19895...
- Page 6 Cross dowel fastening system. This illustration shows how the cam fastening system works. Sistema de fijación de la clavija transversal. Esta ilustración muestra el sistema de fijación de leva y como funciona. Tighten to fully seat. Do not over tighten. Proper orientation of cam.
- Page 7 Insert two wood dowels (3) into the end holes and press finished edge the side (A) and side (B) together. borde acabado finished edge borde acabado After pressing the sides (A&B) together, secure together with connecting plate (19), straight bracket (6) and screws (7) as shown.
- Page 8 You will need to tap the connector (10) with a hammer to fully insert. Be sure the connector is positioned as shown before pushing into holes. B345984303WCOM 0 8 /25...
- Page 9 raw surface superficie cruda Position the three headboard slats (K) as shown. Using screws (8), attach the headboard upper panel (H) and headboard center panel (I) as shown. DO NOT fully tighten the screws in this step. raw surface superficie cruda x 10 End View Vista Lateral...
- Page 10 Attach the left and right headboard panels (E&F) to the headboard slats (K) with screws (8) as shown. Do not overtighten screws. Now tighten the screws that were left loose in the previous step snug, but DO NOT overtighten. x 12 Make sure outer edge of headboard panel (E&F) are flush with the edge of the headboard slats (K).
- Page 11 proper orientation posición correcta Insert a cam lock (1) and wood dowel (3) into both the left and right headboard panels (E&F) as shown. proper orientation of cam lock posición correcta de la cerradura de leva B345984303WCOM 0 11 /25...
- Page 12 LOCK UNLOCK APRETAR DESAPRETAR After connector bolt (9) engages connector (10), turn screw clockwise to lock in place. Press the headboard top (G) onto the headboard panels (E&F) and headboard upper panel (H). Turn the cam locks (1) clockwise to lock in place.
- Page 13 raw edge borde crudo You will need to tap the connector (10) with a hammer to fully insert. Be sure the connector is positioned as shown before pushing into holes. Hammer three tack glides (18) into the edge of each panel (J&M) as shown. B345984303WCOM 0 13 /25...
- Page 14 With the help of another person, attach the footboard (M) to the sides (A&B) as shown using four cross dowel bolts (15) and fasteners (16). Fasten the bolts (15) snug, but do not overtighten. Refer to page 6 for cross dowel fastening. B345984303WCOM 0 14 /25...
- Page 15 With the help of another person, finished edge attach the headboard component borde acabado (from step 6) and headboard lower panel (J) to the sides (A&B) as shown using four cross dowel bolts (17) and fasteners (16). Fasten the bolts (17) snug, but do not overtighten.
- Page 16 Notice: DO NOT fully tighten these bolts (14g). Leave loose for now. Notice hole locations. Attach rail A (14a) and rail B (14b) together with bolts (14g) as shown. You will repeat this two times. Refer to page 4 for part identification if needed. B345984303WCOM 0 16 /25...
- Page 17 B345984303WCOM 0 17 /25...
- Page 18 Notice: DO NOT fully tighten bolts (14g). Leave loose for now. slots on the inside of the frame B345984303WCOM 0 18 /25...
- Page 19 Fasten the bolts (12&13) snug, but do not overtighten B345984303WCOM 0 19 /25...
- Page 20 For locations shown only, insert cross bar (14d) into the left side, insert right end of cross bar into the right side. Slide horizontal and then press down. Press in locking clips (14h) to hold cross bars (14d) in place. "then"...
- Page 21 Screw into groove in molding. Do not overtighten screws (4). (black) B345984303WCOM 0 21 /25...
- Page 22 Position footboard top (L) onto footboard panel (M) so the connector bolts (9) engage the connectors (10). Turn the screw in the center of the connectors (10) clockwise to lock in place. After connector bolt (9) engages connector (10), turn screw clockwise to lock in place.
- Page 23 Insert cross bar (14d) into the left side, insert right end of cross bar into the right side. Slide horizontal and then press down. Repeat for all other cross bars (14d). Press in locking clips (14h) to hold cross bars (14d) in place.
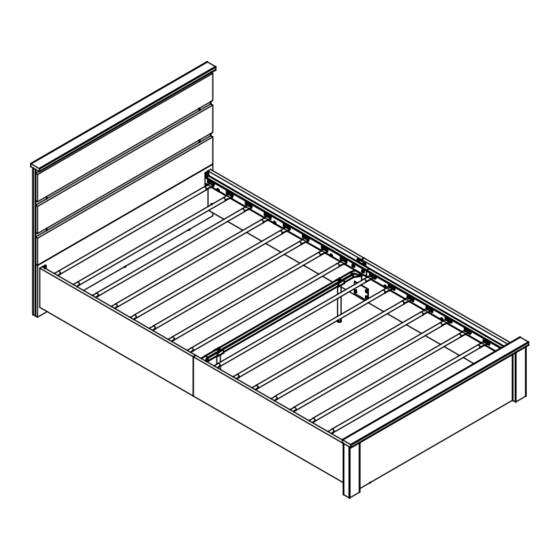
- Page 24 MAXIMUM LOADS: 300 lbs. / 136 kg This unit has been designed to support the maximum loads shown. Exceeding these load limits could cause sagging, instability, product collapse, and/or serious injury. Your bed is now ready for your mattress. Visit our website or call our toll free number for any assistance you should need. www.Ameriwood.com/parts 1-800-489-3351 Clean the product with your favorite furniture polish and a soft cloth.
- Page 25 Certificate of Conformity 1. This certificate applies to the Dorel Home Furnishings, Inc. product identified by this instruction manual. 2. This certificate applies to compliance of this product with the CPSC Ban on Lead-Containing Paint (16 CFR 1303). 3. This product is distributed by: Dorel Home Furnishings, Inc. 410 East First Street South Wright City, MO 63390 636-745-3351...
Need help?
Do you have a question about the 5984303WCOM and is the answer not in the manual?
Questions and answers