Table of Contents
Advertisement
Advertisement
Table of Contents

Subscribe to Our Youtube Channel
Related Manuals for Amplicomms PowerTel M9500


Summary of Contents for Amplicomms PowerTel M9500
- Page 1 PowerTel M9500 mobile phone Operating Instructions...
-
Page 2: Basic Information
M9500 Basic Information The M9500 features a simple user interface and is still a full-fledged smartphone with a camera, an internet connection (WiFi access or data carrier provided by the mobile operator) and other features familiar to traditional smartphones. Hearing aid compatibility This telephone is equipped with T Coil coupler making it compatible with most popular hearing aids. -
Page 3: Table Of Contents
ONTENTS Get to know your M9500 ................4 At a glance ....................4 Delivery Contents ..................5 Insert SIM Card(s), Memory Card and Battery ........5 Charging the battery .................7 Battery status .....................7 Turning On/Off your Mobile Phone ............8 Sleep mode....................9 First use.......................9 Basic Operating Instructions ..............10 First time use....................11 Get used to the touch screen ..............11 Home button.....................11... - Page 4 ONTENTS Practice some features from "More…" functionality......19 WhatsApp ....................19 Internet ......................19 Fun......................19 Camera ......................20 Selfie......................20 Torch......................20 Pills (Medication reminder) ..............20 Apps ......................21 Settings .....................21 Instructions for caregiver/family member ..........23 Register a person as a caregiver ............23 Remote control of the M9500 by an external helper ......25...
- Page 5 ONTENTS ppendix....................26 Technical data ...................26 Service hotline..................26 Tips on the battery ...................27 Intended use ....................27 Areas of use .....................27 Safety information ..................27 Power adapter plug..................29 Disposal.....................29 Maintenance ....................29 7.10 Declaration of Conformity ..............30 7.11 Trademarks ....................30 7.12 Guarantee ....................31 Index......................32...
-
Page 6: Get To Know Your M9500
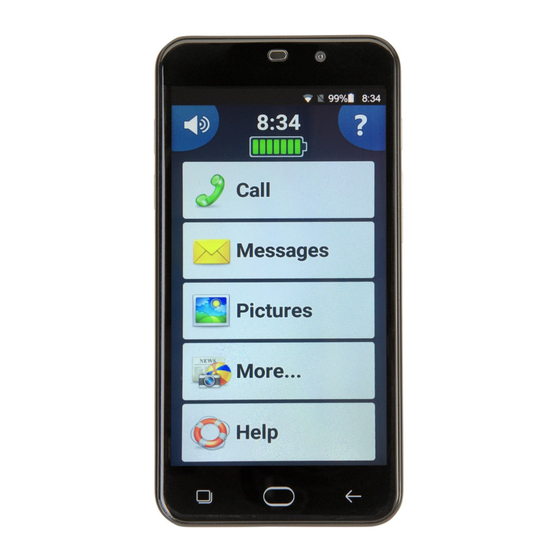
M9500 ET TO KNOW YOUR Get to know your M9500 Important: Before beginning please read the safety information on page t a glance Torch button (long press) More . . . Boost button (long press Flashlight, camera, applications, whilst in a call to boost the settings etc. -
Page 7: Delivery Contents
M9500 ET TO KNOW YOUR Delivery Contents 1 Mobile phone 1 Lithium Ion Battery 1 Battery charger 1 USB cable 1 Headset 1 SIM card adapter 1 Quick Start Guide Insert SIM Card(s), Memory Card and Battery Possible risk of swallowing small parts! The SIM card can be removed. - Page 8 M9500 ET TO KNOW YOUR • If a battery is inserted, remove it. • The M9500 offers two equivalent SIM card holders in different sizes (slot 1 for standard SIM cards used in older mobile phones, and slot 2 for micro SIM cards commonly used in smartphones).
-
Page 9: Charging The Battery
M9500 ET TO KNOW YOUR NOTE: Both card slots (1=Standard SIM, 2=Micro SIM) support LTE (4G). However, if you use two SIM cards at a time, the SIM card in slot 2 is limited to UMTS/GSM (3G/2G). • You have the option to insert a micro SD card (max. 32 GB) to increase the storage capacity. -
Page 10: Turning On/Off Your Mobile Phone
M9500 ET TO KNOW YOUR Turning On/Off your Mobile Phone To turn on your phone hold the On-Off button (14 in the figure) at the side of the phone down until the display lights up. Depending on the setting of your SIM card you will then be prompted to enter your PIN. -
Page 11: Sleep Mode
M9500 ET TO KNOW YOUR Sleep mode After approx. 1 minute of non-use, the M9500 screen will automatically go into “sleep mode” to save battery power and the screen will go dark. To “wake” the phone, simply press the On-Off button (14 in the figure) at the side of the phone briefly. -
Page 12: Basic Operating Instructions
PER TING NSTRUCTIONS asic Operating Instructions • Your mobile phone is equipped with a touch screen which is used for the actual operation of the phone. The touch screen should not be scratched. Do not touch it with sharp objects and do not let it come into contact with water. Do not touch the screen if the glass is broken. -
Page 13: First Time Use
IRST TIME USE First time use 3.1 Get used to the touch screen • If this is your first time you are using a smartphone, most likely you will find the touch screen hard to use. This is the reason we created the patent-pending long click until vibration functionality, to avoid miss-clicks and easier usage for seniors. -
Page 14: Contacts (Phonebook)
IRST TIME USE To send a request for a technical support: 1. Coordinate with your family member a convenient time to start this session. From the home screen: 2. Press "Help". 3. Press "Next". 4. Press "Start". 5. Select the contact to send a message to (SMS) with the details on how to connect to your phone. -
Page 15: Speed Dial
IRST TIME USE 3.6 Speed dial There is an easy option to set the order of your contacts list as you wish. Please make sure the contact you are calling the most is first on the list. To access the speed dial settings: 1. -
Page 16: Practice The Basic Functionality
R CTICE THE B SIC FUNCTION LITY Practice the basic functionality 4.1 Ringer mode – normal / silent / vibrate only How to switch to silent mode (ringer off)? 1. On the home page, press the Speaker in the upper left corner. 2. -
Page 17: Calls
R CTICE THE B SIC FUNCTION LITY 4.3 Calls Making a call 1. On the Home Page press "Call". 2. Select a contact or search for a contact or press on "Dial number" for a new number. Taking an incoming call 1. -
Page 18: Keyboard
R CTICE THE B SIC FUNCTION LITY Keyboard Note: Please note that the keyboard will always be displayed in landscape format to allow a larger representation of the keys. It is possible to change the duration of the clicks to be faster on the keyboard only. -
Page 19: Pictures/Photos
R CTICE THE B SIC FUNCTION LITY Reading old messages 1. In the home page select Messages. 2. Select "Read Old Messages" (if there are un-read new messages, they should be read first). 3. Press the message that you want to read (to view more messages press Next). -
Page 20: Sos Button
R CTICE THE B SIC FUNCTION LITY How to delete a picture 1. Open the picture that you want to delete (using the arrows or by swiping). 2. Click "Show Details" at the bottom of the picture screen. 3. Select “Del“. 4.7 SOS button Set the relevant family member to receive the SOS message. -
Page 21: Practice Some Features From "More
"M …" R CTICE SOME FE TURES FROM FUNCTION LITY Practice some features from "More…" functionality Press "More ...". Here you can find more features and apps (programs). Some of the programs are already preinstalled and immediately usable. Programs that are not already installed will automatically open up to Google PlayStore. -
Page 22: Camera
"M …" R CTICE SOME FE TURES FROM FUNCTION LITY 5.3.3 Facebook Every user of Facebook has a profile, on which he presents himself, including photos and videos. However, Facebook has become famous for its "Like" button, which allows users to say with just one click, whether they find something good or less good. -
Page 23: Apps
"M …" R CTICE SOME FE TURES FROM FUNCTION LITY List of all regular Android applications. You can install more application from Google Play and they will be added automatically into this list. 5.9 Settings 5.9.1 New contact Add a new entry to your contact list (phone book). 5.9.2 Update contact Edit an entry in your contact list (phone book). - Page 24 "M …" R CTICE SOME FE TURES FROM FUNCTION LITY On the “Personal Info“ page, you can set an email account to be read directly into the message center, and to be used to share pictures from M9500. 5.9.5 Change device user level The phone has 3 different device user levels: Basic, Advanced and Skilled.
-
Page 25: Instructions For Caregiver/Family Member
NSTRUCTIONS FOR C REGIVER F MILY MEMBER Instructions for caregiver/family member Not only for the user himself, but also for friends or family members who want to support or help, the M9500 offers exceptional possibilities. It is not necessary to install special software or any apps on your smartphone or computer. - Page 26 NSTRUCTIONS FOR C REGIVER F MILY MEMBER SMS code Description Burst call: Allow you to speak and hear your love one in a fully automatic way. Once the SMS is sent, the M9500 1213 will call you back automatically with the speaker turned on. Find-my-phone: Sending this SMS gives the M9500 current 1214 location as an address and a link to Google Maps...
-
Page 27: Remote Control Of The M9500 By An External Helper
NSTRUCTIONS FOR C REGIVER F MILY MEMBER 6.2 Remote control of the M9500 by an external helper 1. There are two different ways to trigger the live support: Option 1: on the M9500 phone home screen tap "Help". - or - Option 2: send a SMS with text 1325 from your smartphone to M9500 2. -
Page 28: Ppendix
PPENDIX Appendix Technical data Band GSM (850/900/1800/1900 MHz) , WCDMA (2100/850 MHz) , 4G Band-FDD LTE (800/1800/2100/2600 MHz) Dual cards SIM + 4G USIM; dual standby M4/T4 Processor MTK 6735M Quad-cortex 1GHz CPU Android 5.1 Memory RAM 1 GB DDR2, ROM 8 GB, supports a TF Memory Card up to 32 GB (optional) Camera Front 2 M pixel, Rear 8 M pixel, Autofocus... -
Page 29: Tips On The Battery
PPENDIX Tips on the battery • Only use batteries, cables and charging unit approved by the manufacturer, otherwise the battery could be damaged. • Never throw the battery into fire or water. • Do not short circuit the battery. • Always leave the battery in the phone to avoid accidentally short circuiting the battery contacts. - Page 30 PPENDIX • Repairs to this device may only be completed by qualified service personnel. • All mobile communication equipment is subject to interference which may impair its performance. • Keep the phone and accessories out of the reach of children. •...
-
Page 31: Power Adapter Plug
PPENDIX Power adapter plug The power adapter plug supplied fulfils the ecodesign requirements of the European Community (Directive 2005/32/EC). This means that the current consumption is considerably less, both in operation as well as in standby, in comparison to older power adapter plug models. Disposal In order to dispose of your device, take it to a collection point provided by your local public waste authorities (e.g. -
Page 32: Declaration Of Conformity
This device fulfils the requirements stipulated in the EU directive: RED 2014/53/EU. Conformity with the above mentioned directive is confirmed by the CE mark on the device. To view the complete Declaration of Conformity, please refer to the free download available on our web site www.amplicomms.com 7.11 Trademarks •... -
Page 33: Guarantee
If your device shows signs of defect during the period of guarantee, please return it to the sales outlet in which you purchased the AMPLICOMMS device together with the purchase receipt. All claims under the terms of guarantee in accordance with this agreement can only be asserted at the sales outlet. -
Page 34: Index
NDEX Index Advanced Settings..........21 Areas of use . - Page 35 NDEX Hands-free............15 Home button.
- Page 36 NDEX Safety information ..........27 Selfie .
- Page 38 4 250711 994495 Audioline GmbH D-41460 Neuss 12/2016 – Edition 1.0...
Need help?
Do you have a question about the PowerTel M9500 and is the answer not in the manual?
Questions and answers