Table of Contents
Advertisement
Quick Links
Advertisement
Table of Contents

Related Manuals for Crestron Adagio AMS


Summary of Contents for Crestron Adagio AMS
- Page 1 Crestron Adagio ® Media System Operations Guide...
-
Page 2: Important Safety Instructions
• Prevent foreign objects from entering the device. All brand names, product names and trademarks are the property of their respective owners. ©2008 Crestron Electronics, Inc. -
Page 3: Table Of Contents
® Crestron Adagio Media System Contents Media System: Adagio AMS Introduction ..........................1 Features and Functions ....................1 7.1 Surround Sound..................2 High-End Audio Performance...............2 ® Audyssey MultEQ XT.................2 AV Inputs and Outputs..................2 High Definition Multimedia Interface (HDMI™) Technology.....2 Multi-Room Audio..................2 2-Channel Steering..................3... - Page 4 Turn off the System....................96 Programming Software......................97 Earliest Version Software Requirements for the PC ..........97 Programming with Adagio Composer ............... 97 Programming with Crestron SystemBuilder.............. 97 Programming with SIMPL Windows ................ 98 Programming with VisionTools Pro-e............... 98 Configuring the AMS ....................98 Switching Programs....................
-
Page 5: Media System: Adagio Ams
Sirius Satellite Radio subscription, sold separately. © SIRIUS Satellite Radio Inc. “SIRIUS” and the SIRIUS dog logo are registered trademarks of SIRIUS Satellite Radio Inc. Media System: Adagio AMS • 1 Operations Guide – DOC. 6509B... -
Page 6: 7.1 Surround Sound
Listeners in each room can enjoy their own choice of radio stations, CDs and MP3s, or even a stereo downmix of the surround sound output. Each room includes its own volume, bass, and treble 2 • Media System: Adagio AMS Operations Guide – DOC. 6509B... -
Page 7: 2-Channel Steering
Custom naming of rooms, groups, and sources is performed on the LCD display, and also on the custom label strip using Crestron Engraver software. A selection of pre-made labels is also included. -
Page 8: 2-Series Ethernet Control System
IP from computers and PDA devices, as well as remote diagnostics and updates. Built-in IR, RS-232, relay and digital input ports are included to interface the AMS with non-Crestron devices ranging from CD changers to security systems. -
Page 9: Specifications
), and a combination of up to 12 C2N-DBF12 (12-button keypads) or APAD controllers for local control of each zone. With custom programming (via Adagio Composer, Crestron SystemBuilder™ , or ® SIMPL™ Windows ) and additional AAEs, the AMS can control up to 25 zones of audio. - Page 10 20Hz to 20kHz Signal-to-Noise Ratio (SNR) >100dB (preamp), 100dB (power amp) 20Hz to 20kHz A-weighted Dynamic Range >113dB Channel Separation >85dB (preamp), >80dB (power amp) (Continued on following page) 6 • Media System: Adagio AMS Operations Guide – DOC. 6509B...
- Page 11 Freestanding, side ventilation should not be restricted Dimensions Height 7.39 in (18.78 cm) Width 17.16 in (43.59 cm) Depth 18.56 in (47.13 cm) Weight 57.5 lb (26.1 kg) (Continued on following page) Media System: Adagio AMS • 7 Operations Guide – DOC. 6509B...
- Page 12 IR Receiver Crestron Professional Surround Sound Tuning Kit Surround Sound Tuning Kit STIRP IR Probe BTU/hr ratings made while all channels loaded to 1/8 full power with specified impedance. 8 • Media System: Adagio AMS Operations Guide – DOC. 6509B...
-
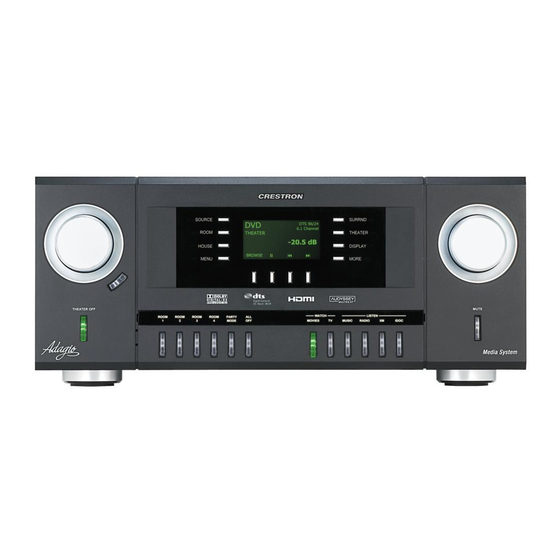
Page 13: Physical Description
AMS. AMS Physical View (Front) AMS Physical View (Rear), Shown with ATC-AMFM2 Adagio AM/FM Dual Tuner Card and ATC-AMFMXM Adagio AM/FM and XM Satellite Radio Tuner Card Media System: Adagio AMS • 9 Operations Guide – DOC. 6509B... - Page 14 (46.30 cm) 17.56 in (44.60 cm) 17.89 in (45.44 cm) 18.54 in (47.09 cm) NOTE: Cable connections can extend the overall depth of the AMS by approximately two to three inches. 10 • Media System: Adagio AMS Operations Guide – DOC. 6509B...
- Page 15 Connectors, Controls, & Indicators CONNECTORS, DESCRIPTION CONTROLS, & INDICATORS SELECTION KNOB Used to select rooms, sources, and radio stations (when using tuner), and other parameters. (Continued on following page) Media System: Adagio AMS • 11 Operations Guide – DOC. 6509B...
- Page 16 The Liquid Crystal Display (LCD) shows DISPLAY system information such as audio controls, tuner controls, and room controls. SOFT BUTTONS Function of soft buttons are dependent on operation of AMS. (Continued on following page) 12 • Media System: Adagio AMS Operations Guide – DOC. 6509B...
- Page 17 MUTE BUTTON The MUTE button is used to mute or unmute the currently selected room (theater is default). When lit, the selected room is muted. (Continued on following page) Media System: Adagio AMS • 13 Operations Guide – DOC. 6509B...
- Page 18 (6) RCA female; S/PDIF coaxial digital audio inputs; Input Impedance: 75 ohms DIGITAL SOURCES 7-10: (4) JIS F05 female (TOSLINK) optical fiber connectors; S/PDIF optical digital audio inputs (Continued on following page) 14 • Media System: Adagio AMS Operations Guide – DOC. 6509B...
- Page 19 Input Impedance: 75 ohms nominal COMPOSITE VIDEO OUTPUTS 1 and 2: (2) RCA female; Composite video outputs; Output Level: 1 V nominal; Output Impedance: 75 ohms nominal (Continued on following page) Media System: Adagio AMS • 15 Operations Guide – DOC. 6509B...
- Page 20 (sold separately); Allows IR wireless control from Crestron and third-party remotes using RC-5 IR commands. Ring Sleeve Tip: IR Data In Ring: +5 VDC Sleeve: Ground (Continued on following page) 16 • Media System: Adagio AMS Operations Guide – DOC. 6509B...
- Page 21 RS-232 computer console port. Use with included serial cable. Pin 1: CTS Pin 2: GND Pin 3: RXD Pin 4: TXD Pin 5: RTS Pin 6: N/C (Not connected) (Continued on following page) Media System: Adagio AMS • 17 Operations Guide – DOC. 6509B...
- Page 22 . The AMSI requires 220-240 VAC, 50-60 Hz, 4 Amps Refer to “Fuse Replacement” on page 38 for additional details. Refer to “Hardware Hookup”, which begins on page 20 for additional cord details. 18 • Media System: Adagio AMS Operations Guide – DOC. 6509B...
-
Page 23: Industry Compliance
Increase the separation between the equipment and receiver. Connect the equipment into an outlet on a circuit different from that to which the receiver is connected. Consult the dealer or an experienced radio/TV technician for help. Media System: Adagio AMS • 19 Operations Guide – DOC. 6509B... -
Page 24: Setup
For more details, refer to “Check Network Wiring” on page 104. Hardware Hookup NOTE: Prior to making any connections, refer to the latest version of the Crestron Safety Instructions (Doc. 6607) which can be downloaded from the Crestron website (www.crestron.com/manuals). - Page 25 Stereo Theater + Four Stereo Rooms Stereo Theater + Five Stereo Rooms Stereo Theater + Four Stereo Rooms + One Mono Room Stereo Theater + Four Stereo Rooms + Two Mono Rooms Media System: Adagio AMS • 21 Operations Guide – DOC. 6509B...
- Page 26 Composer or through the Installer Tools configuration tool. Refer to the Adagio Composer help file or “Configure the Theater” on page 43. NOTE: Connect the subwoofer to the RCA connector or the 3-position terminal block connector. 22 • Media System: Adagio AMS Operations Guide – DOC. 6509B...
- Page 27 Composer or through the Installer Tools configuration tool. Refer to the Adagio Composer help file or “Configure the Theater” on page 43. NOTE: Connect the subwoofer to the RCA connector or the 3-position terminal block connector. Media System: Adagio AMS • 23 Operations Guide – DOC. 6509B...
- Page 28 Composer or through the Installer Tools configuration tool. Refer to the Adagio Composer help file or “Configure the Theater” on page 43. NOTE: Connect the subwoofer to the RCA connector or the 3-position terminal block connector. 24 • Media System: Adagio AMS Operations Guide – DOC. 6509B...
- Page 29 Composer or through the Installer Tools configuration tool. Refer to the Adagio Composer help file or “Configure the Theater” on page 43. NOTE: Connect the subwoofer to the RCA connector or the 3-position terminal block connector. Media System: Adagio AMS • 25 Operations Guide – DOC. 6509B...
- Page 30 Composer or through the Installer Tools configuration tool. Refer to the Adagio Composer help file or “Configure the Theater” on page 43. NOTE: Connect the subwoofer to the RCA connector or the 3-position terminal block connector. 26 • Media System: Adagio AMS Operations Guide – DOC. 6509B...
- Page 31 Composer or through the Installer Tools configuration tool. Refer to the Adagio Composer help file or “Configure the Theater” on page 43. NOTE: Connect the subwoofer to the RCA connector or the 3-position terminal block connector. Media System: Adagio AMS • 27 Operations Guide – DOC. 6509B...
- Page 32 Composer or through the Installer Tools configuration tool. Refer to the Adagio Composer help file or “Configure the Theater” on page 43. NOTE: Connect the subwoofer to the RCA connector or the 3-position terminal block connector. 28 • Media System: Adagio AMS Operations Guide – DOC. 6509B...
- Page 33 Composer or through the Installer Tools configuration tool. Refer to the Adagio Composer help file or “Configure the Theater” on page 43. NOTE: Connect the subwoofer to the RCA connector or the 3-position terminal block connector. Media System: Adagio AMS • 29 Operations Guide – DOC. 6509B...
- Page 34 Composer or through the Installer Tools configuration tool. Refer to the Adagio Composer help file or “Configure the Theater” on page 43. NOTE: Connect the subwoofer to the RCA connector or the 3-position terminal block connector. 30 • Media System: Adagio AMS Operations Guide – DOC. 6509B...
- Page 35 AMS prior to making any wiring connections. When using the out-of-the-box functionality, the AMS can support up to two tuner cards, one AAE, one CEN-IDOC, one AAS-1/-2/-4, and any combination of seven Media System: Adagio AMS • 31 Operations Guide – DOC. 6509B...
- Page 36 NOTE: The APAD and AMS front panel are the only control devices that can control the theater room when using the out-of- the box functionality. • AAE (Optional): One AAE can be connected to the AMS’ analog audio input ports. 32 • Media System: Adagio AMS Operations Guide – DOC. 6509B...
- Page 37 NOTE: If using an AAE, external sources should be connected to the AAE and looped through to the AMS. For more information, refer to the latest version of the AAE guide (Doc. 6460), which is available from the Crestron website.
- Page 38 Make the necessary connections as called out in the illustration that follows this paragraph. Refer to “Network Wiring” on page 20 before attaching the 4-position terminal block connectors. Apply power after all connections have been made. 34 • Media System: Adagio AMS Operations Guide – DOC. 6509B...
- Page 39 PC and provides a console connection to the AMS. A microphone jack is also concealed behind the front panel’s label cover. This jack is used to connect the microphone that is included with the available Crestron Professional Surround Sound Tuning Kit. For more information, refer to the latest version of the Crestron Professional Surround Sound Tuning Kit Operations Guide (Doc.
- Page 40 An additional APAD can also be connected to a NET port for control of the theater room. Refer to the following diagram and “Network Wiring” on page 20 for wiring information when connecting either APAD devices or C2N-DBF12 keypads. 36 • Media System: Adagio AMS Operations Guide – DOC. 6509B...
- Page 41 Theater Calibration The speakers in the theater room can be calibrated with the Crestron Professional Surround Sound Tuning Kit to compensate for the interaction of the loudspeaker with the room. For more information, refer to the Crestron Professional Surround Sound Tuning Kit Operations Guide (Doc.
- Page 42 The appropriate label set must be used for the audio configuration that was specified during the AMS setup procedure described on page 44. Labels for Four-Room Distributed Audio Left Right Labels for Five-Room Distributed Audio Right Left 38 • Media System: Adagio AMS Operations Guide – DOC. 6509B...
- Page 43 Labels for Six-Room Distributed Audio Left Right Adagio Composer or Crestron Engraver software can also be used to create and print custom labels on overhead transparency film for the AMS’ room buttons and function buttons. NOTE: When printing custom labels, some experimentation may be required for optimum results.
- Page 44 Bend the label strip and position the top of the label strip into the Adagio component. Replace the label cover over the new label strip. NOTE: Observe proper orientation so the letters are right-side up. 40 • Media System: Adagio AMS Operations Guide – DOC. 6509B...
-
Page 45: Configuration
AMS, allows custom naming of audio sources connected to the AMS, hides sources from the list of available sources, configures 12-button keypads, and restores default settings for distributed audio functions. Media System: Adagio AMS • 41 Operations Guide – DOC. 6509B... -
Page 46: Select Tuner Format
The AMS must be configured to recognize devices that communicate over Ethernet (i.e. AAS, CEN-IDOC). • Open Installer Tools as described on page 41, select Configure Network, and press the ENTER button. 42 • Media System: Adagio AMS Operations Guide – DOC. 6509B... -
Page 47: Configure The Theater
This is done through the Configure Theater menu. • Open Installer Tools as described on page 41, select Configure Theater, and press the ENTER button. Media System: Adagio AMS • 43 Operations Guide – DOC. 6509B... - Page 48 20. To cancel and return to the Configure Theater menu, press MENU. NOTE: If the pre-printed labels are to be used, select the proper label strips as described on page 38. 44 • Media System: Adagio AMS Operations Guide – DOC. 6509B...
- Page 49 To cancel and return to the Configure Theater menu, press MENU. • To confirm, press the ENTER button and return to the Configure Theater menu. Media System: Adagio AMS • 45 Operations Guide – DOC. 6509B...
- Page 50 ⇒ Set the Audio Source: Turn the selection knob to select Audio and press the ENTER button. The current setting will be bracketed as shown in the following diagram. 46 • Media System: Adagio AMS Operations Guide – DOC. 6509B...
- Page 51 Turn the selection knob to select Name and press the ENTER button. A cursor will appear next to the current name and controls for changing the name will also be displayed. To cancel, press the MENU button. Media System: Adagio AMS • 47 Operations Guide – DOC. 6509B...
-
Page 52: Configure Distributed Audio
Press the soft button labeled Yes to proceed and restore the default settings or press No to cancel. Configure Distributed Audio The AMS must be configured for distributing audio to connected rooms. This is done through the Distributed Audio menu. 48 • Media System: Adagio AMS Operations Guide – DOC. 6509B... - Page 53 Open Installer Tools as described on page 41, select Configure Distributed Audio, and press the ENTER button. • Turn the selection knob to select Set Number of AAE Rooms, and press the ENTER button. Media System: Adagio AMS • 49 Operations Guide – DOC. 6509B...
- Page 54 Edit Room Name Enter AMS Rm 1 Nam SOURCE SURRND 1: AMS Rm 1 ROOM THEATER 2: AMS Rm 2 3: AMS Rm 3 HOUSE DISPLAY MENU MORE < > Done 50 • Media System: Adagio AMS Operations Guide – DOC. 6509B...
- Page 55 ⇒ Select letters (upper and lower-case), numbers, or other characters by turning the selection knob until the desired letter, number, or other character is displayed on the LCD. Move the cursor to another position Media System: Adagio AMS • 51 Operations Guide – DOC. 6509B...
- Page 56 Turn the selection knob to select Name Sources, and press the ENTER button. Select Source to Name Select Source to Name SOURCE SURRND 1: S1 AM/FM ROOM THEATER 2: S1 XM 3: Source 3 HOUSE DISPLAY MENU MORE Edit 52 • Media System: Adagio AMS Operations Guide – DOC. 6509B...
- Page 57 Turn the selection knob to select Hide Sources, and press the ENTER button. Hide Sources Hide Sources SOURCE SURRND 1: S1 AM/FM ROOM THEATER 2: S1 XM 3: S2 AM/FM HOUSE DISPLAY MENU MORE Hide Show Media System: Adagio AMS • 53 Operations Guide – DOC. 6509B...
- Page 58 Select Source for Button and Button Layout Select Src. For Button 1 SOURCE SURRND Btn1: [S1 AM/FM] ROOM THEATER Btn2: S1 XM Btn3: Source 3 HOUSE DISPLAY MENU MORE 54 • Media System: Adagio AMS Operations Guide – DOC. 6509B...
-
Page 59: Identify Keypads
Open Installer Tools as described on page 41, select Identify Keypads, and press the ENTER button. NOTE: Any attached AAE will automatically be identified by the AMS during this step. Media System: Adagio AMS • 55 Operations Guide – DOC. 6509B... - Page 60 Press the appropriate soft button to select the control device type (APAD or keypad) for the first room controlled by the AMS (Room Output 1). If there is no control device for that room, press the soft button labeled None. 56 • Media System: Adagio AMS Operations Guide – DOC. 6509B...
-
Page 61: Load Apads
ROOM THEATER Mask: 255.255.255.0 Hostname: AMS-00107B050025 HOUSE DISPLAY MENU MORE • Turn the selection knob to display additional information. • Press MENU to return to the Installer Tools menu. Media System: Adagio AMS • 57 Operations Guide – DOC. 6509B... -
Page 62: Configure Sources
Room 3 SOURCE SURRND Select Parameter ROOM THEATER to Adjust HOUSE DISPLAY MinV MaxV StartV Mono MENU MORE Parameters that can be adjusted include: ⇒ Minimum Volume ⇒ Maximum Volume 58 • Media System: Adagio AMS Operations Guide – DOC. 6509B... - Page 63 The lowest maximum volume setting is 70%. Press the soft button labeled Reset to set the volume level to 100%. NOTE: Other rooms can be adjusted by pressing a different room button. Media System: Adagio AMS • 59 Operations Guide – DOC. 6509B...
- Page 64 Mono to select the Mono mode. NOTE: Other rooms can be adjusted by pressing a different room button. • Press MENU to return to the Room Setup menu. 60 • Media System: Adagio AMS Operations Guide – DOC. 6509B...
-
Page 65: Configure Theater
The maximum volume establishes the highest volume level setting for the theater. • Access the Theater Setup menu as described on page 61. • Press the soft button labeled MaxV to open the Maximum Volume control. Media System: Adagio AMS • 61 Operations Guide – DOC. 6509B... -
Page 66: Configure Preset Groups
To edit a preset group: • Press the ROOM button to enter the Room mode. • Press the MORE button. • Press the soft button labeled Groups to display the list of groups. 62 • Media System: Adagio AMS Operations Guide – DOC. 6509B... - Page 67 NOTE: The maximum length for any preset group name is 16 characters. Edit Group Name Controls Edit Group 3 SOURCE SURRND Source: No Source Selected ROOM THEATER Name: Read Theater: Not Included HOUSE DISPLAY MENU MORE < > Done Media System: Adagio AMS • 63 Operations Guide – DOC. 6509B...
- Page 68 The theater room can be included in the group or excluded. To set the theater room’s inclusion, press the soft button labeled Theater. • After editing the preset group, press Done to save the changes and return to the Groups listing. 64 • Media System: Adagio AMS Operations Guide – DOC. 6509B...
-
Page 69: Operation
DISPLAY MENU MORE Source Bklt • To select a source, turn the selection knob until the desired source is displayed on the front panel and press the ENTER button. Media System: Adagio AMS • 65 Operations Guide – DOC. 6509B... - Page 70 The signal is steered to the rear speakers. ⇒ Multi-Channel Stereo – Steers the left and right audio signals to all of the theater speakers. 66 • Media System: Adagio AMS Operations Guide – DOC. 6509B...
- Page 71 Theater tools allow for the adjustment of bass and treble levels, and enabling Audyssey processing. To open Theater tools: • Press the MORE button to view additional theater controls. To return to the main theater controls, press the MORE button again. Media System: Adagio AMS • 67 Operations Guide – DOC. 6509B...
- Page 72 Flat to set the treble level to 0dB. ⇒ Audssy – Enables or disables Audyssey processing. For information on configuring Audyssey, refer to “Configuring the AMS” on page 98. 68 • Media System: Adagio AMS Operations Guide – DOC. 6509B...
-
Page 73: Source Mode
A tuner card installed in either slot one or two can be controlled by the AMS front panel. The following assumes that a tuner card has been installed in slot one or two (or both) as described in the tuner card’s guide. Media System: Adagio AMS • 69 Operations Guide – DOC. 6509B... - Page 74 (AM or FM). AM/FM Controls 101.90 FM Stereo SOURCE SURRND ROOM THEATER S1 AM/FM HOUSE DISPLAY MENU MORE Preset Manual Tech 70 • Media System: Adagio AMS Operations Guide – DOC. 6509B...
- Page 75 Press the soft button labeled OK to confirm or the soft button labeled Cancel to cancel. • Manual Mode: Press the soft button labeled Manual to operate in the Manual mode. Media System: Adagio AMS • 71 Operations Guide – DOC. 6509B...
- Page 76 ⇒ To return to the tuner controls, press the MENU button. Control the XM Tuner The XM tuner controls allow access to XM tuner functions such as presets, categories, and channels, as well as viewing radio signal strength. 72 • Media System: Adagio AMS Operations Guide – DOC. 6509B...
- Page 77 12. X Country ROOM THEATER 6. The 60s 8. The 80s HOUSE DISPLAY MENU MORE Save Select a preset location with the selection knob and press the soft button labeled Save. Media System: Adagio AMS • 73 Operations Guide – DOC. 6509B...
- Page 78 SOURCE SURRND 1. XM Preview ROOM THEATER 4. The 40s 5. The 50s HOUSE DISPLAY MENU MORE ⇒ Turn the selection knob to view the list of available channels. 74 • Media System: Adagio AMS Operations Guide – DOC. 6509B...
- Page 79 Press the MENU button to return to the XM Technical Information controls. ⇒ To hide or unhide channels from the channel listing: Press the soft button labeled Setup. The list of channels will be displayed. Media System: Adagio AMS • 75 Operations Guide – DOC. 6509B...
- Page 80 HOUSE S1 SIRIUS DISPLAY MENU MORE Preset Chan Tech • Presets: Use presets to quickly recall favorite stations. ⇒ To recall a preset, press the soft button labeled Preset. 76 • Media System: Adagio AMS Operations Guide – DOC. 6509B...
- Page 81 ROOM THEATER 6. `60s Vibrations 8. Big `80s HOUSE DISPLAY MENU MORE Clear Save Select a preset location with the selection knob and press the soft button labeled Save. Media System: Adagio AMS • 77 Operations Guide – DOC. 6509B...
- Page 82 ⇒ Turn the selection knob to view the list of available categories. ⇒ Press the ENTER button to select a category. ⇒ Turn the selection knob to view the list of channels in the category. 78 • Media System: Adagio AMS Operations Guide – DOC. 6509B...
- Page 83 “Technical Section” on page 80. NOTE: Channel 0 displays the radio ID which is required for subscription to the SIRIUS radio service. Media System: Adagio AMS • 79 Operations Guide – DOC. 6509B...
- Page 84 THEATER Radio ID: 012345678901 HOUSE DISPLAY S1 SIRIUS MENU MORE About Setup ⇒ To view firmware and other information about the tuner card: Press the soft button labeled About. 80 • Media System: Adagio AMS Operations Guide – DOC. 6509B...
- Page 85 DISPLAY MENU MORE Turn the selection knob clockwise or counterclockwise to highlight Setup Channels and press the ENTER button to display a list of all of the SIRIUS channels. Media System: Adagio AMS • 81 Operations Guide – DOC. 6509B...
- Page 86 DISPLAY MENU MORE Turn the selection knob clockwise or counterclockwise to highlight Setup Channels and press the ENTER button to display a list of all of the SIRIUS channels. 82 • Media System: Adagio AMS Operations Guide – DOC. 6509B...
- Page 87 THEATER Change PIN HOUSE DISPLAY MENU MORE Turn the selection knob clockwise or counterclockwise to highlight Change PIN and press the ENTER button to display the Change PIN controls. Media System: Adagio AMS • 83 Operations Guide – DOC. 6509B...
-
Page 88: Controlling An Ipod Or Iphone
Source Source 5 SOURCE SURRND Oh, Pretty Woman ROOM THEATER Roy Orbison HOUSE DISPLAY MENU MORE Control 84 • Media System: Adagio AMS Operations Guide – DOC. 6509B... - Page 89 Off – Plays all items in sequence. All – Will shuffle all items in the list. Album – Will play the songs on an album in order and then shuffle the order of the albums. Media System: Adagio AMS • 85 Operations Guide – DOC. 6509B...
- Page 90 Bottom. If a song name is selected, pressing the ENTER button will begin playback. Playlist Items My Favorites SOURCE SURRND As Tears Go By ROOM THEATER Baba O’Riley HOUSE DISPLAY MENU MORE Back Bottom 86 • Media System: Adagio AMS Operations Guide – DOC. 6509B...
-
Page 91: Controlling An Adagio Audio Server (Aas)
Press the MORE button to display soft buttons to change the Shuffle and Repeat modes and manage the playback queue. Press the MORE button again to return to the playback controls. Media System: Adagio AMS • 87 Operations Guide – DOC. 6509B... - Page 92 Off – Plays all queued items once without repeat. Track – Will repeat the track that is currently playing. Queue – Will repeat all of the tracks in the play queue. 88 • Media System: Adagio AMS Operations Guide – DOC. 6509B...
- Page 93 ⇒ To clear the play queue, press the soft button labeled Clear. Clear Play Queue Confirmation Play Queue SOURCE SURRND Are you sure you want to ROOM THEATER clear the Play Queue HOUSE DISPLAY MENU MORE Media System: Adagio AMS • 89 Operations Guide – DOC. 6509B...
- Page 94 Press the soft button labeled Queue to view items in the play queue. For more information on the play queue, refer to “Queue” on page 89. For more information on the library structure, refer to the latest version of the AAS guide. 90 • Media System: Adagio AMS Operations Guide – DOC. 6509B...
- Page 95 Press the soft button labeled Search to jump to an item in a list. the AMS NOTE: Searches are performed within a category. For example, searching for a song title while browsing artists will not yield any results. Media System: Adagio AMS • 91 Operations Guide – DOC. 6509B...
-
Page 96: Route A Source
After a room is selected, a source can be selected, the room can be turned “off”, room and global volume can be adjusted, or the room output can be muted. • To select a source: ⇒ Press the soft button labeled Source. 92 • Media System: Adagio AMS Operations Guide – DOC. 6509B... - Page 97 The bass level of each room can be adjusted independently. • While in Room mode, press the MORE button. • Press the soft button labeled Tools. • Press the soft button labeled Bass to open the Bass control. Media System: Adagio AMS • 93 Operations Guide – DOC. 6509B...
- Page 98 The balance of each room can be adjusted independently. • While in Room mode, press the MORE button. • Press the soft button labeled Tools. • Press the soft button labeled Balance to open the Balance control. 94 • Media System: Adagio AMS Operations Guide – DOC. 6509B...
-
Page 99: Party Mode And Other Room Groups
For instructions on customizing the Party mode, refer to “Configure Preset Groups” on page 62. Recall a Room Group To recall a room group: • While in Room mode, press the MORE button. Media System: Adagio AMS • 95 Operations Guide – DOC. 6509B... -
Page 100: Lock And Unlock The Front Panel Controls
Press THEATER OFF to turn off the theater outputs. The room outputs will stay Turn off the System Press All Off to turn off all of the rooms and the theater. 96 • Media System: Adagio AMS Operations Guide – DOC. 6509B... -
Page 101: Programming Software
Have a question or comment about Crestron software? Answers to frequently asked questions (FAQs) can be viewed in the Online Help section of the Crestron website. To post a question or view questions you have submitted to Crestron’s True Blue Support, log in at http://support.crestron.com. -
Page 102: Programming With Simpl Windows
NOTE: When programming an AMS in SIMPL Windows, always begin with the example program and modify as required. To find example programs, refer to “Example Program” on page 99. Also visit Crestron’s True Blue Support on the web for more programming tips. -
Page 103: Switching Programs
AMS program need to be updated. To save settings for later use, use the Crestron Toolbox File Manager utility to retrieve the *.xml (where * can be “ootbf” for settings made when running the out- of-the-box functionality program or “custom”... -
Page 104: Uploading And Upgrading
(Crestron STCP-502PC or equivalent). • Use the Address Book in Crestron Toolbox to create an entry using the expected serial communication protocol (RS232, auto-detect baud rate, no parity, 8 data bits, 1 stop bit, XON/XOFF disabled, RTS/CTS enabled). -
Page 105: Programs And Firmware
Establish serial or USB communication between AMS and PC. • Enter the IP address, IP mask, and default router of the AMS via Crestron Toolbox (Functions | Ethernet Addressing); otherwise enable DHCP. NOTE: When taken out of the box, the AMS is configured for DHCP operation. - Page 106 SIMPL Windows or Crestron Toolbox. Firmware Check the Crestron website to find the latest firmware. (New users may be required to register to obtain access to certain areas of the site, including the FTP site.) Upgrade AMS firmware via Crestron Toolbox.
-
Page 107: Problem Solving
® Crestron Adagio Media System Problem Solving Troubleshooting The following table provides corrective action for possible trouble situations. If further assistance is required, please contact a Crestron customer service representative. AMS Troubleshooting TROUBLE POSSIBLE CAUSE(S) CORRECTIVE ACTION AMS does not AMS is not receiving Use the provided power cord. -
Page 108: Check Network Wiring
Cresnet power usage of the entire chain. If the unit is home-run from a Crestron system power supply network port, the Cresnet power usage of that unit is the Cresnet power usage of the entire run. The wire gauge and the Cresnet power usage of the run should be used in the following equation to calculate the cable length value on the equation’s left side. -
Page 109: Reference Documents
Crestron's award winning customer service team by calling Crestron at 1-888-CRESTRON [1-888-273-7876]. You can also log onto the online help section of the Crestron website (http://www.crestron.com/onlinehelp) to ask questions about Crestron products. First-time users will need to establish a user account to fully benefit from all available features. -
Page 110: Software License Agreement
This Agreement may only be modified by a writing signed by an authorized officer of Crestron. Updates may be licensed to You by Crestron with additional or different terms. This is the entire agreement between Crestron and You relating to the Software and it supersedes any prior representations, discussions, undertakings, communications or advertising relating to the Software. - Page 111 “applets” incorporated into the Software), the accompanying media and printed materials and any copies of the Software are owned by Crestron or its suppliers. The Software is protected by copyright laws and international treaty provisions. Therefore, you must treat the Software like any other copyrighted material, subject to the provisions of this Agreement.
-
Page 112: Return And Warranty Policies
Purchasers should inquire of the dealer regarding the nature and extent of the dealer's warranty, if any. CRESTRON shall not be liable to honor the terms of this warranty if the product has been used in any application other than that for which it was intended, or if it has been subjected to misuse, accidental damage, modification, or improper installation procedures. -
Page 113: Trademark Information
DTS logos, Symbol and DTS 96/24 are trademarks of DTS, Inc. © 1996-2007 DTS, Inc. All Rights Reserved. Audyssey Audyssey MultEQ XT is a trademark of Audyssey Laboratories. Media System: Adagio AMS • 109 Operations Guide – DOC. 6509B... - Page 114 Crestron Electronics, Inc. Operations Guide – DOC. 6509B 15 Volvo Drive Rockleigh, NJ 07647 (2015963) Tel: 888.CRESTRON 05.08 Fax: 201.767.7576 Specifications subject to www.crestron.com change without notice.
Need help?
Do you have a question about the Adagio AMS and is the answer not in the manual?
Questions and answers