Grundfos MP 204 Installation And Operating Instructions Manual
Hide thumbs
Also See for MP 204:
- Installation and operating instructions manual (64 pages) ,
- Instructions manual (44 pages) ,
- Safety instructions and other important information (10 pages)
Table of Contents
Advertisement
Advertisement
Table of Contents

Related Manuals for Grundfos MP 204


Summary of Contents for Grundfos MP 204
- Page 1 GRUNDFOS INSTRUCTIONS MP 204 Installation and operating instructions...
- Page 2 Declaration of Conformity We, Grundfos, declare under our sole responsibility that the product MP 204, to which this declaration relates, is in conformity with these Council directives on the approximation of the laws of the EC member states: – Low Voltage Directive (2006/95/EC).
-
Page 3: Table Of Contents
Fault finding GENIbus. 16.1 Warning and trip codes The power supply to the MP 204 is in parallel with Disposal the supply to the motor. Motor currents up to 120 A are passed directly through the MP 204. The MP 204... -
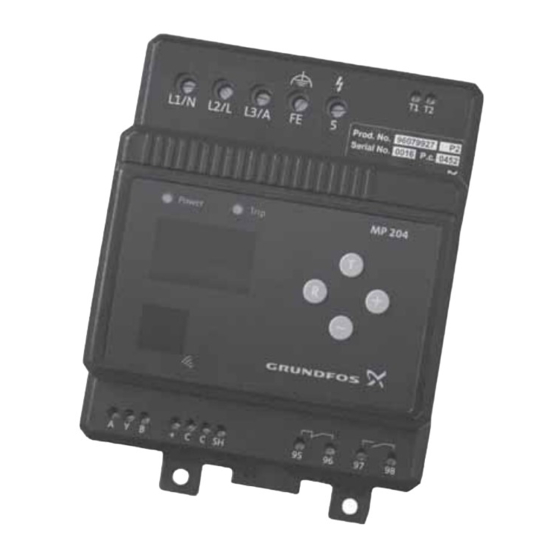
Page 4: Nameplates
The MP 204 is designed for single- and three-phase Tripping conditions motors. In single-phase motors, the starting and run • Overload capacitors are also measured. Cos ϕ is measured in • Underload (dry running) both single- and three-phase systems. • Temperature (Tempcon sensor, PTC/thermal switch and Pt sensor) 2. -
Page 5: Mechanical Installation
5. Mechanical installation 5.1 MP 204 in control cabinet The MP 204 is designed for mounting in a control cabinet, either on a mounting plate or on a DIN rail. 5.2 MP 204 on DIN rail Mounting and removal of an MP 204 mounted on a DIN rail is shown in figs. -
Page 6: Connection
6. Connection 6.1 Overview Pos. 1 Pos. 3 Pos. 2 MP 204 Pos. 7 Pos. 4 Pos. 5 Pos. 6 Terminals Cable entries Fig. 6 Fig. 5 Pos. Designation Three-phase connection Single-phase connection Cable Entry for phase L1 to motor Entry for neutral Max. -
Page 7: Input For Pt100/Pt1000
L1-L2-L3 and "5" to the MP 204 must be protected separately with max. 10 A fuses. See fig. 8. If current transformers are used, the L1-L2-L3 and "5" to the MP 204 must be protected with max. 10 A fuses. For installation examples, see figs. -
Page 8: Wiring Diagrams
50 A is therefore not required. If larger back-up fuses are used, the voltage to the L1, L2 and L3 must be protected separately. A maxi- mum of 10 A or less is recommended. Max. 10 A MP 204 Pt100 Pt100/Pt1000 Three-phase connection Fig. 8... - Page 9 6.5.2 Three-phase system with external current transformers Max. 10 A MP 204 Pt100 Pt100/Pt1000 Three-phase connection with current transformers Fig. 9 Fig. 10 Five windings per phase through the MP 204...
- Page 10 6.5.3 Single-phase system with starting and run capacitors start MP 204 Pt100/Pt1000 Pt100 Fig. 11 Single-phase connection...
-
Page 11: External Current Transformers
Fit the transformers as shown in fig. 12. Note: Take the three measuring cables through the three holes in the MP 204 five times per phase. See fig. 13. Note: The three current transformers must be fitted in the same direction, and the measuring cables must be connected in the same way. -
Page 12: Start-Up
7. Start-up 7.1.3 Button Normally the actual current or temperature appears A basic setting of the MP 204 can be made on the in the display. Press the button to show informa- control panel. tion in the display, according to the following... - Page 13 Press the buttons simultaneously for a tons (1 phase, 3 phases (non-earthed) or 3 phases minimum of 5 seconds to place the MP 204 in the w. FE (functional earth)). programming mode. When the display shows "..", the buttons can be released.
- Page 14 Status display Press for approx. 5 seconds Set rated current The value is not stored 10 seconds The value is not stored Set nominal voltage The value is stored 10 seconds The value is stored Set trip class The value is stored 10 seconds The value is stored Set number of phases...
-
Page 15: Learning Function
10 seconds. The dot in the right side of the display is flashing. The MP 204 is waiting for current to pass through the unit for a minimum of 120 seconds. Then the phase sequence is measured and stored. -
Page 16: R100 Menus
• Service interval Display of • Number of automatic restarts • Supply overview • Units/display • Average current • MP 204 display • Average voltage • GENIbus ID number • Tempcon sensor • Learning function. • Pt100/Pt1000 sensor • Power input and energy consumption •... -
Page 17: Operating The R100
In the menus OPERATION, STATUS, LIMITS and INSTALLATION, data are exchanged between the Change of menu R100 and the MP 204 each time the button [OK] is [<] or [>] steps from one menu to the other. The bot- pressed. -
Page 18: Setting With The R100
The time "1min" indicates the time which has passed since the MP 204 tripped. Note: The time is measured only as long as the If the MP 204 is tripped, the cause of the trip is indi- MP 204 is powered. The clock stops when the cated. -
Page 19: Menu 2. Status
When a single-phase motor is connected correctly, the "N" shows 0 V. The MP 204 measures the phase voltage as well as For a list of trip and warning codes, see section the voltage across the auxiliary winding. The current 9.1.8 Alarm log 4... - Page 20 See section 9.4.9. lated as follows: Note: The learning function registers whether a Pt100/Pt1000 sensor is connected. When using a three-core Pt-sensor connection, the MP 204 auto- ---------------------------------- - A average matically compensates for cable impedances.
- Page 21 9.2.8 Phase sequence 9.2.11 Trip counter of hours and starts Actual phase sequence and frequency: Trip counter counting the number of operating hours and the number of motor starts. Can be reset. • L1-L2-L3 (correct direction of rotation) • L1-L3-L2. 9.2.12 Starting capacitor Note: The actual phase sequence is accepted as correct and stored when the learning function is ter-...
-
Page 22: Menu 3. Limits
Note: The trip limits must be set in accordance with the • The value is shown only if the MP 204 has been motor manufacturer’s specifications. set up for three-phase, earthed operation. The warning limits should be set to a less critical •... - Page 23 9.3.2 Pt sensor 9.3.4 Current warning Set the warning and trip limits for the Pt sensor. Set the warning limits for "Max." and "Min.". Set the max. warning limit in the "Max." field. Factory setting: The value is set in ampere. •...
- Page 24 9.3.7 Current unbalance 9.3.10 Insulation resistance Set the warning and trip limits for current unbalance. Set the warning and trip limits for the insulation For calculation, see section 9.2.9. resistance in the installation. The value set should be low enough to allow for an early indication of faults in Factory setting: the installation.
-
Page 25: Menu 4. Installation
9.4 Menu 4. INSTALLATION 9.4.4 External current transformers In this menu, it is possible to set a number of operat- ing data and thus match the MP 204 to the actual installation. The installation values should not be changed unless the pump has stopped. - Page 26 Note: The learning function registers automatically whether a Pt100/Pt1000 sensor is connected. 9.4.10 Insulation resistance measurement Set the time after which the MP 204 is to attempt automatic restarting of motor after cut-out. The time runs from the moment when the value which triggered the fault has returned to normal.
- Page 27 Line 2: Select the MP 204 display indication during normal operation. Line 1: Set the number of hours of motor operation at Display: which the MP 204 is to give a service warning in the • Crnt (current) (factory setting) display. • Tcon (Tempcon temperature) Factory setting: •...
- Page 28 See been operating for a minimum of 120 seconds. The section 7.1.3. dot in the right side of the MP 204 display is flashing. During the storing of the measured values, "LRN" cos ϕ: appears in the MP 204 display.
-
Page 29: Mp 204 With Genibus
Each of the units in the chain must be assigned an 10. MP 204 with GENIbus identification number with the R100, see section If several MP 204 units are connected to the same 9.4.7. GENIbus, the connection is to be made as shown in For further information about the GENIbus, see fig. -
Page 30: Submersible Pumps
Wastewater pumps may incorporate a PTC/thermal 35 are the optimum choice. Apply IEC trip class 45 switch to be connected direct to the MP 204. for the pumping of liquids of extremely high viscosity Wastewater pumps may also be connected to a or liquids containing many solid particles. -
Page 31: Curves
• Set the trip delay to 900 ms. Fig. 25, curve 1: The pump has an abnormal start-up time, and the current exceeds 10 A. The MP 204 trips after 900 ms. Fig. 25, curve 2: The pump has a normal start-up time, and the cur- rent exceeds 10 A only briefly (<... -
Page 32: Iec Trip Curves
• Set the MP 204 to IEC trip class 20. • Set the overload limit to 10 A (the rated motor cur- rent is stated on the nameplate). At a motor current of 22.5 A (10 x 2.25), the MP 204 trips after approx. 170 seconds. -
Page 33: Technical Data
Min. load 5 V/10 mA Max. load power AC/DC 400 VA/48 W Example: NO (normally open Contact type The MP 204 is connected to 3 x 400 V. contact) ≅ • -- - 400 327 V test... -
Page 34: Measuring Ranges
15.4 Measuring ranges Measuring range Accuracy Resolution Current without external current trans- 3 - 120 A ±1% 0.1 A former Current with external current transformer 120 - 999 A ±1% Phase-to-phase voltage 80 - 610 VAC ±1% Frequency 47 - 63 Hz ±1% 0.5 Hz Insulation resistance... -
Page 35: Fault Finding
Communication alarm for main system – Commanded trip (not in alarm log) Low insulation resistance – Too many starts per hour – The motor is operating even if the MP 204 is tripped Overvoltage Undervoltage Overload Underload Overtemperature, Tempcon measurement Overtemperature, Pt100/Pt1000 measurement –... - Page 36 Dimensions All dimensions in mm.
- Page 37 GRUNDFOS Pumps (Hong Kong) Ltd. Turkey BiH-71000 Sarajevo Unit 1, Ground floor New Zealand GRUNDFOS POMPA San. ve Tic. Ltd. Sti. Phone: +387 33 713 290 Siu Wai Industrial Centre GRUNDFOS Pumps NZ Ltd. Gebze Organize Sanayi Bölgesi Telefax: +387 33 659 079 29-33 Wing Hong Street &...
- Page 38 Thinking ahead makes it possible Innovation is the essence 96650480 0510 Repl. 96079899 1006 The name Grundfos, the Grundfos logo, and the payoff Be–Think–Innovate are registrated trademarks owned by Grundfos Management A/S or Grundfos A/S, Denmark. All rights reserved worldwide. www.grundfos.com...
Need help?
Do you have a question about the MP 204 and is the answer not in the manual?
Questions and answers
All my wiring are ok According to the OEM Specifications, once i start my pump it will trip after 10seconds.
How to put off trip on my MP 204 panel