Advertisement
THIS PRODUCT IS FOR OUTDOOR USE ONLY
ASSEMBLY, CARE & USE MANUAL
WARNING & SAFETY INFORMATION
30" DIGITAL ELECTRIC SMOKER MODEL 20078715
Masterbuilt Manufacturing, Inc.
1 Masterbuilt Ct.
Columbus, GA 31907
Servicio de atención al cliente 1-800-489-1581
www.masterbuilt.com
Tools needed for assembly: Adjustable Wrench and Phillips Head Screwdriver
Approximate assembly time: 25 minutes
*Actual product may differ from picture shown
CARBON MONOXIDE
WARNING
HAZARD
This manual contains important
information necessary for the proper
Burning wood chips gives off carbon
assembly and safe use of the appliance.
monoxide, which has no odor and
can cause death.
Read and follow all warnings and
instructions before assembling and using
DO NOT burn wood chips inside homes,
the appliance.
vehicles, tents, garages or any enclosed areas.
Follow all warnings and instructions when
Use only outdoors where it is
www.masterbuilt.com
using the appliance.
well ventilated.
SEA PARTE DE NUESTRA COMUNIDAD EN LÍNEA "DADGUM GOOD"
BE A PART OF OUR "DADGUM GOOD" COMMUNITY ONLINE
Keep this manual for future reference.
Failure to follow these warnings and instructions properly could result in fi re or explosion,
which could cause property damage, personal injury, or death.
Advertisement

Subscribe to Our Youtube Channel
Related Manuals for Masterbuilt 20078715


Summary of Contents for Masterbuilt 20078715
- Page 1 THIS PRODUCT IS FOR OUTDOOR USE ONLY ASSEMBLY, CARE & USE MANUAL WARNING & SAFETY INFORMATION 30” DIGITAL ELECTRIC SMOKER MODEL 20078715 Masterbuilt Manufacturing, Inc. 1 Masterbuilt Ct. Columbus, GA 31907 Servicio de atención al cliente 1-800-489-1581 www.masterbuilt.com Tools needed for assembly: Adjustable Wrench and Phillips Head Screwdriver...
- Page 2 2. This product contains chemicals, including lead and lead compounds, known to the State La garantía de Masterbuilt no cubre el acabado de la pintura ya que puede salirse durante el uso normal. of California to cause cancer, birth defects or other reproductive harm.
- Page 3 • Do not operate any appliance with a damaged cord or plug, or after appliance malfunctions or has Chips de nogal o mesquita 2 cucharaditas de ajo en polvo been damaged in any manner. Contact Masterbuilt Customer Service for assistance at 2 cucharaditas de cebolla en polvo Retire la piel gruesa y reduzca la grasa para 1-800-489-1581.
- Page 4 HECHOS IMPORTANTES SOBRE EL USO DEL AHUMADOR LET’S GET STARTED! • La confi guración máxima de temperatura es 275°F (135°C). • This is a slow smoker… allow suffi cient time for cooking. Smoker is for OUTDOOR USE ONLY. • NO mueva la unidad a lo largo de superfi cies desiguales. •...
-
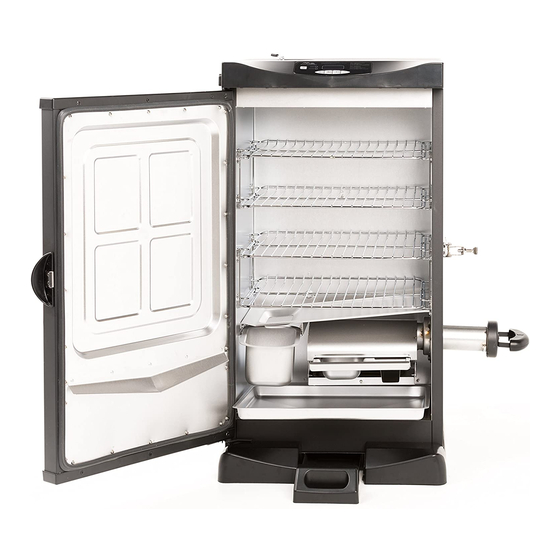
Page 5: Smoking Rack
INSTRUCCIONES DE PRE-SAZONADO DO NOT RETURN TO RETAILER For Assembly Assistance, Missing or Damaged Parts Call: MASTERBUILT Customer Service at 1-800-489-1581. STOP! SAZONE PREVIAMENTE EL AHUMADOR ANTES DEL PRIMER USO. Please have Model Number and Serial Number available when calling. -
Page 6: Table Of Contents
DO NOT RETURN TO RETAILER For Assembly Assistance, Missing or Damaged Parts ENSAMBLAJE Call: MASTERBUILT Customer Service at 1-800-489-1581. STOP! Please have Model Number and Serial Number available when calling. PASO 9 These numbers are located on silver label on back of unit. - Page 7 ENSAMBLAJE ASSEMBLY STEP 1 PASO 7 Remove all components Coloque las rejillas para on inside of smoker before ahumar (3) dentro del beginning assembly. ahumador como se muestra. Carefully position smoker on side as shown. Alternatively, the smoker can be positioned upside down for assembly.
- Page 8 ASSEMBLY ENSAMBLAJE STEP 3 PASO 5 Remove adjustable screw leg Deslice la bandeja de grasa (10). Set aside to be used in (12) en las abrazaderas de Step 4. la bandeja de grasa (19). Attach side panel (20) to smoker body (1) using screws (B) as shown.
- Page 9 ENSAMBLAJE ASSEMBLY PASO 3 STEP 5 Retire la pata ajustable con Slide grease tray (12) onto tornillos (10). Coloque a un grease tray brackets (19). lado para usarse en el Paso 4. Fije el panel lateral (20) al cuerpo del ahumador (1) usando los tornillos (B) como se muestra.
- Page 10 ASSEMBLY ENSAMBLAJE PASO 1 Retire todos los STEP 7 componentes de la parte Place smoking racks (3) inside interior del ahumador antes de empezar el smoker as shown. ensamblaje. Coloque cuidadosamente el ahumador de lado como se muestra. Alternativamente, el ahumador puede colocarse de cabeza para el ensamblaje.
-
Page 11: Wood Chip Tray
ASSEMBLY unidad, o para reclamar partes faltantes o dañadas. ¡PARE! Llame al: Departamento de Servicio al Cliente de MASTERBUILT al: 1-800-489-1581 STEP 9 Tenga a la mano los números de modelo y serie cuando llame. Estos números se ubican en la etiqueta plateada en la parte posterior de la unidad. -
Page 12: Wood Chip Loader
NO DEVUELVA AL ESTABLECIMIENTO MINORISTA para solicitar asistencia en el montaje de la unidad, o para reclamar partes faltantes o dañadas. ¡PARE! Llame al: Departamento de Servicio al Cliente de MASTERBUILT al: 1-800-489-1581 PRE-SEASON SMOKER PRIOR TO FIRST USE. Tenga a la mano los números de modelo y serie cuando llame. -
Page 13: Grease Tray
IMPORTANT FACTS ABOUT USING SMOKER ¡EMPECEMOS! • Este es un ahumador lento... permita que haya sufi ciente tiempo para la cocción. El ahumador • Maximum temperature setting is 275°F (135°C). SOLO DEBE USARSE EN EXTERIORES. • Do NOT move unit across uneven surfaces. •... - Page 14 • No opere ningún artefacto con un cable o enchufe dañado, o luego que el artefacto se haya than 1/2” thick covering on ham. Score ham. malogrado o dañado de cualquier manera. Contacte al Servicio al cliente de Masterbuilt si Mix ingredients and rub mixture on meat for 2 Combine syrup, ginger, nutmeg, and allspice desea asistencia al 1-800-489-1581.
- Page 15 • La unidad es SOLAMENTE DE USO EN EXTERIORES. • Nunca la use dentro de áreas cerradas como patios, garajes, edificios o tiendas de This expressed warranty is the sole warranty given by Masterbuilt and is in lieu of all other warranties, expressed or camping.
- Page 16 ESTE PRODUCTO ES SOLAMENTE DE USO EN EXTERIORES MANUAL DE ENSAMBLAJE, CUIDADO Y USO INFORMACIÓN DE ADVERTENCIAS Y SEGURIDAD AHUMADOR ELÉCTRICO DE 30” MODELO 20078715 Masterbuilt Manufacturing, Inc. 1 Masterbuilt Ct. Columbus, GA 31907 Customer Service 1-800-489-1581 www.masterbuilt.com Herramientas requeridas para el ensamblaje: Llave ajustable, destornillador Phillips o en cruz...
- Page 17 CE PRODUIT EST DESTINÉ UNIQUEMENT À UNE UTILISATION EN EXTÉRIEUR MANUEL D’ASSEMBLAGE, D’ENTRETIEN ET D’UTILISATION AVERTISSEMENTS ET INFORMATIONS RELATIVES À LA SÉCURITÉ FUMOIR ÉLECTRIQUE NUMÉRIQUE DE 30 PO MODÈLE 20078715 Masterbuilt Manufacturing, Inc. 1 Masterbuilt Ct. Columbus, GA 31907 Service à la clientèle 1-800-489-1581 www.masterbuilt.com...
- Page 18 Cette garantie de Masterbuilt ne couvre pas la finition de peinture, car elle risque de brûler lors de toute utilisation 2. Ce produit contient des produits chimiques, notamment du plomb et des composés normale de l’appareil.
- Page 19 2 c. à t. d'oignon en poudre après qu’il ait présenté un dysfonctionnement ou s’il est endommagé d’une quelconque manière. Contactez le service à la clientèle de Masterbuilt pour obtenir de l’aide en composant le 1-800-489- Copeaux à l’hickory ou au mesquite Copeaux à...
- Page 20 RENSEIGNEMENTS IMPORTANTS CONCERNANT L’UTILISATION DU FUMOIR COMMENÇONS! • Le réglage de température maximal est de 135 °C (275 °F). • Ce fumoir est lent... prévoyez suffi samment de temps pour la cuisson. Ce fumoir est conçu pour une • Ne PAS déplacer l’appareil sur des surfaces inégales. UTILISATION EN EXTÉRIEUR UNIQUEMENT.
- Page 21 ARRÊTEZ! Appelez le service à la clientèle de MASTERBUILT au 1-800-489-1581. A PPRÊTEZ LE FUMOIR AVANT LA PREMIÈRE UTILISATION. Veuillez avoir le numéro de modèle et le numéro de série à portée de main lors de l’appel.
-
Page 22: High Temperature Limiter Kit
ASSEMBLAGE manquantes ou endommagées ARRÊTEZ! Appelez le service à la clientèle de MASTERBUILT au 1-800-489-1581. ÉTAPE 9 Veuillez avoir le numéro de modèle et le numéro de série à portée de main lors de l’appel. Ces numéros se trouvent sur l’étiquette argentée au dos de l’appareil. - Page 23 ASSEMBLAGE ASSEMBLAGE ÉTAPE 1 ÉTAPE 7 Enlevez tous les composants de l’intérieur Mettez les grilles de fumage du fumoir avant de (3) dans le fumoir, de la façon commencer l’assemblage. illustrée. Positionnez soigneusement le fumoir sur le côté, de la façon illustrée.
- Page 24 ASSEMBLAGE ASSEMBLAGE ÉTAPE 5 ÉTAPE 3 Faites glisser le bac à Enlevez le pied à vis réglable (10). Mettez-le de côté en at- graisse (12) sur les supports tendant l’étape 4. du bac à graisse (19). Fixez le panneau latéral (20) au bâti du fumoir (1) au moyen des vis (B) de la façon illus- trée.
Need help?
Do you have a question about the 20078715 and is the answer not in the manual?
Questions and answers