Table of Contents
Advertisement
Advertisement
Table of Contents

Subscribe to Our Youtube Channel
Related Manuals for TESTO 523


Summary of Contents for TESTO 523
- Page 1 523 Refrigeration System Analyzer Instruction manual en (international)
-
Page 2: Safety And Environment
Never store the instrument together with solvents, do not use dessicants. Carry out only repair and maintenance work described in the instruction manual. Observe the prescribed handling steps. Use only original spare parts from Testo. -
Page 3: Specifications
Dispose of faulty rechargeable batteries/empty batteries at the proper collection points. Send the product back to Testo at the end of its life. We will ensure that it is disposed of in an environmentally friendly manner. Specifications... -
Page 4: Technical Data
· Probes: 1x mini DIN socket for Pt100 temperature · Material: ABS/PA/TPU probes · Dimensions: 265 x 135 x75 mm (10.4 x 5.3 x 3.0“) · Printer: IR for compatible Testo printer · Weight: approx 1200 g (2.7 lbs.) Measurement ranges · Protection class: IP54 / NEMA 3/3S ·... -
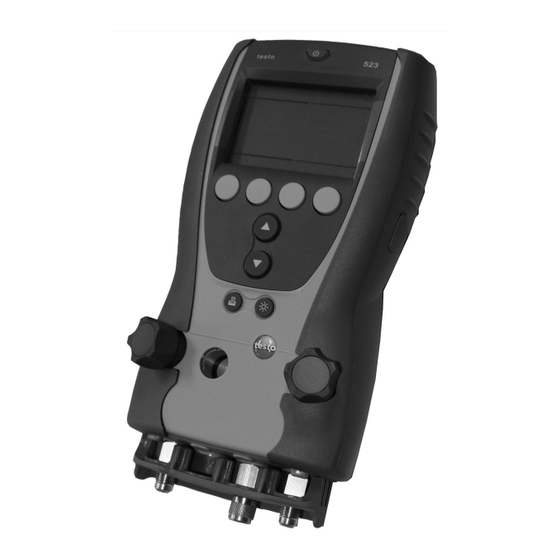
Page 5: Product Description
: Up/Down buttons: change display view. Warning! : Light button: switches display/sight glass illumination on/off. Do not remove fitting protector : Printer button: transmits data to Testo report during measurement and trans- printer port. It protects the fittings at the Sight glass for refrigerant flow. -
Page 6: First Steps
First steps First steps Inserting b b atteries/rechargeable b b atteries: Fold out the suspension hook and open battery compartment (clip fastening). Insert batteries (included in delivery) or rechargeable batteries (4x 1.5V, Type AA / Mignon / LR6) into the battery compartment. Observe polarity! Close battery compartment. -
Page 7: Setting Parameters
First steps 7 Setting parameters: Button functions · : Alter parameter. · : Change to next parameter. · : Store settings and leave configuration menu. · : Leave configuration menu (without storing). Settable parameters · : Set pressure sensors to zero ·... -
Page 8: Using The Product
Using the product Using the product Preparing measurement Connecting t t emperature p p robe: For the measurement of the line temperature and the automatic calculation of super-heating and sub-cooling, a Pt100 temperature probe (accessory) must be connected. Probes must be connected before switching the instrument on, in order for them to be recognized. - Page 9 For this reason, replace the refrigerant hoses after any fall or comparable mechanical strain with new, undamaged refrigerant hoses. For your own safety, send the instrument to Testo customer service for technical testing. Setting r r efrigerant: Press right-hand function button (R..., ...T or ---) .
-
Page 10: Carrying Out A Measurement
Using the product Carrying out a measurement Warning! Danger o o f i i njury d d ue t t o h h ighly p p ressurized h h ot, c c old o o r p p oisonous refrigerants! Always secure the measuring instrument with the carabiner suspension hook before pressurizing the instrument, in order to prevent falls (danger of breakage). - Page 11 Using the product 11 Button functions · : Change measurement value display. Possible display combinations: ________________________________________________________________ ________________________________________________________________ Evaporation pressure Condensation temperature Refrigerant evaporation temperature. t Refrigerant condensation temperature. t ________________________________________________________________ ________________________________________________________________ - or (only with connected temperature probe) - ________________________________________________________________ ________________________________________________________________ Evaporation pressure Condensation pressure...
-
Page 12: Maintaining The Product
For this reason, replace the refrigerant hoses after any fall or comparable mechanical strain with new, undamaged refrigerant hoses. For your own safety, send the instrument to Testo customer service for technical testing. Removing o o il t t races: Carefully blow any oil traces out of the valve block with compressed air. - Page 13 Replacing t t he v v alve o o r t t he p p ositioner k k nob: Warning! Replacing of the positioner knob and the valve by the customer is not allowed. Send the instrument to Testo customer service.
-
Page 14: Tips And Assistance
Testo cutomer service. If we were not able to answer your question, please contact your dealer or Testo customer service. For contact data, see back of this document or web page www.testo.com/service-contact Accessories and spare parts Description Part no. - Page 15 Notes 15...
- Page 16 0973 5231 en 08 V02.02 en-GB...
Need help?
Do you have a question about the 523 and is the answer not in the manual?
Questions and answers