Table of Contents
Advertisement
Issue 2 July 2012
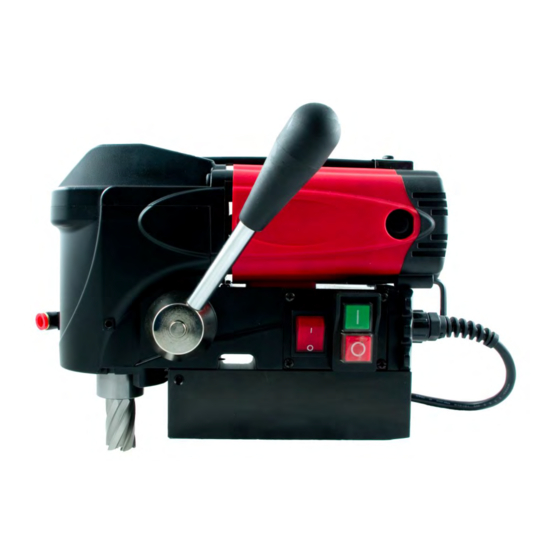
ADDER MAGNETIC DRILLING MACHINE
Model No. CM/705/1 & CM/705/3
This machine (Serial No
) is CE approved
Rotabroach™ Ltd
Imperial Works, Sheffield Road
Sheffield, South Yorkshire
United Kingdom
S9 2YL
Tel: +44 (0) 114 2212 510
Fax: +44 (0) 114 2212 563
Email: sales@rotabroach.co.uk
Web site: www.rotabroach.co.uk
1
Advertisement
Table of Contents

Related Manuals for Rotabroach CM/705/1A


Summary of Contents for Rotabroach CM/705/1A
- Page 1 Model No. CM/705/1 & CM/705/3 This machine (Serial No ) is CE approved Rotabroach™ Ltd Imperial Works, Sheffield Road Sheffield, South Yorkshire United Kingdom S9 2YL Tel: +44 (0) 114 2212 510 Fax: +44 (0) 114 2212 563 Email: sales@rotabroach.co.uk Web site: www.rotabroach.co.uk...
- Page 2 We would really like your feedback on the machine. Other Products by Rotabroach™: Thank you for your purchase of our product. For more information please visit our website at www.rotabroach.co.uk Or contact our sales department on +44 (0) 114 2212 510...
-
Page 3: Table Of Contents
Issue 2 July 2012 CONTENTS Page Intended Use General safety instructions Machine Specification Operating instructions Mounting of cutters Remedies for hole making problems Wiring Diagram Exploded diagram of machine Parts List Maintenance checks Trouble shooting Warranty... -
Page 4: Intended Use
Petrochemical and any other application when drilling ferrous metal. Any deviation from its intended use will not be the subject of responsibility from Rotabroach™. WARNING! Read and understand all instructions before operating any drilling system. Failure to follow all instructions listed below may result in electrical shock, damage to drilling system and even personal injury. - Page 5 Issue 2 July 2012 Maintain tools with care. Keep cutting tools sharp and clean. Properly maintained tools, with sharp cutting edges are less likely to bind and are easier to control. Check for misalignment or binding of moving parts, breakage of parts, and any other condition that may affect the tools operation.
- Page 6 Issue 2 July 2012 FORESEEABLE MISUSE During operation, failure to keep the cable away from the machine body, will result in the cable damaged by the drill bit, causing electric conduction and other accidental injury. Before operation, when plugging in the power source, failure to turn all the switches to position <off>, may result in accidental start-up from the machine, causing accidental injury.
-
Page 7: Machine Specification
Issue 2 July 2012 3) MACHINE SPECIFICATION Model Number CM/705/1A / CM/705/3A Motor specification 110V full load 10.8A 1100W 230V full load 5.4A 1100W No Load rpm 650 rpm Max hole cutting capacity 35mm x 25mm deep Overall dimensions Height 210mm... -
Page 8: Operating Instructions
Issue 2 July 2012 4) OPERATING INSTRUCTIONS WARNING: Always ensure that the magnet has adhered properly to the work piece before beginning drilling. NOTE: If mounting to a curved surface beam, mount the machine parallel to the curve in the work piece. WARNING: Avoid operating at more than 90 degrees from horizontal. -
Page 9: Mounting Of Cutters
Issue 2 July 2012 5) MOUNTING OF CUTTERS CAUTION: Never use a cutting tool that is larger than the maximum rated capacity of the machine. The machine has been made to accept cutters having 19.05mm (3/4”) dia. shanks. The following procedure is to be used when mounting cutters. -
Page 10: Wiring Diagram
Issue 2 July 2012 dirt or apply oil externally. (Even a small amount of oil is very effective). 5) Excessive See cause and remedy above cutter wear Incorrectly re-sharpened cutter. Refer to instructions and a new cutter for proper tooth geometry. -
Page 11: Exploded Diagram Of Machine
Issue 2 July 2012 8) EXPLODED DIAGRAM OF THE MACHINE... -
Page 12: Parts List
Issue 2 July 2012 9) PARTS LIST Parts Name Part number Qty No. Parts Name Part number INTERNAL CIRCLIP RD49000 46.) CRANK HUB RD49049 ARBOR WASHER RD49001 47.) SPRING RD49050 O-RING RD49212 51.) CRANK LEVER RD49054 COOLANT SEAL RD49002 52.) GRIP RD49055 SPRING... -
Page 13: Maintenance Checks
10) TIPS FOR KEEPING YOUR MACHINE IN CORRECT WORKING ORDER In order to ‘get the best life’ out of your Rotabroach™ machine always keep in good working order. A number of items must always be checked on Rotabroach™ machines. Always before starting any job make sure the machine is in good working order and that there are no damaged or loose parts. - Page 14 Issue 2 July 2012 Caution: Always replace the brushes as a pair. To replace: 1. Remove the 2 brush caps 3. Unscrew the screw to remove the brush lead. The old carbon brush may now be lifted away. 4. Install a new brush. Installation is the reverse of removal. Carbon Brushes Due to the brush design, if the machine comes to a stop without any reason, the brushes have to be checked.
-
Page 15: Trouble Shooting
Issue 2 July 2012 11) TROUBLE SHOOTING Magnet and motor do not function - The magnet switch is not connected to the power supply - Damaged or defective wiring - Defective fuse - Defective magnet switch - Defective Control Unit - Defective power supply Magnet does function, the motor does not - Damaged or defective wiring... - Page 16 Issue 2 July 2012 Fuse blows when magnet switch is turned on - Damaged or defective wiring - Wrong value fuse - Defective magnet switch - Defective Control Unit - Defective magnet Fuse blows when motor is started up - Damaged or defective wiring - Wrong value fuse - Motor running roughly - Defective Armature and / or Field...
-
Page 17: Warranty
WARRANTY STATEMENT Rotabroach™ warrants its machines to be free from faulty materials, or workmanship under normal use for a period of 12 months from initial date of purchase and 90 days for all other parts (excluding cutters), provided that the warranty registration card (or online registration) has been completed and returned to Rotabroach™, or its designated distributor...
Need help?
Do you have a question about the CM/705/1A and is the answer not in the manual?
Questions and answers