Table of Contents
Advertisement
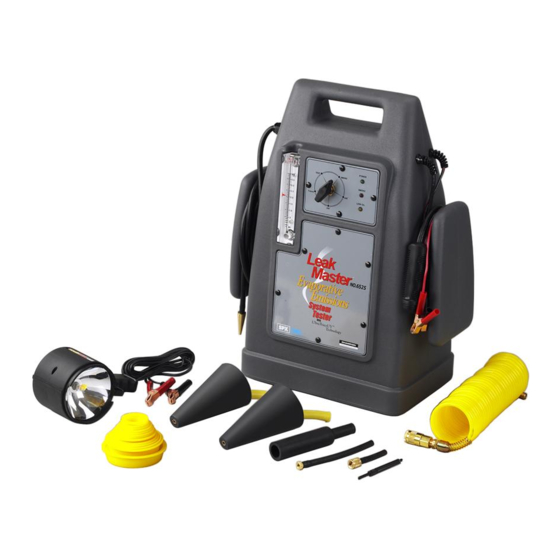
LeakMaster
™
Evaporative Emissions System Tester with UltraTraceUV
dye Technology
®
Probador del sistema de emisiones de evaporatión y la tecnologia de tinte UltraTraceUV
®
Testeur de système absorbeur de vapeurs de carburant de colorants UltraTraceUV
technologie
®
Operator's Manual
Manual del operador
Manuel de l'opérateur
Part No. 6525
Advertisement
Table of Contents

Related Manuals for SPX LeakMaster


Summary of Contents for SPX LeakMaster
- Page 1 LeakMaster ™ Evaporative Emissions System Tester with UltraTraceUV dye Technology ® Probador del sistema de emisiones de evaporatión y la tecnologia de tinte UltraTraceUV ® Testeur de système absorbeur de vapeurs de carburant de colorants UltraTraceUV technologie ® Operator’s Manual Manual del operador Manuel de l’opérateur...
-
Page 2: Table Of Contents
Table of Contents Table of Contents ................1 Safety Precautions ................2 Background ..................3 Introduction ..................4 Technical Specifications ..............4 Tester Overview ................5 Setup ....................6 Phase One ..................7 Phase Two ..................9 Vacuum and Induction Leaks ............10 Exhaust Leaks ................13 Miscellaneous Leaks ..............14 Oil Seals and Gasket Leaks ..........14 Intercooler and Turbocharger Leaks ........14 Component Testing .............15 Under-Dash Leaks ...............15... -
Page 3: Safety Precautions
Safety Precautions If the operator cannot read these instructions, operating instructions and safety precautions must be read and discussed in the operator’s native language. WARNING: To prevent personal injury and / or damage to equipment : • Read, understand, and follow all safety precautions and operating procedures. -
Page 4: Background
Use a scanner to close has a leak. Prior to the LeakMaster No. 6525, the EVAP system in order to perform any determining the location of an EVAP leak was a leak tests. -
Page 5: Introduction
Introduction Congratulations! You are in possession of the most useful, yet simple to operate, Evaporative Emissions (EVAP) system diagnostic tester available today. The LeakMaster’s versatile 12-volt design was specifically developed to diagnose vehicle EVAP systems for leaks. In addition, the LeakMaster will also find intake manifold system leaks, exhaust system leaks, and under-dash vacuum system leaks. It will also diagnose many other closed systems where you may suspect a leak, as well as pinpointing wind and water leaks entering the vehicle’s passenger compartment. -
Page 6: Tester Overview
We recommend replacing the solution once a year (at the 12. Smoke Diffuser is designed to slow the velocity of minimum) to help keep the LeakMaster operating in a the smoke exiting the supply hose. The diffuser allows like-new condition for many years to come. -
Page 7: Setup
Setup Connect black 1. Connect the red power cable from the LeakMaster battery clip to to a 12V DC power supply. If you are using a battery, chassis ground. Connect red verify it is in good condition and fully charged. See battery clip to Figure 1. -
Page 8: Phase One
Phase One 1. Verify the vehicle’s fuel level is below the base of the fuel tank neck. 2. Determine if the vehicle’s EVAP system is governed by a .040 or .020 acceptable leak standard. 3. Position the selector valve on the tester control panel to the correct standard. - Page 9 Phase One 8. Insert the supply hose from the tester into the EVAP service port adapter. See Figure 6. 9. Close the vehicle’s EVAP system vent solenoid. 10. Set the tester’s control valve to TEST. 11. Press the remote start button to activate the tester. Service Port At the beginning of the test procedure, the flow meter’s indicator-ball is toward the top of the...
-
Page 10: Phase Two
Phase Two 1. Verify the vehicle’s fuel level is below the base of the fuel tank neck. 2. Position the selector valve on the tester to SMOKE. See Figure 8. 3. Remove the vehicle’s fuel cap. This saves time when filling the EVAP system with smoke. 4. Press the remote starter button to activate the tester. The “ON”... -
Page 11: Vacuum And Induction Leaks
Vacuum and Induction Leaks 1. Seal the system to be tested by selecting the correct size cap plug (supplied) and sealing the engine’s air intake. To inspect the entire system, it is best to seal the engine’s intake as close as possible to the air inlet Cap Plugs origin. - Page 12 Vacuum and Induction Leaks Typical Areas to Search on Carbureted Engines Exhaust Gas Vacuum Vacuum Switches Recirculating Valve Hose Vacuum Hose Connections Choke Pull Off PCV Valve Vacuum Diaphragm & Hoses Advance Module Carburetor Intake Manifold Base Gasket Gasket Typical Areas to Search on Fuel Injected Engines Vacuum Lines Throttle...
- Page 13 PCV. Press If smoke is seen exiting the EGR valve, disconnect the the remote button on the LeakMaster. Watch vacuum supply line, and introduce smoke directly into for smoke to escape from the EGR valve. If you see a lot of smoke, the valve is bad;...
-
Page 14: Exhaust Leaks
Exhaust Leaks The exhaust cones were developed for the identifi- cation of leaks in a vehicle’s exhaust system. These leaks can be difficult to locate, because they are often hidden by metal shields, or become silenced as the engine warms up. Exhaust Cones 1. -
Page 15: Miscellaneous Leaks
Many oil leaks can be located with the LeakMaster; however, it is important to understand that the LeakMaster will only find leaks that allow air to flow through them, causing the oil to bubble. To find oil leaks, it is necessary to pressurize the crankcase with smoke: 1. -
Page 16: Component Testing
Component testing has endless possibilities; anything from hoses to diaphragms can be tested. Supplied with every LeakMaster are two exhaust cone adapters that can be used to access any opening from 1" to 3-1/2". Simply introduce smoke into the system being tested, seal any interconnecting ports or passages, and look for smoke to exit a leak. -
Page 17: Wind And Water Leaks
Miscellaneous Leaks Wind and Water Leaks (sunroofs, windows, etc.) The smoke diffuser was developed for quick identification of air and water leaks in a vehicle’s passenger compartment. These leaks can be caused Diffuser by faulty door and glass seals, windshield or sliding roof seals, or by misalignment of any of these components. -
Page 18: Maintenance
Maintenance CAUTION: Use only the No. P-0716-UV smoke-producing solution (obtained from the manufacturer) in the LeakMaster. Using solutions not recommended by the manufacturer can damage the unit and cause injury to the operator. Checking the Smoke Solution Level Check the smoke-producing solution in the tester regularly, and top off the solution to the FULL mark. -
Page 19: Parts List
Parts List Item No. Part No. Qty. Description Remote Cable Assembly (includes switch) 6525-7 Remote ON/OFF (switch only) 6525-6 6525-5 Battery Power Cable Assembly CEA-041 Nitrogen Coiled Hose (25 ft.) P-0716-UV Smoke Producing Solution 6525-4 Water Trap w/ filter CEA-049 Schrader Removal Tool CEA-04 Standard Service Port Adapter... -
Page 20: Troubleshooting
Troubleshooting Diagnostic Lights The LeakMaster has three diagnostic lights on the control panel that indicate if the tester is working correctly. The following table describes the tester’s trouble codes. Diagnostic Lights Interval Probable Cause √ Constant ON (switch in SMOKE position; smoke venting into atmosphere;... -
Page 21: Fluid Change Record
Fluid Change Record Date Name Date Name Notes... -
Page 22: Quick Reference
Quick Reference Tester Hookup 1. Connect red power cable to 12V DC power. 2. Connect black ground cable to chassis ground. 3. Connect nitrogen to tester. Phase One 1. Set control valve to correct calibration. 2. Press remote button, and align flow meter’s flag with ball. -
Page 23: Warranty
Warranty LIMITED ONE (1) YEAR WARRANTY Champion Engineering, Inc. warrants only to the original Purchaser that under normal use, care and service, the Equipment (except as otherwise provided herein) shall be free from defects in material and workmanship for ONE YEAR from the date of original invoice. This Warranty does not cover (and separate charges for parts, labor and related expenses shall apply to) any damage to, malfunctioning, inoperability or improper operation of the Equipment caused by, resulting from or attributable to (A) abuse, misuse or tampering;... -
Page 24: Español
Owatonna, MN 55060-0995 USA Phone: (507) 455-7000 Tech. Serv.: (800) 533-6127 Fax: (800) 955-8329 Order Entry: (800) 533-6127 Fax: (800) 283-8665 International Sales: (507) 455-7223 Fax: (507) 455-7063 manufactured by Form No. 107360 USA & Canada Patented © 2002 SPX Corporation (Rev. H, October 23, 2008) Foreign & Other USA Patents Pending...
Need help?
Do you have a question about the LeakMaster and is the answer not in the manual?
Questions and answers