Table of Contents
Advertisement
Advertisement
Table of Contents

Subscribe to Our Youtube Channel
Related Manuals for CIAT µConnect


Summary of Contents for CIAT µConnect
- Page 1 NA 06.95 B 04 - 2011 Simplified user manual...
-
Page 3: Table Of Contents
1. FOREWORD Thank you for choosing CIAT. We are confident that you will be completely satisfied with the heat pump that you have just purchased, for many years to come. All CIAT products are designed to optimise performance and to provide our customers with guaranteed comfort and energy savings. -
Page 4: Overview
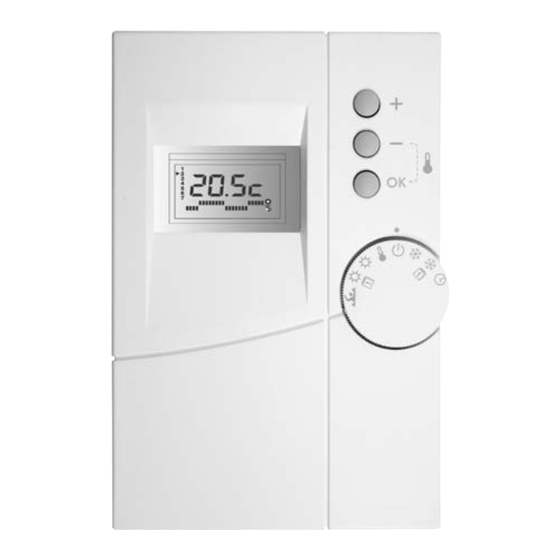
3. OvERvIEW 3.1 The remote control The control terminal must be mounted and connected by your installer in one of the main rooms of your house (e.g. lounge), observing the following conditions. As the terminal is fitted with an indoor environment sensor, it must not be exposed to turbulence (e.g. draughts, direct sunlight, heat from a fireplace, etc.) and must not be mounted on an exterior wall or in contact with an unheated room in order to detect the most representative temperature of your home. -
Page 5: First Steps
r 10- Up/down buttons. r 11- Display the room temperature by pressing - and OK simultaneously µ r 12- Change modes (comfort, economy or programmed), ¸ ¹ confirm your choice or clear faults. r 13- Function selector marker r 14- Function selector r 15- Defrost cycle operating indicator (air-source machine) r 16 - Opening the load shedding contact (configured by the installer) -
Page 6: Settings
5. SETTINGS It is possible to program the unit to switch automatically from comfort mode to economy mode at pre-set times which can be different every day of the week. To do this, configure the weekly programming mode. To define the program to be used in heating mode, position the dial to: To define the program to be used in cooling mode (depending on the model), position the dial 5.1 Configuring the weekly programming The display then shows:... -
Page 7: Clearing A Fault
5.3.2 Clearing a fault If the fault is temporary (display flashing), the fault will be cleared automatically when the cause disappears. If the fault is permanent (display fixed), the fault must be cleared manually by positioning the dial to the Off position: then pressing and holding the OK button for 3 seconds. - Page 8 (charged at local rate) Registered address Document non contractuel. Avenue Jean Falconnier B.P. 14 Dans le souci constant d’améliorer son matériel, CIAT se réserve le droit de 01350 Culoz – France procéder sans préavis à toutes modifications techniques. info@ciat.fr - www.ciat.com Non-contractual document.
Need help?
Do you have a question about the µConnect and is the answer not in the manual?
Questions and answers