
Related Manuals for Petsafe PIG00-14673


Summary of Contents for Petsafe PIG00-14673
- Page 1 Operating Guide PIG00-14673 Rechargeable In-Ground Fence ™ Please read this entire guide before beginning...
- Page 2 Our products provide you with the tools and technologies to successfully train your pet. If you have any questions about our products or training your pet, please visit our website at www.petsafe.net or contact our Customer Care Center at 1-800-732-2677. To get the most protection out of your warranty, please register your product within 30 days at www.petsafe.net.
- Page 3 • Risk of injury. Wire placed on top of the ground may be a trip hazard; use care in how you place your wires. This PetSafe Rechargeable In-Ground Fence system is not a solid barrier. This system is designed to act as a deterrent ®...
- Page 4 • Plug the surge protector into a grounded (3-prong) outlet that is within 5 ft. of the fence transmitter. ALWAYS use a grounded (3-prong) outlet to ensure maximum protection. • Do not remove the ground prong from the surge protector plug. Do not use a 3-prong plug to 2-prong outlet converter.
-
Page 5: Table Of Contents
Accessories ............................................28 System Test............................................29 Wire Break Location Test ......................................30 Troubleshooting ........................................32 Terms of Use and Limitation of Liability ..................................33 Compliance ............................................34 Customer Care International ......................................34 Battery Disposal ..........................................34 Warranty ............................................35 www.petsafe.net... -
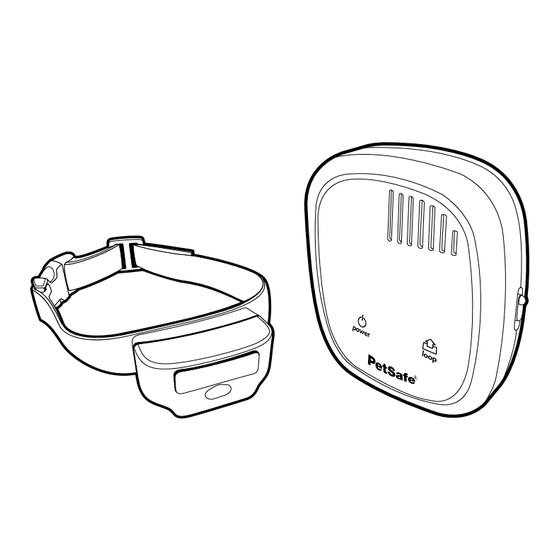
Page 6: Components
• Waterproofing compound (e.g. silicone caulk) • Small Phillips screwdriver • PVC pipe or water hose • Pliers • Circular saw with masonry blade • Staple gun • Non-metallic collar and leash • Scissors Setup and training help: www.petsafe.net 1-800-732-2677... -
Page 7: How The System Works
While harmless, the correction will persuade him to stay in the containment area you have established. Boundary flags are a temporary visual aid for your pet; remove them after training. This PetSafe Rechargeable ®... -
Page 8: Operating Guide
Operating Guide Step 1: Have Your Utilities Marked Buried Cable 1. Call your utility company to have your utility lines marked. If you have neighbors using an in-ground pet containment system, you 10’ 10’ will want to ask them where the boundary is located. Trust us, you really do not want to skip this step. - Page 9 Doing so will make the surge protector ineffective against surges or spikes. • For added protection, when unused for long periods of time or prior to thunderstorms, unplug from the wall outlet and disconnect the loop boundary wires. This will prevent damage to the transmitter due to surges. www.petsafe.net...
-
Page 10: Step 4: Design Your Boundary Zone
Step 4: Design Your Boundary Zone Basic Planning Tips • Always design your layout, position the boundary wire and test the system as outlined in this guide before burying the boundary wire. You do not want to find out after burying the wire that there is a problem with your layout or a loose connection somewhere. •... - Page 11 Run the wire from the fence transmitter to point A, then to point B and so on (B to C to D to E) all the way around the entire property until back to point A again. The wires from point A will then need to be twisted and connected back to the fence transmitter inside your home. www.petsafe.net...
- Page 12 Double Loop Boundary • To section off only one boundary area or one section of your yard (e.g., front yard 5’ only, or waterfront property) • The 2 parallel sections of the double boundary wire must be separated by a minimum of approximately 5 ft.
-
Page 13: Step 5: Position, Twist And Splice The Boundary Wire
Once you have securely spliced the wires together, open the lid of the gel-filled splice capsule and insert the wire nut as deeply as possible into the waterproof gel inside the capsule (5E). e. Snap the lid of the capsule shut (5F). www.petsafe.net... -
Page 14: Step 6: Connect The Wires
Additional Boundary Wire Acres Feet of Wire Needed Number of Spools Needed Extra spools of boundary wire can be purchased in lengths of ⁄ 500 ft. per spool where you purchased the kit or through the ⁄ Customer Care Center. ⁄... - Page 15 You will have to reset the GFCI or RCD to restore power to the system. For added protection, when unused for long periods of time or prior to thunderstorms, unplug from the wall outlet and disconnect the loop boundary wires. This will prevent damage to the transmitter due to surges. www.petsafe.net...
-
Page 16: Step 7: Prepare The Receiver Collar
Step 7: Prepare the Receiver Collar In order to test the system you will need to use the receiver collar. Your receiver collar comes installed with short contact points. If your pet has long or thick hair, use the long contact points instead. Tighten or switch the contact points by using the contact point wrench (7A). - Page 17 In the unlikely event that your pet “freezes” in the static correction zone, this feature limits the static correction duration to a maximum of 15 seconds. After 15 seconds, the static correction will stop and the green indicator light will stay on for 10 seconds. The receiver collar remains locked out until your pet leaves the static correction zone. www.petsafe.net...
-
Page 18: Step 8: Set The Boundary Width And Test The Receiver Collar
Step 8: Set the Boundary Width and Test the Receiver Collar With the boundary wire in place and properly connected, and the receiver collar fully charged, it is time to set the boundary width and test the system. The receiver collar should not be on your dog when the system is tested. Note: The receiver collar is waterproof, which can make the tone hard to hear. - Page 19 (8G). If you are satisfied that your system is functioning properly, you are ready to start burying the boundary wire. If the receiver collar did not tone or the test light did not flash, see the troubleshooting section. Boundary Wire Pet Area www.petsafe.net...
-
Page 20: Step 9: Bury The Boundary Wire
Step 9: Bury the Boundary Wire • Underground cables can carry high voltage. Have all underground cables marked before you dig to bury your wire. In most areas, this is a free service. Avoid these cables when you dig. • Before you begin installing the boundary wire, turn the fence transmitter off and unplug the adapter from the surge protector. -
Page 21: Step 10: Place The Boundary Flags
Note: If you cannot hear the beep, refer to the test light instructions in Step 8. To prevent an unintended correction, after the boundary flags have been placed, be sure to set the static correction on the receiver collar back to level 1, which is tone only. Boundary Boundary Wire Wire 10 ft. www.petsafe.net... -
Page 22: Step 11: Fit The Receiver Collar
Step 11: Fit the Receiver Collar Proper fit of the receiver collar is important. A receiver collar worn for too long or made too tight on your pet’s neck may cause skin damage, ranging from redness to pressure ulcers. This condition is commonly known as bed sores. •... - Page 23 Use a lighter to seal the cut so that it will not fray (11C). 5. The collar will slip if it is not properly threaded. The slide buckle prevents the collar from becoming loose around your pet’s neck and the ridges must be facing up (11D). Slide Buckle Ridges www.petsafe.net...
-
Page 24: Training Guide
. Read this section ® ™ completely before beginning to train your pet. Remember that this PetSafe Rechargeable In-Ground Fence system is not a solid barrier. • Pets respond to our emotions. You should stay upbeat and have fun with your pet throughout the training process. -
Page 25: Day 1-Tone-Only Training For Boundary Awareness
5. Aim to master 3–4 boundary flags per session. Make this FUN! Praise your pet if he or she quickly retreats or resists going into the static correction zone. Note: Never treat your pet or allow them to eat a treat in the static correction zone. www.petsafe.net... -
Page 26: Days 2 Through 4-Boundary Awareness With Static Correction
Phase 2 Days 2 Through 4—Boundary Awareness with Static Correction Perform 3 training sessions per day, each lasting 10–15 minutes. Goal: To train your pet to stay in the pet area and respect the boundary. Setup: • Program the static correction level on the receiver collar to level 2. •... -
Page 27: Days 9 Through 14-Unleashed Supervision
2. Walk around the yard and play with your pet, staying within the pet area at all times (12D). 3. Preoccupy yourself with another task in the yard while watching your pet. 4. Should your pet escape, take the receiver collar off and lead him back into the pet area. www.petsafe.net... -
Page 28: Days 15 Through 30-Pet Monitoring
Accessories To purchase additional accessories for your PetSafe Rechargeable In-Ground Fence system, contact the Customer Care Center at ® ™ 1-800-732-2677 or visit our website at www.petsafe.net to locate a retailer near you. 1-800-732-2677... -
Page 29: System Test
Connected protector. Reconnect the transmitter wires to the surge protector and connect the test loop to the surge protector loop terminals (13B). Repeat steps 6–11. www.petsafe.net... -
Page 30: Wire Break Location Test
13. Interpreting the results with the surge protector: a. If both the power and loop indicator lights are on and the receiver collar is activating at different distances on the test loop wire, the problem is in the containment boundary wire. Perform the wire break location test. b. - Page 31 9. Replace the damaged boundary wire with new boundary wire. 10. Reconnect the boundary wire to the surge protector. 11. Check the loop indicator light. If the loop indicator light is on, test the system with the receiver collar. www.petsafe.net...
-
Page 32: Troubleshooting
Troubleshooting The receiver collar is not • Charge the receiver collar. beeping or correcting. • Make sure the receiver collar is turned on and the battery status lights are flashing every 4–5 seconds. • Check that both lights are lit on the fence transmitter. If not, perform the “System Test” on page 29. -
Page 33: Terms Of Use And Limitation Of Liability
Product. Buyer assumes all risks and liability from the use of this Product. 5. Modification of Terms and Conditions Radio Systems Corporation reserves the right to change the terms, conditions and notices under which this Product is offered. www.petsafe.net... -
Page 34: Compliance
Customer Care Center to receive instructions on proper disposal of the unit. Please do not dispose of the unit in household or municipal waste. For a listing of Customer Care Center telephone numbers in your area, visit our website at www.petsafe.net. 1-800-732-2677... -
Page 35: Warranty
This Product has the benefit of a limited manufacturer’s warranty. Complete details of the warranty applicable to this Product and its terms can be found at www.petsafe.net and/ or are available by contacting your local Customer Care Center. United States and Canada—Radio Systems Corporation, 10427 PetSafe Way, Knoxville, TN 37932 USA Australia/New Zealand—In compliance with the Australian Consumer Law, Warranties Against Defects, effective January 1, 2012, the... - Page 36 Radio Systems Corporation 10427 PetSafe Way Knoxville, TN 37932 1-800-732-2677 www.petsafe.net For a list of patents protecting this product, please visit: http://www.radiosystemscorporation.com/patents J400-1790/2 2017 Radio Systems Corporation ©...
Need help?
Do you have a question about the PIG00-14673 and is the answer not in the manual?
Questions and answers