Petsafe In-Ground Fence PIG00-13661 Operating And Training Manual
Hide thumbs
Also See for In-Ground Fence PIG00-13661:
- Operating and training manual (28 pages) ,
- Operating manual (21 pages)

Related Manuals for Petsafe In-Ground Fence PIG00-13661


Summary of Contents for Petsafe In-Ground Fence PIG00-13661
- Page 1 Model number Pig00-13661 in-ground fence ™ operating and training guide Please read this entire guide before beginning...
- Page 2 Important Safety Information Explanation of Attention Words and Symbols used in this guide This is the safety alert symbol. It is used to alert you to potential personal injury hazards. Obey all safety messages that follow this symbol to avoid possible injury or death. WARNING indicates a hazardous situation which, if not avoided, could result in death or serious injury.
- Page 3 This PetSafe In-Ground Fence is not a solid barrier. This system is designed to act as a deterrent to remind ® ™ pets by Static Correction to remain in the boundary established. It is important that you reinforce training with your pet on a regular basis.
-
Page 4: Table Of Contents
Customer Care Center at 1-800-732-2677. To get the most protection out of your warranty, please register your product within 30 days at www.petsafe.net. By registering and keeping your receipt, you will enjoy the product’s full warranty and should you ever need to call the Customer Care Center, we will be able to help you faster. -
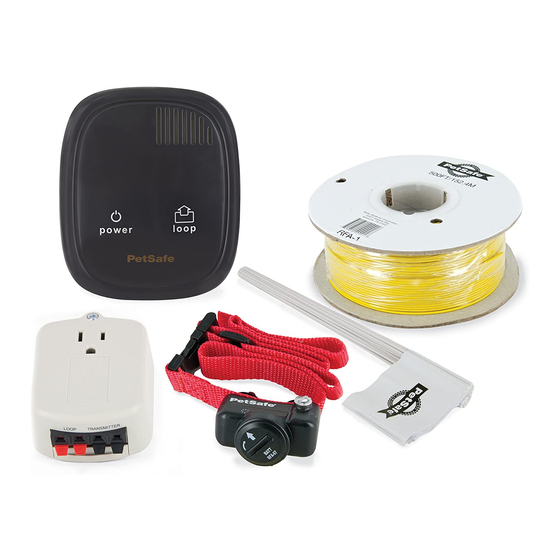
Page 5: Components
• Shovel or lawn edger • PVC pipe or water hose • Pliers • Circular saw with masonry blade • Wire stripping pliers • Staple gun • Scissors • Non-metallic collar and leash • Lighter Fence installation and training help: www.petsafe.net www.petsafe.net... -
Page 6: How The System Works
If he proceeds further, he receives a safe but startling Static Correction. While harmless, the correction will persuade him to stay in the containment area you’ve established. Boundary flags are a temporary visual aid for your pet; remove them after training. This PetSafe In-Ground Fence has been proven safe, comfortable, and effective ®... -
Page 7: Operating Guide
Make sure the Boundary Wire is not cut off or pinched by a window, door, or garage door, as this can damage it over time. To prevent fires and electrical hazards, install the Fence Transmitter in buildings that are in accordance with state and local electrical codes. 3ft. www.petsafe.net... -
Page 8: Lay Out The System
Step Lay Out the System Basic Planning Tips Underground cables can carry high voltage. Have all underground cables marked before you dig to bury your wire. In most areas this is a free service. Avoid these cables when you dig. For information regarding how these underground wires can affect your system’s operation, see Step 3 Position the Boundary Wire. - Page 9 B, B to C, C to D, D to E, E to F, make a U-turn and follow your path all the way back to A, keeping the wire separated at least 5 feet. Twist the wire from A back to the Fence Transmitter. See the “Install the Boundary Wire” section for more information on attaching the wire to a fence. www.petsafe.net...
-
Page 10: Position The Boundary Wire
Step Position the Boundary Wire Lay out the Boundary Wire using your planned boundary and test the system BEFORE burying the wire or attaching it to an existing fence. This will make any layout changes easier. Work carefully. A nick in the wire insulation can diminish the signal strength and create a weak area where your pet can escape. -
Page 11: Connect The Wires To The Surge Protector And Fence Transmitter (Usa And Canada)
Transmitter. ALWAYS use a grounded (3-prong) outlet to ensure maximum protection. • Do not remove the ground prong from the Surge Protector plug. Do not use a 3-prong plug to 2-prong outlet converter. Doing so will make the Surge Protector ineffective against surges or spikes. www.petsafe.net... - Page 12 1. Turn the power OFF to the outlet that the Surge Protector and Fence Transmitter will be plugged into. Fence Transmitter 2. We recommend that, if possible, use the outlet center Loop screw that holds the cover plate in place to secure the Power Transmitter Adapter...
- Page 13 For added protection, when unused for long periods of time or prior to thunderstorms, unplug from the wall outlet and disconnect the loop boundary wires. This will prevent damage to the transmitter due to surges. www.petsafe.net...
-
Page 14: Prepare The Receiver Collar
(RFA-67) can be found at many retailers. Contact the Customer Care Center or visit ® our web site at www.petsafe.net to locate a retailer near you. To Set the Static Correction Level Read all steps before attempting to set the Static Correction Level. - Page 15 Low Static Correction Timid 3 Flashes Medium Static Correction Timid or Average 4 Flashes Medium High Static Correction Average or High Energy 5 Flashes High Static Correction High Energy Flashes once every Indicates Low Battery 4 to 5 seconds www.petsafe.net...
-
Page 16: Set The Boundary Width And Test The Receiver Collar
Step Set the Boundary Width and Test the Receiver Collar With the Boundary Wire in place and properly connected, it is time to set the containment field and test the system. The Receiver Collar should NOT be on your dog when the system is tested. Note: The Receiver Collar is waterproof, which can make the tone hard to hear. - Page 17 Test Light should flash brighter as you enter the run-through area (6G). If you are satisfied that your system is functioning properly, you are ready to start burying the Boundary Wire. If the Receiver Collar did not tone or the Test Light did not flash, see the “Troubleshooting” section. www.petsafe.net...
-
Page 18: Install The Boundary Wire
3. Use a blunt tool such as a wooden paint stick to push the Boundary Wire into the trench. Be careful not to damage the Boundary Wire insulation. To Attach the Boundary Wire to an Existing Fence The Boundary Wire of the PetSafe In-Ground Fence ®... -
Page 19: Place The Boundary Flags
Note: If you cannot hear the beep, see the Test Light Instructions in Step 6. To prevent an unintended correction, after the Boundary Flags have been placed, be sure to set the static correction on the Receiver Collar back to level 1 Tone Only. www.petsafe.net... -
Page 20: Fit The Receiver Collar
1. Make sure that the battery is not installed in the Receiver Collar. 2. Start with your pet standing comfortably (9A). 3. Place the Receiver Collar on your pet so that the “PetSafe” logo is facing your pet’s chin. Center the Contact Points underneath your pet’s neck, touching the skin. -
Page 21: Training Guide
The ridges must be facing up; the collar will slip if it is not properly threaded. Training Guide Be Patient With Your Pet Important: Proper training of your pet is essential to the success of the PetSafe In-Ground Fence . Read ®... -
Page 22: Day 1 - Boundary Awareness
Phase Day 1 - Boundary Awareness Perform three training sessions per day, each lasting 10-15 minutes. Goal: To have your pet learn that the Boundary Flags and warning beep from the Receiver Collar defines the new Pet Area. Setup: • Program the Static Correction Level on the Receiver Collar to Level 1 Tone Only training mode. • Put a separate non-metallic collar on your pet’s neck ABOVE the Receiver Collar and attach a leash. -
Page 23: Days 5 Thru 8 - Distraction Phase
2. Walk around the yard and play with your pet, staying within the Pet Area at all times. 3. Preoccupy yourself with another task in the yard while watching your pet. 4. Should your pet escape, take the Receiver Collar off and lead him back into the Pet Area. www.petsafe.net... -
Page 24: Days 15 Thru 30 - Pet Monitoring
To purchase additional accessories for your PetSafe In-Ground Fence , contact the Customer Care Center at 1-800- ® ™ 732-2677 or visit our website at www.petsafe.net to locate a retailer near you. Component Part Number Battery - two pack RFA-67D-11... -
Page 25: Troubleshooting
• Perform the “System Test” (page 27) to determine if the Fence Transmitter or Surge Protector needs to be loop alarm is sounding. replaced. • If the Fence Transmitter is functioning properly, you have a break in your Boundary Wire. See the “Wire Break Location Test” (page 28) section in this guide. www.petsafe.net... -
Page 26: Additional Information
• Use care when using a weed eater or when digging near the Boundary Wire to prevent damage. • The system should only be used with healthy pets. Contact your veterinarian if you have concerns about the medical condition of your pet (medication, pregnant, heart conditions, etc.). • The PetSafe In-Ground Fence is for residential use only. -
Page 27: System Test
Connected containment Boundary Wire. Perform the Wire Break Location Test. b. If the Loop indicator light is OFF with an alarm on the Fence Transmitter, there is a problem with the Surge Protector. Contact the Customer Care Center. www.petsafe.net... -
Page 28: Wire Break Location Test
14. When testing is complete reconnect and verify that the Boundary Wire is plugged into the Loop Terminals on the Surge Protector and the Transmitter is connected to the Surge Protector. 15. Return the Boundary Control Switch and the Boundary Width Control knob setting to the position noted earlier. 16. -
Page 29: Terms Of Use And Limitation Of Liability
Product. Buyer assumes all risks and liability from the use of this Product. 5. Modification of Terms and Conditions Radio Systems Corporation reserves the right to change the terms, conditions and notices under which this ® Product is offered. www.petsafe.net... -
Page 30: Compliance
Monday - Friday 10:30 AM - 7 PM This product has the benefit of a limited manufacturer’s warranty. Details of the warranty applicable to this product and its terms can be found at www.petsafe.net and/or are available by sending a stamped addressed envelope to PetSafe Ltd. -
Page 31: Warranty
This Product has the benefit of a limited manufacturer’s warranty. Complete details of the warranty applicable to this Product and its terms can be found at www.petsafe.net. Australia/New Zealand - In compliance with the Australian Consumer Law, Warranties Against Defects, effective January 1,... -
Page 32: Mounting Template
Layout Grid Mounting Template Drill Here 3.000" (7.62 cm) Drill Here Radio Systems Corporation ® 10427 PetSafe Way Knoxville, TN 37932 1-800-732-2677 www.petsafe.net Protected by US Patents 6,921,089, 6,538,617 and D515,027. 400-1418/4 ©2012 Radio Systems Corporation...
Need help?
Do you have a question about the In-Ground Fence PIG00-13661 and is the answer not in the manual?
Questions and answers