Table of Contents
Advertisement
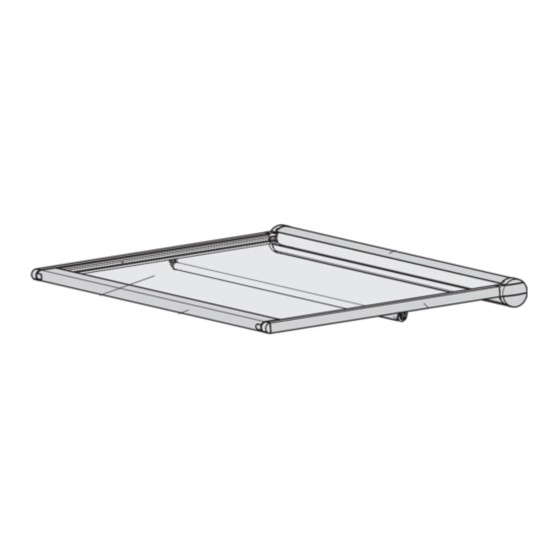
Mounting instructions conservatory awning
markilux 8800 / 8800 tracfix
overview
5
1
Cassette
2
Guide track
3
cover support tube
4
Front profile
5
Awning cover
Table of contents
Scope of the Delivery
This conservatory awning is delivered with the cassette fully pre-assembled, a front profile and 1 pair of guide
tracks in protective foil. The drive belts have been matched to the cover length in the factory. The number of fixture
brackets depends on the awning size and fixture type, see sales literature.
02-06-2014
7061438 TK + QS
4
1
2
3
Page
5
5
5
6 - 7
8
8
9
10 - 11
2
12
13
14
17
17
18
18
18
19
19
19 - 21
markilux
1
Advertisement
Table of Contents

Related Manuals for Markilux 8800


Summary of Contents for Markilux 8800
-
Page 1: Table Of Contents
6.1 Motor connection 6.2 Motor connection data markilux 8800 / 8800 tracfix 6.3 Motor connection data coupled unit markilux 8800 / 8800 tracfix - optional 7. Fixing the cassette coupling bracket (e.g. bottom fixture) - optional 8. Coupling single awnings - optional... -
Page 3: Markilux Safety Instructions
The security and attachment notes as well as the operation manuals are to be read and observed! The markilux operating guide, as well as the setting instructions of the motor, switch and controller manufacturers are to be handed over to the user with a written confirmation and fitted wind class (see handover declaration). -
Page 4: Cassette 3
If the awning is installed at a height less than 2.5 metres above accessible traffic ways, then the awning may only be operated by a pushbutton switch which enables the moving parts to be viewed. Electric controls, radio-controlled motors with click in-switches are not permitted for such installations. www.markilux.com... -
Page 5: Markilux Mounting Instructions Page
1. Overviews and fixing types 1.1 Mounting types and mounting brackets 76063.L 76061.L 76064.R 76062.R 76017. (76181.) 76046. (76180.) 76061.L 76077. L 76062.R 76046. 76078. R (76180.) (76180.) 76053. 76063.L 76064.R (76181.) 76049. 76061.L 76062.R 76049. (76180.) 76017. -
Page 6: Mounting Bracket
77780. 76065. 71780. sions" bracket assembly for cover coupling bracket assembly for Storm security device assem- support tube cover support tube bly / track slider 76019. 76059. 76235. Bottom fixture assembly right reveal 76076 left 76077. 76076. + 76077. www.markilux.com... -
Page 7: Mounting Bracket
76052. 76049. 78158. Mounting bracket Mounting bracket assembly Track bracket assembly for track fixture directly on the without mounting screws 76099. Mounting bracket conservatory rafters incl. mounting screws as an Ø9 addition to fixture type 32 76735. 76098. 76099. www.markilux.com... -
Page 8: Dimension Overviews And Fixture Dimensions
Overview of dimensions, see chapter 1.3.1 - 1.3.3. Respective information on the mounting dimensions of other mounting types (see chapter 1.1) can be found in our sales documentation. 1.4.1 Bottom fixture Overview of dimensions markilux 8800 / 8800 tracfix Fixture type 11 76061. -
Page 9: Face Fixture (Fixture Type 12)
1.4.2 Face fixture Overview of dimensions markilux 8800 / 8800 tracfix Fixture type 12 5° 10° 15° 20° 25° 30° 35° 40° 45° 76063. 76064. (76181.) S A-A 76046. measurements in mm = overall awning width = from a fixture width (MA) of 451 cm an additional cassette coupling... -
Page 10: Track Fixture (Fixture Type 32)
1.4.3 Track-only fixture Overview of dimensions markilux 8800 / 8800 tracfix Fixture type 32 76046. S A-A 76046. measurements in mm = overall awning width = from a fixture width (MA) of 451 cm an additional cassette/casing support is required... - Page 11 76191. 76192. 76193. 76194. 105 to 505 205 to 505 = overall awning width = bracket fixture range = width between fixing points = MA = bracket = awning fixture width = BA = fixture bracket height www.markilux.com...
-
Page 12: Reveal Fixture (Fixture Type 16)
= track bracket with adjustable head 100 mm = width between fixing points 76054. = universal track bracket assembly height 100 mm = projection from a fixture width (MA) of 601 cm an cassette support assembly, = detailed view 76183., is required www.markilux.com... -
Page 13: Fitting The Brackets (E.g. Bottom Fixture)
(11). Remove the tape holding the drive belt in place (adhesive strip) from the guide track profile. The lug-end of the drive belt (12) must be fed over the belt roller (13). www.markilux.com... - Page 14 6a. Attention! For awnings with 7. Push the guide track profile (2) up to 8. Tighten the jaws of the track bracket the stop and secure with a SW 6 Allen (10) SW 6 Allen key. tracfix system, the cover has to be threaded in the plastic track (15) with the key cheese-head screw (16).
- Page 15 (13). tube brackets (24) (on both the right and left). Clip the left cover support tube bracket to the guide track (2) and firmly tighten the jaws of the bracket with a SW 6 spanner. www.markilux.com...
- Page 16 15. have to be repeated. For this profile (20) and put on the end cap (21) head screws (8). purpose the gas piston has to be (on both the right and the left). secured again as described in chapter 4 "What to do, if..". www.markilux.com...
-
Page 17: What To Do If The Awning Has No Tension In The Middle Position
3, paragraph 21 and tension the awning again as in paragraph 22. 5. The course taken by the drive belt = cassette = belt roller = fabric roller = drive belt = projection profile www.markilux.com... -
Page 18: Motor
Cable outlet for motor operation: measurements in mm 6.2 Motor connection data markilux 8800 / 8800 tracfix wireless (433 MHz) U = 230 V~ / 240 W, 50 Hz, I = 1.0 A... -
Page 19: Motor Connection Data Coupled Unit Markilux 8800 / 8800 Tracfix - Optional
8800 / 8800 tracfix coupled units Attention! Observe the technical instructions as for the single unit! 6.3 Motor connection data coupled unit markilux 8800 / 8800 tracfix wireless (433 MHz) U = 230 V~ / 290 W, 50 Hz, I = 1.25 A... - Page 20 (18) that are offset by 90° in the fab- Attention! Do not twist transport and fix them. ric roller of the coupled awning (7). bands! See point 7a for tracfix system. 11 = guide track with inside plastic track (15) www.markilux.com...
- Page 21 Align the front profiles at the same height: either by pulling the front profile (22) of the awning to be coupled or by using the drive of the drive awning (3). Subsequently tighten the four SW 5 threaded pins and attach the inspection cover (2). www.markilux.com...
-
Page 23: Markilux Handover Declaration
Handover Declaration For the users of vertical blinds and conservatora awnings markilux awnings for exterior use conform to the standard EN 13561 for awnings and thus to the current technical requirements in relation to their construction and installation brackets. - Page 25 Handover Declaration For the users of vertical blinds and conservatora awnings markilux awnings for exterior use conform to the standard EN 13561 for awnings and thus to the current technical requirements in relation to their construction and installation brackets.
Need help?
Do you have a question about the 8800 and is the answer not in the manual?
Questions and answers