CAMBRIONIX PowerPad15s User Manual
Hide thumbs
Also See for PowerPad15s:
- User manual (44 pages) ,
- User manual (12 pages) ,
- User manual (41 pages)
Advertisement
Quick Links
Advertisement

Subscribe to Our Youtube Channel
Related Manuals for CAMBRIONIX PowerPad15s


Summary of Contents for CAMBRIONIX PowerPad15s
- Page 1 PowerPad15s User guide v1...
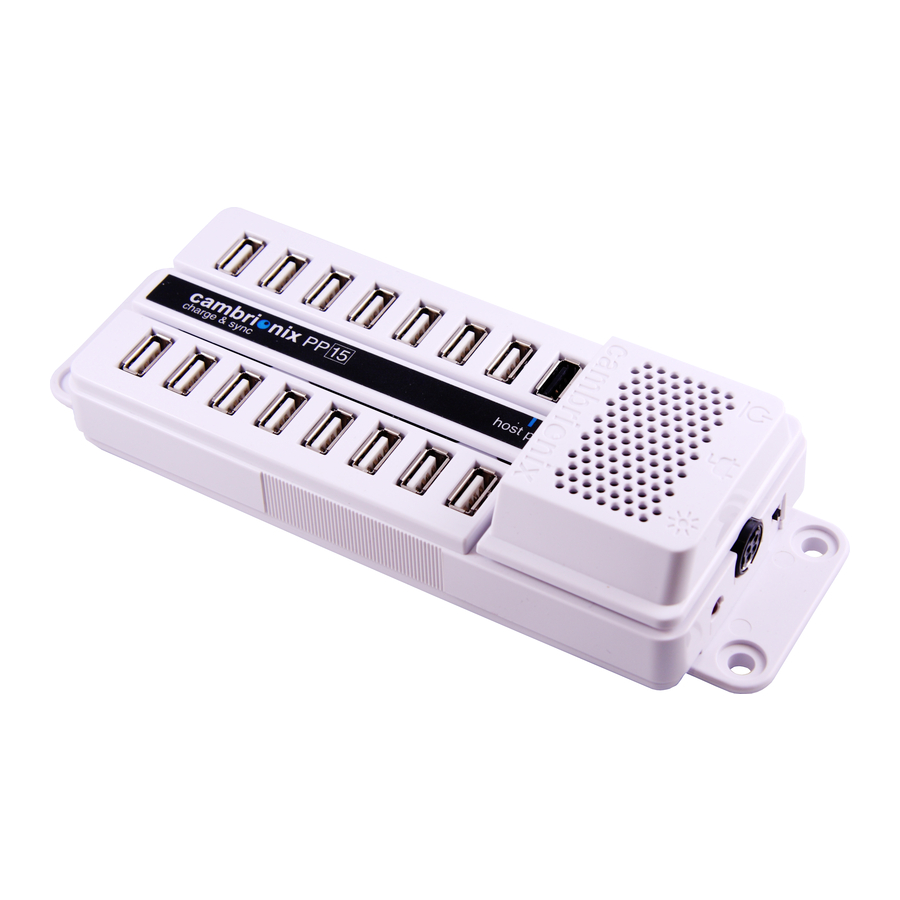
- Page 2 Introduction The PowerPad15s is a device used to charge and synchronise (sync) data across 15 USB devices simultaneously. It's a compact and safe device suited to home and office use. The PowerPad15s detects and adapts to connected devices ensuring that each device is charged at the optimum rate.
-
Page 3: Table Of Contents
Contents 1. Operating 2. Installation 3. Port control and monitoring 4. Safety messages 5. Electrical specifications 6. Warranty 7. Contact details... -
Page 4: Operating
1. Operating • Connect a suitable power cord between the power supply (PSU) and receptacle (socket outlet). The PSU is shown below. Power supply for PowerPad15s PSU output connector. Connect a suitably rated cord between here and your receptacle (socket... - Page 5 1. Operating • Connect the output of the power supply to the PowerPad15s. Correctly fitted power connector.
- Page 6 1. Operating • Switch the PowerPad15s 'on' using the on/off switch as shown below. The red 'power LED' will illuminate when the PowerPad15s is switched 'on'. This LED may flicker or pulse depending on the level of activity within the PowerPad15s - this is entirely normal.
- Page 7 USB device manufacturer. • With no host computer connected to the PowerPad15s the devices will all begin to charge. If you connect a host computer, all the devices will be placed in sync mode and will be visible within iTunes, Apple configurator or similar software.
-
Page 8: Installation
2. Installation • The PowerPad15s can either be used on a desk/bench or mounted to a surface using the mounting holes on either end of the device. Under all mounting conditions it is essential to avoid covering/blocking the ventilation holes indicated below. - Page 9 2. Installation • To mount the PowerPad15s to a surface you will require four M5 screws (suitable for the material you are mounting the PowerPad15s to). You will also require a suitable tool for driving your chosen screws. Do not use countersunk head screws as these will damage the plastic flanges, we recommend a 'pan head' screw type.
- Page 10 2. Installation • The PowerPad15s dimensions and mounting hole locations are shown below.
- Page 11 • The PowerPad15s can be mounted in a number of vertical orientations as shown below. The PowerPad15s can also be mounted horizontally to a flat surface such as a desk. Care should always be taken to ensure that the ventilation holes are not blocked or obstructed.
-
Page 12: Port Control And Monitoring
• It is possible to control individual charging ports and also monitor the current on each port as well as total consumed power etc. In order to monitor and control the 15 charging ports a host computer connection is required. Connect the PowerPad15s 'Host Port' to a computer USB port using a USB A-A cable. - Page 13 • Install the FTDI driver for your operating system from cambrionix.com/updater • Open a terminal emulator (ZTerm, PuTTY etc) and connect to the PowerPad15s USB COM port with the following settings: 115,200 baud, 8N1. • Press the ENTER key on your computer to bring up the...
-
Page 14: Safety Messages
• Do not attempt to modify or open the PowerPad15s enclosure. • The plug on the power supply cord is considered the 'disconnect device' and as such the receptacle (socket outlet) should be located near the PowerPad15s and shall be easily accessible should the power supply need to be isolated from the 100-240VAC input for whatever reason. - Page 15 5. Electrical specifications of PSU if supplied. Parameter Specification Notes Part number FSP180-AHAN1 Manufactured by FSP Group Inc. PSU input voltage 100-240 VAC 50-60Hz PSU input current 2.5A PSU output voltage 12 VDC PSU output current Input connector Output connector 4pin DIN On the end of a 90cm cable.
-
Page 16: Electrical Specifications
5. Electrical specifications of PowerPad15. Parameter Specification Notes Model number PowerPad15s Manufactured by Cambrionix Ltd. Input voltage 12VDC Input current Port output voltage 5.2VDC Per port PSU output current 2.1A Per port Power in connector 4pin DIN See product label for pinout. -
Page 17: Warranty
6. Warranty • The PowerPad15s is provided with a 12 month RTB warranty from date of purchase. • Details of our standard warranty terms are available at www.cambrionix.com... -
Page 18: Contact Details
7. Contact details • Address: Cambrionix Ltd, St Johns Innovation Centre, Cowley Road, Cambridge, CB4 0WS, • Telephone: +44 (0) 1223 422 249 • Email: support@cambrionix.com • Web: www.cambrionix.com...
Need help?
Do you have a question about the PowerPad15s and is the answer not in the manual?
Questions and answers