Table of Contents
Advertisement
Operator's Manual
Operator's Manual
Operator's Manual
Handheld or mounted,
Handheld or mounted,
Handheld or mounted, this
this BP, HR, SpO2 &Temp
this BP, HR, SpO2 &Temp
multi-parameter monitor goes
monitor goes everywhere
monitor goes everywhere
everywhere you need it to.
you need it to.
you need it to.
Now with options
for ECG & CO2.
–<NEED<NEED<NEED COVER>
Portability and accuracy
Portability and accuracy
Portability and accuracy
like no other!
like no other.
like no other.
Developed by:
Manufactured,
Distributed and
Serviced by:
Advertisement
Table of Contents

Summary of Contents for petMAP PETMAP+ II
- Page 1 –<NEED<NEED<NEED COVER> Operator’s Manual Operator’s Manual Operator’s Manual Handheld or mounted, Handheld or mounted, Handheld or mounted, this this BP, HR, SpO2 &Temp this BP, HR, SpO2 &Temp multi-parameter monitor goes monitor goes everywhere monitor goes everywhere everywhere you need it to. you need it to.
- Page 2 COPYRIGHT © 2012-2016 Ramsey Medical, Inc. All rights reserved. No portion of this manual may be reproduced without the written permission of Ramsey Medical, Inc.
- Page 3 CO2 Module Note that Operator’s Manuals for the ECG and CO2 Modules are included with the modules, which are packaged separately. This is a typical screen display when petMAP+ II (#7402 or #7404) is configured with an ECG Module (#9026)
- Page 4 ECG Module (#9026) and a CO2 Module (#9027) petMAP+II is to be operated by qualified personnel only. Before use, familiarize yourself with the device and read this manual, including all warnings and cautions. The user should check that...
-
Page 5: Table Of Contents
Power/Batteries Controls & Connections Operating Modes & Displays User Selections Alarms SD Card Functions. Updating petMAP+II with new software. Mounting Options Operating Instructions Prior to Use: Charging the Batteries and Setting Date & Time Powering the petMAP+II Measuring Blood Pressure Blood Pressure Values in Cats &... -
Page 6: Introduction
The measured values are displayed and trended on the device continuously. Modules for ECG and CO2 can also be purchased and added to the base unit. Data trended on the petMAP+II can optionally be saved on an SD memory card via the petMAP+II’s integrated SD memory card slot. -
Page 7: Measuring Vital Signs On Animals
Veterinarians who teach BP seminars point out the most important requirements are the skill, training and patience of the person taking BP. Also, a calm animal is essential. petMAP+II is specifically designed to allow the user to get good determinations on calm, awake animals. Even so, many animals will require extra time for calming and lots of user patience. -
Page 8: Unit Configurations & Accessories
Unit Configurations & Accessories The following table describes the petMAP+II configurations currently available: Product Code Description... - Page 9 Certain configurations are also upgradeable, after purchase. For instance, if 7400 was purchased and now SpO2 capability is desired, the petMAP+II may be upgraded buy purchasing the SpO2 option. Such upgrades require the unit be returned to the service center. Contact Customer Service for more...
- Page 10 Software/Firmware Update: Using an SD card (16 GB or less) and two files provided by the manufacturer, the operating firmware of the device can be updated in the field by the user when such updates are made available.
-
Page 11: Symbols, Warnings & Cautions
RamseyCuffs should be used. Improper cuff size and improper cuff fit will result in inaccurate (or no) BP readings. petMAP requires a cuff whose width is approximately 42 - 50% of the circumference of the forearm, the hind foot, or the tail of the animal. The index line on the cuff should fall within the “OPTIMUM zone”... - Page 12 To ensure that the unit remains in calibration, verify calibration on a yearly basis or at any time there is user suspicion that proper calibration may have been lost. If the petMAP+II has been dropped or damaged in any way, it should be checked by qualified service personnel to ensure proper operation prior to use.
- Page 13 Consult the dealer or an experienced radio/TV technician for help. The petMAP+II is not intended for use on patients being imaged with an MRI device since the petMAP device contains magnetically active materials and could result in injury if used too close to an operating MRI.
-
Page 14: Emc Declaration
EMC Declaration Precautions regarding Electromagnetic Compatibility (EMC) are required when using Medical Equipment. The petMAP+II should be put into service according to the EMC information provided in this manual. Portable and mobile RF communications equipment can affect Medical Equipment. The measurement accuracy and user control functions as specified in this manual is determined to be petMAP+II essential performance. - Page 15 Electromagnetic Immunity The petMAP+II is intended for use in the electromagnetic environment specified below. The customer or user of the petMAP+II should assure that it is used in such an environment. IEC60601 Electromagnetic environment - Immunity test Compliance Level test level...
- Page 16 Electromagnetic Immunity The petMAP+II is intended for use in the electromagnetic environment specified below. The customer or user of the petMAP+II should assure that it is used in such an environment. IEC60601 Immunity test Compliance Level Electromagnetic environment - guidance...
- Page 17 Recommended separation distances between portable and mobile RF communications equipment and the petMAP+II The petMAP+II is intended for use in an electromagnetic environment in which radiated RF disturbances are controlled. The customer or user of the device can help prevent electromagnetic interference by maintaining a minimum distance between portable and mobile RF communications equipment (transmitters) and the device as recommended below, according to the maximum output power of the communications equipment.
-
Page 18: Device Overview
The petMAP+II may also operate on 4 AA alkaline or lithium batteries (these are non-rechargeable battery types); however, the AC/DC adapter should never be used when using batteries other than NiMH rechargeable batteries. -
Page 19: Controls & Connections
ECG Plugin AC/DC Adapter Temperature Connector. petMAP+II optional accessories include a temperature extension cable, an esophageal probe and a rectal probe (see Unit Configurations & Accessories section). While it is possible to connect the probes directly to the unit, using the extension cable allows for more placement flexibility. -
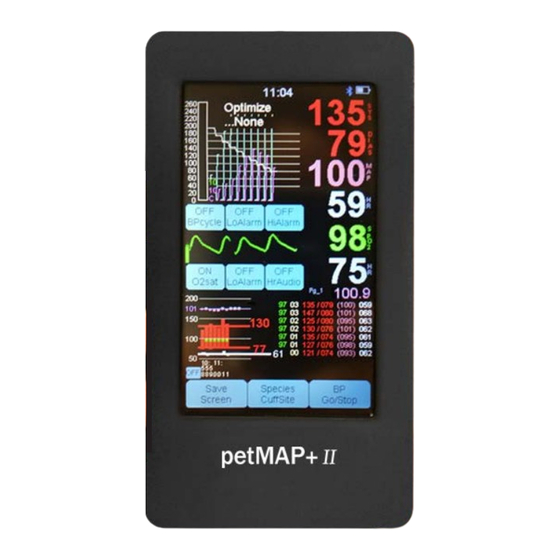
Page 20: Operating Modes & Displays
Clinic Mode (BPcycle is OFF) in which each BP reading must be started using the “BP Go/Stop” button. Touch Screen. The touch screen is the primary method for the user to interact with petMAP+II. The display has several active areas (buttons) for the user to make selections, but some functions (alarm cancelation, trend display and selection of Fahrenheit or Celsius temperature display) are invoked by simply touching the screen in areas without buttons or by touching the temperature display directly. -
Page 21: User Selections
Press and release to set the species and cuff site which is displayed at the top. The seven available settings are DOG (forearm, hindfoot and tail), CAT (forearm, hindfoot and tail) and Optimize…None. The non- optimized mode should be used on any species other than dog or cat or when comparing petMAP to Doppler or other oscillometric BP devices. -
Page 22: Alarms
As mentioned above, the user may set alarms for systolic pressure (both hi and low) and SpO2 (low only). The default setting for all user selectable Alarms is OFF. When activated by the user, the petMAP+II will audibly alarm when the selected alarm settings are exceeded. - Page 23 Low Battery Alarm – The message “Low Batt” is displayed on the screen and the battery level indicator will turn RED. When this warning is displayed, the unit will shut off automatically after a few minutes of continued use, but BP may not be measurable even though SpO2 is still functioning.
-
Page 24: Sd Card Functions. Updating Petmap+Ii With New Software
To remove the card, press it firmly further into the slot and then release pressure and the card will eject automatically. The mechanical function of the SD card in the petMAP+II is the same as in cameras that use SD cards for picture storage and will be familiar to most users. - Page 25 PC/MAC to an SD card. The SD card must be a 16 GB or less in capacity; it is OK to reuse SD cards that have been used previously in the petMAP+II and which may have old update files or old data files on them.
-
Page 26: Mounting Options
Mounting Options. While petMAP+II can be used in the palm of your hand, several types of mounting options may be useful. Pole Mount Pole Mount Pole Mount Cage Mount... -
Page 27: Operating Instructions
OPERATING INSTRUCTIONS Prior to Use — Charging the batteries. Connect the petMAP+II AC/DC adapter cable to the bottom of the petMAP+II and plug it into a suitable power outlet; the included rechargeable NiMH batteries will charge whether the device is OFF. -
Page 28: Powering The Petmap+Ii
Using the Species Cuff Site button at the bottom of the screen, press and release to set the species and cuff site appropriate for the patient being measured. There are three settings for dogs (forearm, hind foot and tail) and the same three for cats. - Page 29 In addition to the measured data in this Clinic Mode data display, the petMAP+II displays the NSV in the graphical display area. NSV stands for Nominal Session Value, a unique and proprietary petMAP feature. After the second reading, NSV is automatically calculated after each subsequent reading in the BP measurement session.
- Page 30 Taking BP in OR Mode OR mode is the mode used when multiple BP readings are desired to be automatically measured at a specific user selected frequency of BP measurement. The BP cycle time is set by touching the BPcycle button repeatedly until you arrive at the desired time interval.
- Page 31 The GOOD, the BAD, and the UGLY . . . BP determinations that are showing ragged oscillometric envelopes like the BAD and the UGLY examples below should be terminated while in process by pressing the BP Go/Stop button, and appropriate corrective action taken such as checking the fit of the cuff and calming the patient to reduce motion before a new determination is started.
-
Page 32: Blood Pressure Values In Cats & Dogs
10-20% higher than Doppler or other oscillometric devices. If correlation of petMAP BP readings with other BP devices (other than direct intra-arterial readings) is desired by the user, petMAP should be used in the non-optimized mode. -
Page 33: Measuring Spo2
Measuring SpO2 Theory of Operation The pulse oximetry function of petMAP+II determines both pulse rate and SpO2 % (percent oxygen saturation) by passing two different wavelengths of low intensity light (one is a visible red and the other is an invisible infrared) through body tissue which has good blood flow to a photodetector. The sensor is divided into two halves: the emitter is the part of the sensor that glows red when powered on;... -
Page 34: Spo2 Instructions
SpO2 Instructions Some configurations of petMAP+II are capable of measuring SpO2. Currently, petMAP+II supports two technologies for SpO2 measurement as outlined in the following table: Technology Product Code Sensor Classic/hybrid O2 7402 Nonin 7404 While the technologies are different, the instructions for use are the same. The unit will contain the necessary electronics and be equipped with a “clothes pin”... -
Page 35: Causes Of Inaccurate Spo2 Measurements
Subject motion: reduce motion by appropriate means. SpO2 Sensors As previously outlined, petMAP+II has technology options for SpO2 measurement. The sensors are different, depending on the technology purchased. If petMAP+II was purchased with the classic/hybrid SpO2 option (#7402), it will include a SpO2 sensor and two clips. One of the clips is larger; the other smaller. - Page 36 4) Install the rubber covers. Store the removed clip in an area where others will know where to find it. If petMAP+II was purchased with the NONIN SpO2 technology (#7404), the sensor supplied with the unit will look like this: Additional sensor types are optionally available for purchase.
-
Page 37: Measuring Temperature
Measuring Temperature All configurations of petMAP+II are capable of monitoring temperature, provided that the proper accessories are purchased. The necessary accessories include a temperature extension cable (#9014) and either an esophageal probe (#8040) and/or a rectal probe (#8041). The temperature extension cable is 2 meters long and serves to connect the probe to the device more conveniently than using the temperature probe plugged directly into the device. - Page 38 OR MODE CLINIC MODE BP cycle set Temperature Temperature Temp Trend As previously mentioned, there are two different data display formats depending on the user’s selection. The display formats are shown below and can be changed from one to the other by simply touching the graphic trend area of the display at any time.
-
Page 39: Data Recording & Transfer-Sd Card, Usb
Data Recording and Transfer—SD Card File Name Format for Data .txt Files If an SD card is inserted into the SD card slot, files of the data measured at each measurement session will be recorded in a file on the SD card in the .txt format (that is, in a simple text format). The filename naming convention is comprised of the MonthDayHourMinute of the time when the file is actually written to the SD card. - Page 40 19:03:04 147 104 (115) 080 101.8 95 080 19:03:28 93 081 19:03:38 95 080 19:03:53 149 100 (115) 081 101.8 94 080 19:04:45 152 099 (114) 080 101.8 94 080 19:05:09 93 080 Importing text file into Excel The text data file can be archived and printed directly from a PC/MAC without any changes. However, if graphics are desired, the text data file can be imported into an Excel worksheet easily by following the steps below.
- Page 41 Automatic Screen Save If the petMAP+II has an SD card in the card slot, there will be a very small button on the lower left of the screen, just above the “Save Screen” button (see figure 1). This button controls the automatic screen save function and is OFF at power ON.
- Page 42 Standard SD cards do not have this WiFi capability and EyeFi cards do not function in the petMAP. Note that the user must have set this up prior to this use following the instructions included with the FlashAir card and the downloaded phone or tablet app.
- Page 43 USB The USB connector at the top of the petMAP+II unit is available for advanced users who want to monitor the data generated by the unit during a monitoring session on a local computer monitor in real time. Also, in the future, optional Bluetooth output will become available and the requirements for Bluetooth connection to a computer are the same as those described below for USB connection to a computer using a cable.
-
Page 44: Crittercuff™/Ramseycuff™ Information
The cuff should fit “snug tight”, i.e., tight enough to get all of the air out of the cuff (attach cuff to animal BEFORE attaching the cuff hose to the petMAP+II), and tight enough so that it will not slip off of the limb. - Page 45 The “OPTIMUM zone” is petMAP specific. Seven CritterCuffs are packaged with each petMAP. Their sizes are: 2.0 cm, 2.5 cm, 3.0 cm, 3.5 cm, 4.0 cm, 4.5 cm, 5.5 cm. Larger cuff sizes (6.5 cm, 8.0 cm, 10.0 cm and 13.0 cm) and a 5.0 cm cuff are available at extra charge.
-
Page 46: Maintenance
MAINTENANCE Device. Cleaning petMAP+II: As needed, clean the device with a soft cloth dampened with warm water and a mild detergent solution. Gently rub the soiled area until clean. Use a soft cloth to dry the device. Do not use abrasive cleaners, alcohol or cleaning solutions which contain alcohol. Do not immerse in water or other liquids. -
Page 47: Troubleshooting
4. Cuff is not in correct location on forearm, hind foot, or tail. Reposition cuff or move to another approved site and set petMAP using Species/Cuff Site button. 5. Determine if the cuff, hose or connector is leaking air. Observe the deflation steps on the screen during a BP determination to confirm that each step is about 10% of the cuff pressure before the deflation step. - Page 48 WARRANTY/SERVICE Warranty Ramsey Medical, Inc. warrants that the petMAP+II device, when new, is covered by a one year warranty against defects in materials and workmanship. All warranties begin at the date of original purchase from CardioCommand, Inc. or its authorized distributors.
-
Page 49: Specifications
SPECIFICATIONS For Veterinary Use Only Method of BP Measurement: Oscillometric. Accuracy optimized for species (dog/cat) and blood pressure cuff site (forearm, tail, hind foot). Parameters Measured: BP: Systolic, Diastolic, Mean Arterial Pressure (MAP) Heart Rate, both by BP cuff and SpO2 (if configured) Sp02 Temperature. -
Page 50: History Of Revisions
HISTORY OF REVISIONS Document #/ Date Comments Revision R400257-A May 2016 Manual Released ECO 160503 R400257-B January 2017 Minor corrections and clarifications. ECO 170101... - Page 52 Tampa, FL 33607 petMAP, CritterCuff and RamseyCuff are registered trademarks of Ramsey Medical, Inc. petMAP+II is manufactured, distributed and serviced by: 4920 W. Cypress St., Ste. 110 Tampa, FL 33607 For Customer Service contact CardioCommand, Inc.
Need help?
Do you have a question about the PETMAP+ II and is the answer not in the manual?
Questions and answers