Table of Contents
Advertisement
Advertisement
Table of Contents
Troubleshooting

Subscribe to Our Youtube Channel
Related Manuals for horiba F-74BW


Summary of Contents for horiba F-74BW
- Page 1 Instruction Manual 表紙は別途デザインの表紙とする pH/ION/COND METER F-74BW...
- Page 2 HORIBA, Ltd., any malfunctioned or damaged Product attributable to responsibility of HORIBA, Ltd. for a period of one (1) year from the delivery unless otherwise agreed with a written agreement. In any one of the following cases, none of the warranties set forth herein shall be extended;...
- Page 3 REGULATIONS ■ Conformable Directive This equipment conforms to the following directives and standards: Directives: The EMC Directive 2004/108/EC The Low Voltage Directive 2006/95/EC Standards: [the EMC Directive] EN61326-1:2006 Class B, Basic requirements [the Low Voltage Directive] EN61010-1:2010(Ed.3.0) ● Installation Environment This product is designed for the following environment.
- Page 4 REGULATIONS ■ FCC Rules Any changes or modifications not expressly approved by the party responsible for compliance shall void the user's authority to operate the equipment. ● WARNING This equipment has been tested and found to comply with the limits for a Class A digital device, pursuant to part 15 of the FCC Rules.
- Page 5 SAFETY OPERATION ■ Hazard Classification and Warning Symbols Warning messages are described in the following manner. Read the messages and follow the instructions carefully. ● Hazard classification This indicates an imminently hazardous situation which, if not avoided, will result in death or serious injury. This signal word is to be limited to the most extreme situations.
-
Page 6: Safety Precautions
SAFETY OPERATION ■ Safety Precautions This section provides precautions to enable you to use the product safely and correctly and to prevent injury and damage. The terms of DANGER, WARNING, and CAUTION indicate the degree of imminency and hazardous situation. Read the precautions carefully as it contains important safety messages. - Page 7 SAFETY OPERATION ■ Product Handling Information ● Operational Precautions Do not drop, crash, or give any physical impact on the instrument. ● Do not immerse the instrument into alcohol, organic solvent, strong ● acid, strong alkaline, or the like. The instrument body contains ABS resin, acrylic resin, and some rubber parts.
- Page 8 MANUAL INFORMATION ■ Description in This Manual This interprets the necessary points for correct operation and notifies the important points for handling the instrument. This indicates the part of where to refer the informatione. HINT! This indicates reference information. MANUAL INFORMATION...
-
Page 9: Table Of Contents
CONTENTS Chapter 1 About the F-74BW ..1 Chapter 2 Information of the F-74BW . 2 2.1 Measurement Items ..... . . 2 2.2 Packing List . - Page 10 CONTENTS 3.2.9 Conductivity Temperature Coefficient Setting ....26 3.2.10 Conductivity Cell Constant Setting ... . . 27 3.2.11 Salinity Unit Setting .
- Page 11 CONTENTS Chapter 5 Specifications ..113 5.1 Specifications ......113 5.2 Default Settings .
-
Page 13: Chapter 1 About The F-74Bw
Chapter 1 About the F-74BW Chapter 1 About the F-74BW The desktop type pH meter F-74BW is optimized for laboratory measurement, and allows you to measure pH, ORP, ION, conductivity, resistivility, salinity, and TDS. It provides a comfortable measurement environment... -
Page 14: Chapter 2 Information Of The F-74Bw
Chapter 2 Information of the F-74BW 2.1 Measurement Items Chapter 2 Information of the F-74BW Measurement Items Measurement item F-74BW √ √ ORP (mV) √ √ Conductivity √ Salinity √ Resistivity √ (Total Dissolved Solids) √ Temperature HORIBA... -
Page 15: Packing List
Chapter 2 Information of the F-74BW 2.2 Packing List Packing List The F-74BW’s package includes the following. Electrodes are required for the measurement in addition to this package. If you want to buy an electrode, contact HORIBA sales representative. Product... -
Page 16: Names And Functions
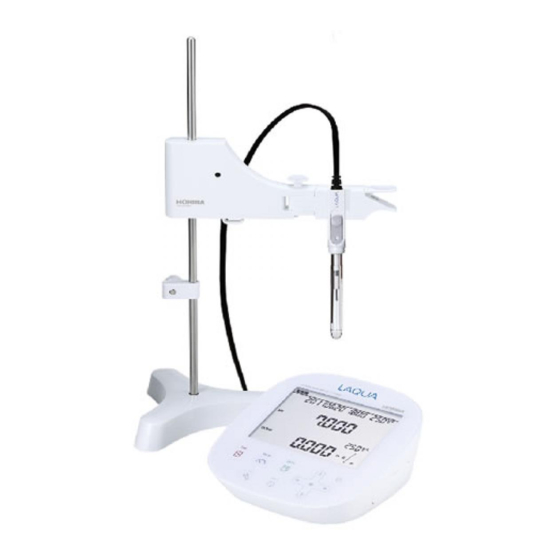
Chapter 2 Information of the F-74BW 2.3 Names and Functions Names and Functions 2.3.1 Names of Each Part Stand arm Display Stopper Stand base Operation key CH2 reference electrode CH1 reference electrode CH2 measurement electrode CH1 measurement electrode CH2 temperature electrode... -
Page 17: Display
Chapter 2 Information of the F-74BW 2.3 Names and Functions Connector for USB communication with a personal computer 2.3.2 Display Electrode status icon Printer connecting icon Data memory icon Setting mode Error No., USB icon Data No., Date Temperature Active mode... -
Page 18: Operation Key
Chapter 2 Information of the F-74BW 2.3 Names and Functions 2.3.3 Operation Key This instrument employs capacitance switches. You can not operate them with thick gloves. Operate them with bare hands or thin rubber gloves. Operation key Function CAL key Starts/stops calibration or enters the calibration mode. -
Page 19: Measurement (Meas) Flow Chart
Chapter 2 Information of the F-74BW 2.4 Measurement (MEAS) Flow Chart Measurement (MEAS) Flow Chart 2.4.1 CH1 pH measurement MODE key ORP measurement ORP measurement (mV) (relative mV) CAL key MODE key ION measurement (mV) MODE key 2.4.2 CH2 COND measurement... -
Page 20: Setting (Set) Flow Chart
Chapter 2 Information of the F-74BW 2.5 Setting (SET) Flow Chart Setting (SET) Flow Chart 2.5.1 CH1 Standard solution setting NIST, USA, CUST ▲▼ key Temperature compensation ATC, MTC function setting ▲▼ key Automatic data memory ON, OFF setting ▲▼ key... -
Page 21: Ch2
Chapter 2 Information of the F-74BW 2.5 Setting (SET) Flow Chart 2.5.2 CH2 Temperature compensation ATC, MTC function setting ▲▼ key Automatic data memory ON, OFF setting ▲▼ key Sample ID setting ▲▼ key Conductivity S/cm, S/m, mS/cm unit setting ▲▼... -
Page 22: Data (Data) Flow Chart
Chapter 2 Information of the F-74BW 2.6 Data (DATA) Flow Chart Data (DATA) Flow Chart Data memory ▲▼ key Data display ▲▼ key pH calibration data ▲▼ key pH check data ▲▼ key Ion calibration data ▲▼ key HORIBA... -
Page 23: Chapter 3 Basic Operation
Chapter 3 Basic Operation 3.1 Preparation Chapter 3 Basic Operation Preparation 3.1.1 Assembling the Electrode Stand Attach the stand shaft to the stand base. Attach the stopper and the stand arm to the stand shaft. Stand shaft Stand arm Stopper Stand base F-74BW... -
Page 24: Electrode Connection
Insert the groove of electrode plug by fitting it with the socket pin of the instrument. If the pin and groove are misaligned, do not insert the plug with force. CH1 measurement electrode Turn the electrode connector to the right along the groove to plug the connector. HORIBA... -
Page 25: Connecting The Power Source
If the temperature connector is unconnected or the connection is wrong, the MTC set temperature is displayed as the sample temperature. 3.1.3 Connecting the Power Source Insert the AC adapter cable by fitting with the connector socket of in the instrument. AC adapter connector F-74BW... -
Page 26: Connecting And Setting The Printer
・ Make sure to power OFF the instrument before connecting a printer. ・ When you do not connect a printer with the instrument, disconnect the printer cable and put the rubber cap firmly on the connector sockets on the instrument. HORIBA... -
Page 27: Connecting The Personal Computer
If you change the transfer formats, power OFF both of the instrument and the personal computer once, and then turn on them again. ・For the details of communication commands, register with our website and see the free download page of manuals. F-74BW... -
Page 28: Settings
NIST is selected initially for pH standard solutions. This setting is possible only for CH1. Press the SET key on the measurement screen is displayed to enter the pH standard solution setting screen. Press the ENTER key to enter the pH standard solution change screen. HORIBA... - Page 29 Bottle mark The calibration value of the pH7 standard solution differs between NIST and USA. NIST specification: pH6.865 (at 25°C) US specification: pH7.000 (at 25°C) When you use NIST standard solution for calibration, make sure to set NIST here. F-74BW...
-
Page 30: Temperature Compensation Function Setting
ATC or MTC, and press the ENTER key. If you select MTC, press the key to select a digit and press the ▲ or ▼ key to change the value, and then press the ENTER key. Setting range: 0°C to 100°C HORIBA... - Page 31 If the sensor is not connected, the set value for MTC (default: 25°C) is displayed. In Manual Temperature Compensation (MTC), the tem- perature sensor of the electrode is not used, and the solution temperature is entered manually. F-74BW...
-
Page 32: Auto Data Memory Setting
ENTER key. If you select ON, press the key to select a digit and press the ▲ or ▼ key to change the value, and then press the ENTER key. Setting range: 2 seconds to 24 hours HORIBA... -
Page 33: Ph Calibration Interval Setting
ON or OFF, and press the ENTER key. If you select ON, press the key to select a digit and press the ▲ or ▼ key to change the value, and then press the ENTER key. Setting range: 1 to 999 days F-74BW... -
Page 34: Sample Id Setting
Press the ENTER key to enter the sample ID change screen. Press the key to select digit and press the ▲ or ▼ key to change value, and press the ENTER key. Setting range: 0 to 9999 HORIBA... -
Page 35: Ion Unit Setting
Press the SET key on the measurement screen, and press the ▲ or ▼ key to enter the ion unit set- ting screen. Press the ENTER key to enter the ion unit change screen. Select the unit to g/L or mol/L, and press the ENTER key. F-74BW... -
Page 36: Ion Valency Setting
Press the SET key on the measurement screen, and press the ▲ or ▼ key to enter the ion valency setting screen. Press the ENTER key to enter the ion valency change screen. Select the ion valency, and press the ENTER key. HORIBA... -
Page 37: Conductivity Unit Setting
▲ or ▼ key to enter the conductivity unit setting screen. Press the ENTER key to enter the conductivity unit change screen. Press the key to select S/cm, S/m or mS/ , and press the ENTER key. F-74BW... -
Page 38: Conductivity
Press the key to change ON or OFF, and press the ENTER key . Press the key to select digit and press the ▲ or ▼ key to change value, and ENTER key. Setting range: 0.00% to 10.00% HORIBA... -
Page 39: Conductivity Cell Constant Setting
For the SI unit (S/m) ×10 → ×100 → ×1000 → ×10 For the conventional units (S/cm, mS/cm ×0.1 → ×1 → ×10 Press the ENTER key. F-74BW... -
Page 40: Salinity Unit Setting
Press the SET key on the measurement screen, and press the ▲ or ▼ key to enter the salinity unit setting screen. Press the ENTER key to enter the salinity unit change screen. PPT or %, and Press the key to select press the ENTER key. HORIBA... -
Page 41: Auto Printer Setting
▲ or ▼ key to enter the auto printer setting screen. Press the ENTER key to enter the auto printer set- ting change screen. Press the key to select ON or OFF, and press the ENTER key. F-74BW... -
Page 42: Maintenance
▲ or ▼ key to enter the maintenance screen. Press the ENTER key to enter the maintenance item selecting screen. Press ENTER key to indicate the all LCD. Press the ENTER key to return to the maintenance item selecting screen. HORIBA... - Page 43 ▲ or ▼ key to enter the maintenance screen. Press the ENTER key to enter the maintenance item selecting screen. Press the ▲ or ▼ key to enter the printer test screen. Press the ENTER key to start the printing. F-74BW...
- Page 44 OFF automatically. Press the SET key on the measurement screen, and press the ▲ or ▼ key to enter the maintenance screen. Press the ENTER key to enter the maintenance item selecting screen. HORIBA...
- Page 45 ▲ or ▼ key to change the value, and then press the ENTER key and press the ENTER key to return to the auto power off change screen. Setting range: 1 to 30 minutes F-74BW...
- Page 46 Press the ▲ or ▼ key to enter the date setting screen. Press the ENTER key to enter the year setting screen. Press the key to select a digit and press the ▲ or ▼ key to change the value, and then press the ENTER key. HORIBA...
- Page 47 This operation is irreversible. We recommend printing out or saving data into a PC ("3.1.5 Connecting the Personal Computer" P.15) before this operation. Press the SET key on the measurement screen, and press the ▲ or ▼ key to enter the maintenance screen. F-74BW...
- Page 48 Press the ENTER key to enter the memory data clear (Yes/No) screen. Press the key to select Yes, and press ENTER key to delete the memory data. When the deletion is completed, "End" is displayed. Press the ENTER key to return to the memory data clear screen. HORIBA...
- Page 49 Press the SET key on the measurement screen, and press the ▲ or ▼ key to enter the maintenance screen. Press the ENTER key to enter the maintenance item selecting screen. Press the ▲ or ▼ key to enter the calibration data clear screen. F-74BW...
- Page 50 (Yes/No) screen. (*Case of pH) Press the key to select Yes, and press ENTER key to delete the calibration data. When the deletion is completed, "End" is displayed. Press the ENTER key to return to the calibration data clear screen. HORIBA...
- Page 51 Press the ENTER key to enter the maintenance item selecting screen. Press the ▲ or ▼ key to enter the number of mem- ory data display screen. Press the ENTER key to display the number of the memory data currently saved in the instrument. F-74BW...
-
Page 52: Temperature Calibration
This setting is possible for both CH1 and the CH2. Press the SET key on the measurement screen, and press the ▲ or ▼ key to enter the maintenance screen. Press the ENTER key to enter the maintenance item selecting screen. HORIBA... - Page 53 Press the ENTER key to enter the temperature dis- play value change screen. Press the key to select a digit and press the ▲ or ▼ key to change the value, and then press the ENTER key to return to the temperature calibra- tion screen. F-74BW...
-
Page 54: Setting Initialization
▲ or ▼ key to enter the maintenance screen. Press the ENTER key to enter the maintenance item selecting screen. ▲ or ▼ Press the key to enter the initializing set- tings screen. Press the ENTER key to enter the initializing set- tings (Yes/No) screen. HORIBA... - Page 55 Press the SET key on the measurement screen, and press the ▲ or ▼ key to enter the maintenance screen. Press the ENTER key to enter the maintenance item selecting screen. F-74BW...
- Page 56 ENTER key to return to the password change screen. Setting range: 0000 to 9999 If this setting is ON, password entry is required when you power ON the instrument. Enter the password and press the ENTER key. If you forget the password, contact HORIBA sales representative. HORIBA...
-
Page 57: Calibration
(deionized), and wipe it off by filter paper or tissue paper. Open the filler port of the internal solution. During the calibration, the filler port should be kept open. Immerse the pH electrode in the standard solution of pH7 to calibrate the first point. F-74BW... - Page 58 ・To stop calibration. Press the CAL key while the HOLD indicator blinks. ・To redo calibration. Press the CAL key again after the HOLD indicator lights up. HORIBA...
- Page 59 But if you go back to the measurement mode once and return to the calibration mode again, redoing calibration will erase the previous set of calibration. You have to perform the entire calibration procedures from the beginning in this case. F-74BW...
- Page 60 Prepare the pH electrode. Wash the pH electrode with pure water (deionized), and wipe it off by filter paper or tissue paper. HORIBA...
- Page 61 When the reading stabilizes, the HOLD indicator lights up and the reading is held. mark, which means that the pH7 calibration is completed, is displayed on the screen. ・To stop calibration: Press the CAL key while the HOLD indicator blinks. F-74BW...
- Page 62 But if you go back to the measurement mode once and return to the calibration mode again, the calibration data are all cleared. You have to perform the entire calibration procedures from the beginning in this case. HORIBA...
- Page 63 (deionized), and wipe it off by filter paper or tissue paper. Open the filler port of the internal solution. During the calibration, the filler port should be kept open. Immerse the pH electrode in the desired standard solution to calibrate the first point. F-74BW...
- Page 64 ・To stop calibration: Press the CAL key while the HOLD indicator blinks. ・To redo calibration: Press the CAL key again after the HOLD indicator lights up. HORIBA...
- Page 65 As for calibration of the third and later points, perform the calibration from the step 7. When the calibration is completed, press the MEAS key to return to the measurement mode. F-74BW...
-
Page 66: Ion Calibration
Nerst formula. Also, no stirring will cause slow response, measurement failure in low concentrations, or the fluctuation of readings. Use a temperature controlled bath with a stirrer for standard solution calibration and sample measurement. HORIBA... - Page 67 E of the ion electrode inside the measured solution. In actual measurement, an ion electrode measures the ion concentrations, therefore, a linear relationship forms between the logarithm of ion concentrations and the electrode potential. Quantitative analysis using an ion F-74BW...
- Page 68 Calibration curve for univalent positive ion electrode Potential slope Ion concentration (mg/L) Relationship between ion concentration and electric potential HORIBA...
- Page 69 1 through 3 mentioned above, the sample may contain interfering ions. How to reduce the effect of the interfering ion, contact HORIBA sales representative. When (coexistence limit value) × (measurement ion concentration) is larger than (coexistence ion concentration), the effect of the interfering ion becomes small.
- Page 70 2565A-10T mg/L I =10000, Iodide 3.33 mol/L KCl to 10 mol/L I =1000 (250 g/L ② pH2 to pH11 =100 potassium (1300 mg/L I chloride) ③ −59 mV = Not ④ 0°C to 50°C applicable (At 10 mol/L I HORIBA...
- Page 71 1 mol/L KNO L SCN =100 Thiocya (100 g/L to 10 mol/L nate Potassium , CN = Not nitrate) (SCN ② pH2 to pH12 applicable (5.8 mg/L SCN (At 10 mol/L SCN ③ −59 mV ④ 0°C to 50°C F-74BW...
- Page 72 1 mol/L KCl mg/L NO =300 brane Nitrate (75 g/L (1 to 10 mol/L NO =200 potassium ② pH3 to pH7 chloride) (62 mg/L NO ③ −55 mV ④ 0°C to 50°C =0.1 =0.03 (At 10 mol/L NO HORIBA...
- Page 73 Calcium 3.33 mol/L KCl (1 to 10 mol/L Ca =1000 (250 g/L ② pH5 to pH11 =500 potassium (4.0 mg/L Ca chloride) =350 ③ +29 mV , Cu ④ 0°C to 50°C , Zn =0.1 (At 10 mol/L Ca F-74BW...
- Page 74 ① 0.62 mg/L to 62000 mg/ = more than Nitrate (2 pcs) (100 g/L L NO 1000 potassium =300 (1 to 10 mol/L NO chloride) ② pH3 to pH7 =200 (62 mg/L NO ③ −55 mV =0.1 =0.03 (At 10 mol/L NO HORIBA...
- Page 75 *4: The internal liquid types are not limited to the solutions listed in the table. You may use other internal liquid so far as you have determined that its bleeding rarely interferes or affects the electric potential at the electrode and less frequently causes electric potential differences between the solutions. F-74BW...
- Page 76 ▲ or ▼ key to change value, to set the value of the desired standard solution. Wait for the instantaneous value to be stable and press the CAL key. The HOLD indicator blinks until the reading stabilizes. When the reading stabilizes, the HOLD indicator lights up and the reading is held. HORIBA...
- Page 77 ・To stop calibration: Press the CAL key while the HOLD indicator blinks. ・To redo calibration: Press the CAL key again after the HOLD indicator lights up. F-74BW...
-
Page 78: Conductivity Calibration
Press the CAL key on the measurement screen is displayed to enter the calibration screen. Press the key to select digit and press the ▲ or ▼ key to change value, to set the value of the desired standard solution. HORIBA... -
Page 79: Salinity Calibration
Press the ▲ or ▼ key when the measurement screen is displayed to light up ACT for CH2. Press the MODE key on the measurement screen to enter the salt measurement screen. Press the CAL key to enter the salinity calibration screen. F-74BW... - Page 80 CAL key. The HOLD indicator blinks until the reading stabilizes. When the reading stabilizes, the HOLD indicator lights up and the reading is held. After the calibration is completed, press the MEAS key to return to the measurement screen. HORIBA...
-
Page 81: Calibration Value Printing
③ Asymmetry potential ④ ⑤ Sensitivity ⑤ Calibration data ⑥ ⑥ ● Printing at ION calibration ① Instrument model ② ① ③ Serial number ② ④ Electrode status ③ Asymmetry potential ④ ⑤ Sensitivity ⑤ Calibration data ⑥ ⑥ F-74BW... - Page 82 ● Printing at COND calibration ① Instrument model ① ② Serial number ② ③ Cell constant ③ Calibration data ④ ④ ● Printing at salinity calibration ① Instrument model ① ② Serial number ② ③ Calibration coefficient ③ Calibration data ④ ④ HORIBA...
-
Page 83: Measurement
10 seconds: within ±0.017 pH (converted to 25°C) ORP and ion measurements: Potential change in 10 seconds: within ±1 mV Conductivity, resistivity, salinity, and TDS measurements: Display change in 10 seconds: within ±3 digit Temperature measurement: Temperature change in 10 seconds: within ±2°C F-74BW... -
Page 84: Measurement Items Changing
● CH1 pH measurement MODE key ORP measurement ORP measurement (mV) (relative mV) CAL key MODE key ION measurement (mV) MODE key ● CH2 COND measurement MODE key Resistivity measurement MODE key Salinity measurement MODE key TDS measurement MODE key HORIBA... -
Page 85: Auto Data Memory
・ The actual date of memory may have the difference of ±1 second from the time calculated based on the interval setting. ・ When the number of memory data exceeds 999, data memory is stopped and ERROR No.0010 is displayed. F-74BW... -
Page 86: Measurement Value Printing
Instant value: INST ① Temperature ② ② compensation setting ③ At Manual mode: MTC ④ ⑤ At Auto mode: ATC Sample ID ③ ⑥ ⑦ Instrument model ④ Serial number ⑤ ⑧ Electrode status ⑥ Asymmetry potential ⑦ Sensitivity ⑧ HORIBA... - Page 87 Instant value: INST Temperature ② ② compensation setting ③ ④ At Manual mode: MTC ⑤ At Auto mode: ATC ⑥ Sample ID ⑦ ③ Instrument model ④ Serial number ⑤ ⑧ Electrode status ⑥ Asymmetry potential ⑦ Sensitivity ⑧ F-74BW...
-
Page 88: Conductivity Measurement Mode
At HOLD: AUTO ① Instant value: INST Temperature ② ② compensation setting ③ ④ At Manual mode: MTC ⑤ At Auto mode: ATC ⑥ Sample ID ③ ⑦ Instrument model ④ Serial number ⑤ Calibration coefficient ⑥ Temperature coefficient ⑦ HORIBA... -
Page 89: Tds Measurement Mode
HOLD condition ① At HOLD: AUTO Instant value: INST ① Temperature ② compensation setting ② ③ At Manual mode: MTC ④ At Auto mode: ATC ⑤ Sample ID ③ ⑥ Instrument model ④ Serial number ⑤ Temperature coefficient ⑥ F-74BW... -
Page 90: Data Operation
Press the DATA key to enter the data operation screen. Press the ENTER key to enter the data memory screen. The measurement value and "IN" are alternately displayed. Press the ENTER key. The measurement data is stored into the memory. HORIBA... -
Page 91: Memory Data Display
Press the ▲ or ▼ key to enter the memory data dis- play screen. The latest data is displayed. Press the key to switch between date display and DATA No/ID No. display. Press the ▲ or ▼ key to search past data. F-74BW... -
Page 92: Memory Data Printing
HOLD condition ② At HOLD: AUTO ② Instant value: INST ③ Temperature ③ ④ compensation setting ⑤ At Manual mode: MTC ⑥ At Auto mode: ATC ⑦ Sample ID ④ Instrument model ⑤ Serial number ⑥ Electrode status ⑦ HORIBA... - Page 93 HOLD condition ② At HOLD: AUTO ② Instant value: INST ③ Temperature ③ ④ compensation setting ⑤ At Manual mode: MTC ⑥ At Auto mode: ATC ⑦ Sample ID ④ Instrument model ⑤ Serial number ⑥ Electrode status ⑦ F-74BW...
-
Page 94: Calibration History Display
Press the ▲ or ▼ key to enter the calibration history display screen. Press the ENTER key. The asymmetry potential of the latest calibration data is displayed. Press the key to display the sensitivity and the data of the third point or later. HORIBA... - Page 95 ● ION calibration history display Press the DATA key to enter the data operation mode. Press the ▲ or ▼ key to enter the calibration history display screen. Press the ENTER key. The asymmetry potential of the latest calibration data is displayed. F-74BW...
-
Page 96: Calibration History Printing
Press the ENTER key. The displayed measurement data is printed out. ● pH check data (without check data) ① Instrument model ① ② ③ Serial number ② ④ Electrode state ③ Asymmetry potential ④ ⑤ Sensitivity ⑤ Calibration data ⑥ ⑥ HORIBA... - Page 97 Sensitivity ⑤ Check value of repeatability ⑥ ⑥ Calibration data ⑦ ⑦ ● ION calibration history ① Instrument model ① ② ③ Serial number ② ④ Electrode state ③ Asymmetry potential ④ ⑤ Sensitivity ⑤ Calibration data ⑥ ⑥ F-74BW...
-
Page 98: Ph Check History Display
●Calibration Repeatability check Press the DATA key to enter the data operation screen. Press the ▲ or ▼ key to enter the pH check history display screen. Press the ENTER key. The repeatability of the latest check data is displayed. HORIBA... -
Page 99: Ph Check Data Printing
Check History Display" P.86. Press the ENTER key. The displayed measurement data is printed out. Instrument model ① ① Serial number ② ② Check value of ③ repeatability Temperature ④ compensation setting ③ At Manual mode: MTC At Auto mode: ATC. ④ F-74BW... -
Page 100: Chapter 4 Maintenance And Troubleshooting
Broken glass may cause injury. The outer tube and tip of an electrode are made of glass. Handle them with care. As an example, the maintenance operations of pH electrodes (9615-10D) are described below. Maintain ORP electrodes in the same manner. HORIBA... - Page 101 Disconnect the electrode from the instrument. Detach the protective cap from the electrode. (2) Remove (1) Loosen Knurled nut Protective cap Open the internal solution filler port, then use a dropper to remove the internal solution. F-74BW...
- Page 102 (deionized) to soak the sponge. If the inside the protective cap of an electrode dries out and the electrode is not used for a long period of time, the response speed of the electrode may slow and its sensitivity may decrease. HORIBA...
- Page 103 Wipe the dirt/grime off using cotton gauze absorbed with neutral detergent. Inorganic grime Rinse the tip using a hydrochloric acid solution of approximately 1 mol/L or a wash solution (model 220). Be sure not to soak the electrode in strong acid for a long period of time. F-74BW...
-
Page 104: Ion Electrode Maintenance
Change in the electric potential of the electrode (25ºC) when the ion concentration is changed by a factor of 10. The above electrodes are subject to change without notice. The maintenance operations of the ion electrodes listed in the above table are describes below. HORIBA... -
Page 105: Before Use
Ion electrode Storage solution Deionized water ion electrode ion electrode 1 mol/L potassium nitrate solution (100 g/L ion electrode 0.1 mol/L potassium chloride solution (7.5 ion electrode g/L KCl) Tap water ion electrode ammonia electrode 0.01 mol/L ammonium chloride solution F-74BW... -
Page 106: 65Xx-10C Electrode Maintenance
In such cases, perform the following operations to let the standard solution seep out from the liquid junction. HORIBA... - Page 107 It depends on the use and storage conditions.) To fill the internal solution in the inner tube, you have to disassemble the electrode. Take extra care for handling the electrode. Requirements: A dropper, model 330 gel internal solution, the internal solution of the electrode. F-74BW...
- Page 108 Move the silicon tube of the internal body 1 downward to expose the internal solution filler port (inner tube). Use a dropper to fill the electrode inner tube with the gel internal solution (model 330) until the solution nears the filler port of the inner tube. HORIBA...
- Page 109 90° and fit the rubber sleeve into the electrode protective cap. Adjust the HORIBA logo on the electrode protective cap and the filling port of the outer tube face in the same direction and fit the cap into the body 2.
- Page 110 Rubber sleeve Electrode cap Connector cover Spring Electrode connector Rubber seal of internal solution O-ring filler port (external cylinder) Silicon tube Rubber seal of internal Body 2 solution filler port (internal cylinder) Tip-type ion electrode Body 1 Rubber cap HORIBA...
-
Page 111: Conductivity Electrode Maintenance
Wash the inside of the electrode protective cap with pure water, then, after shaking out the water, fill the cap with enough pure water to soak the sponge. Place the electrode protective cap on the electrode. F-74BW... -
Page 112: Troubleshooting
Data memory over The number of the memory data exceeds the limit of the memory. 0011 Cell constant out of COND: The cell constant is out of the range automatic calculation range. 000E Key operation Key operation is invalid. ERROR HORIBA... - Page 113 If the same error occurs again after the power ON. countermeasure is performed, contact HORIBA sales representative. The internal IC is Contact HORIBA sales representative. defective. ● ERROR No.0003 Unstable reading ERROR Definition The electric potential does not stabilize within three minutes.
- Page 114 Electrode is not sub- Immerse the electrode in the sample, to at merged deeply least 3 cm beyond the electrode tip. enough to cover ref- erence junction. There is problem Use new standard solution. with the standard buffers. HORIBA...
- Page 115 The electrode is not Connect the electrode correctly. connected correctly. Electrode is not sub- Immerse the electrode in the sample, to at merged deeply least 3 cm beyond the electrode tip. enough to cover ref- erence junction. F-74BW...
- Page 116 The responsive Replace the electrode. membrane is dam- aged or worn out. ● ERROR No.0008 Please calibrate Definition The actual calibration interval exceeds the calibration cycle setting. Cause Countermeasure It exceeds setting Perform calibration. days of the calibration cycle. HORIBA...
- Page 117 The printer is Replace the printer. defective. If the same error occurs again after the countermeasure is performed, contact HORIBA sales representative. ● ERROR No.0010 Data memory over Definition The number of the memory data exceeds the limit of the memory.
- Page 118 Key operation is invalid. Cause Countermeasure Loose connection or Disconnect and reconnect the AC breaking of keys adapter, and press the ON/OFF key 10 seconds later. If the same error occurs again after the countermeasure is performed, contact HORIBA sales representative. HORIBA...
-
Page 119: More Troubleshooting
Countermeasure There is a motor or Measure at a place where no influence other device caus- from induction is given. ing electrical inter- Ground all AC-powered equipment ference. The electrode is Connect the electrode correctly. not connected cor- rectly. F-74BW... - Page 120 Caused by the Judge by measuring with a stable stan- effects of the sam- dard solution. ple. Contact HORIBA sales representative. ● The response is slow. Cause Countermeasure Caused by the Response time may slow down, depend- effects of the sam- ing on the properties of the sample solu- ple.
-
Page 121: Lithium Battery Replacement
Disconnect and reconnect the AC invalid. adapter, and press the ON/OFF key 10 seconds later. If the same error occurs again, seek repairs at contact HORIBA sales representative. The electrode con- Turn the power OFF, then turn it back ON nector is not again. - Page 122 Immerse the electrode up to 3 cm from its is not immersed in tip. the sample. The electrode Replace the electrode. cable is broken. The instrument is Perform the check operation mentioned defective. below. Calibration is Perform calibration correctly. unperformed or incorrect. HORIBA...
- Page 123 The connection of Insert the temperature connector firmly. the temperature connector is failed. The instrument is Contact HORIBA sales representative. defective. The settings of the Initialize the settings referring to " ● temperature cali- Setting Initialization" P.42.
- Page 124 Check the following points. ・ Is the printer turned ON? ・ Is an error occurred in printer? ・ Is the printing paper run out or clogged? ・ When the test print is made according to the manual, is it done correctly? HORIBA...
-
Page 125: Chapter 5 Specifications
Chapter 5 Specifications 5.1 Specifications Chapter 5 Specifications Specifications ● Measuring object Measuring Item Description F-74BW object Measuring √ Glass electrode principle Display √ pH−2.000 to pH19.999 range Measuring √ pH0.000 to pH14.000 range Display √ 0.001 pH resolution √... - Page 126 Chapter 5 Specifications 5.1 Specifications Measuring Item Description F-74BW object Measuring √ Ion electrode principle Measuring 0.00 µg/L to 999 g/L (mol/L) √ range Display √ Valid numbers 3 digits resolution √ Repeatability ±0.5% ±1 digit of full scale Measuring √...
- Page 127 Chapter 5 Specifications 5.1 Specifications Measuring Item Description F-74BW object Measuring Conversion from √ principle conductivity value Measuring 0.00 PPT to 80.00 PPT √ Salinity range (0.000% to 8.000%) Display √ 0.01PPT (0.001%) resolution Measuring Conversion from √ principle conductivity value Measuring √...
-
Page 128: Default Settings
Calibration interval Password Auto data memory Auto print Calibration standard NIST solution Default value before Asymmetric potential: 0 mV calibration Sensitivity: 100% Ion valency Unit Unit Temperature coefficient 2.00%/°C (ON) Conductivity Cell constant 1.000 × 100 m Salinity Unit HORIBA... -
Page 129: Options
Chapter 5 Specifications 5.3 Options Options This section lists spare and optional parts for the instru- ment. These parts are possible through HORIBA distributors. Place an order specifying their names, and part numbers. Part name Part number Remarks AC adapter,... - Page 131 For any question regarding this product, please contact your local agency, or inquire from the Customer Registration website (http://www.horiba.com/register) 1st edition: October 2011 CODE: GZ0000260898...
- Page 132 表紙は別途デザインの表紙とする...
Need help?
Do you have a question about the F-74BW and is the answer not in the manual?
Questions and answers