Table of Contents
Advertisement
Advertisement
Table of Contents

Related Manuals for Wheel Witness HD PRO Plus


Summary of Contents for Wheel Witness HD PRO Plus
- Page 1 Owner’s Manual...
- Page 2 Thank you for purchasing the WheelWitness HD PRO Plus! We are always here to help so please do not hesitate to let us know any questions or concerns you may have! Your 100% satisfaction is our priority! If you have any questions, please contact us via our website! (http://www.WheelWitness.com) Copyright Notice Please note this product is for personal use only. The form of usage should not offend or infringe international or domestic copyright laws and regulations. All recorded videos should be for personal use only. Please note that using this product for recording occasions like shows, exhibitions or commercial activities will infringe others copyrights or legislation rights.
-
Page 3: Table Of Contents
Table of Contents About WheelWitness HD PRO Plus Dashboard Camera ............ 2 WheelWitness HD PRO Plus Features .................. 2 Setting Up for First Time Use .................... 3 Connecting Power ........................ 5 Powering the Camera On ...................... 6 Manual Power On/Off ...................... 6 WheelWitness HD PRO Plus Layout .................. 7 Using the HD PRO Plus - Display Icons .................. 8 Event Triggering ........................ 9 Menu Operation ........................ 1 0 .............................. 1 1 Video Menu .......................... 1 1 Setup Menu .......................... 1 3 Recording Operation (Zoom & Snapshot) . -
Page 4: About Wheelwitness Hd Pro Plus Dashboard Camera
About WheelWitness HD PRO Plus Dashboard Camera The HD PRO Plus is designed to automatically turn ON when it receives power to the DC IN port. It also automatically shuts down and records for a few extra seconds using the internal battery when the power is shut off (to avoid any sudden power cuts and possibly corrupting data). Under default settings the camera always cycles or “loops” the memory card so you will always be recording and never run out of space. Certain camera functions such as Motion Sensor should remain OFF under normal operating conditions. They are intended to be used ONLY when the vehicle is stationary and would interfere with normal camera operation while driving. Please only change the settings as required! WheelWitness HD PRO Plus Features - Full HD video recording – 1920 x 1080, 30fps. - 140 Degree Wide Angle 6 Glass Lens - Premium – High Sensitivity Low Light CMOS Sensor - Automatic Power On/Record Function - High Fidelity Microphone - Built in GPS – (location is embedded into the video file metadata) - Built in Wi-Fi – Use Android or iPhone to control (3... -
Page 5: Setting Up For First Time Use
Setting Up for First Time Use 1. Install memory Card into the card slot. (If you have trouble use a penny to push it in.) 2. Attach the bracket to the camera. Slide it into the bracket holder until you hear a click. P a g e | 3... - Page 6 3. Remove the protection tape from the Suction Cup and onto windshield. (We recommend to clean the installation area with rubbing alcohol). Then securely lock it. Usually the best result is when the camera is installed near the top of the windshield behind the rearview mirror. The camera lens has to be closest to the glass for prevent reflection. 4. Loosen the adjusting knob and adjust the camera for the best viewing angle. Make sure to tighten the knob so the camera is securely locked in place. P a g e | 4...
-
Page 7: Connecting Power
Connecting Power Please only use the included original power adapter with the included original USB wire. The long USB wire should be plugged into the power adapter and the smaller end (mini USB) should be plugged into the camera We recommend running the wire around the side, down the A pillar and hide it under your glove box. This can usually be done just using your hands, without any tools. There should be enough space on the roof and pillar to stuff and hide the wire. P a g e | 5... -
Page 8: Powering The Camera On
If you have a SWITCHED outlet, you can leave the power adapter always plugged in and the camera will turn ON and OFF with the vehicle. Some vehicles have an “always on” outlet. In this case you will have to manually disconnect the power adapter OR you can choose to hardwire the camera using our hardwire kit. Available on Amazon: “WheelWitness hardwire kit” https://www.amazon.com//dp/B00TGQ1Y3Q/ Powering the Camera On The HD PRO Plus has “Auto Power On/Off” – Once the camera receives power (usually when vehicle is started) it will automatically turn on and start recording. Once the power is cut (engine is turned off) the camera will save the current file and power down within 10 seconds. Manual Power On/Off To manually turn on, press the POWER button. To turn off, hold power button for 2 seconds. P a g e | 6... -
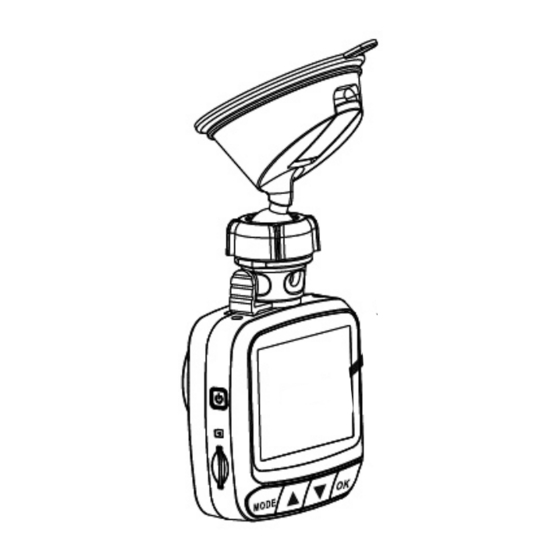
Page 9: Wheelwitness Hd Pro Plus Layout
WheelWitness HD PRO Plus Layout No. Description No. Description Mount Bracket Power Button Connection Power Input / USB Card Slot HDMI Output Power LED Reset Camera LCD Screen Speaker Mode Button Camera Lens UP Button Microphone DOWN Button Sticker OK Button P a g e | 7... -
Page 10: Using The Hd Pro Plus - Display Icons
Using the HD PRO Plus - Display Icons P a g e | 8... -
Page 11: Event Triggering
Event Triggering In case of emergency or for some other reason when you want to save the recorded moment simply press the “DOWN” button (# 15) while camera recording. The “KEY” icon (# 10) will be shown immediately on the upper center of the screen, and the recorded file will be protected. To stop the emergency mode, press the ‘DOWN” button. WARNING: FORMATTING THE Memory CARD WILL ERASE ALL THE INFORMATION INCLUDING “READ ONLY” FILES. P a g e | 9... -
Page 12: Menu Operation
Menu Operation The camera has two menus: Video Setup Menu & General Setup Menu Press “MODE” button in STOP POSITION (no red recording symbol on the display, to STOP recording press “OK” button). Press “UP” or “DOWN” buttons to select Video or General Setup Menu and press “OK” to confirm. Press “UP” or “DOWN” buttons to select desired line and press “OK” to confirm. Press “UP” or “DOWN” buttons to select desired setting and press “OK” to confirm. When you finish setting press “MODE” button to exit. P a g e | 10... -
Page 13: Video Menu
Video Menu Menu Title Description Available Option Video Resolution Set the desired resolution 1080P Full HD 1920x1080 720P 1280x 720 WVGA 848x480 VGA 640x480 Loop Recording The camera splits the Off / 3min / 5min / recordings into segmented 10min files for easy transfer/use. WDR Improves image quality On / Off (Wide Dynamic under high-contrast Range) lighting conditions. Exposure Exposure Compensation Set between +2.0 to - Value 2.0 P a g e | 11... - Page 14 Motion Detection Detect Motion in view On / Off (Set to OFF when moving) Record Audio Turns the Microphone On / Off On/Off Date Stamp The current date and time On / Off will be “stamped” into the video. G-Sensor Detect sudden change in Off / Low / Medium / XYZ axis which will trigger High EVENT SAVE. (If too many false alarms while driving, please set to OFF) GPS Embeds GPS coordinates On / Off into metadata of video file Time Zone Set the correct Time Zone -12 / - 11 … +11 / +12 (important for GPS accuracy) Speed Stamp Set to “0” it will show 20, 30, 40, etc. current speed. Set to desired speed, it will (For example, setting show current speed under to 30, will show UP the set speed, if you go TO 30 – anything faster, it will show the over 30 will show as...
-
Page 15: Setup Menu
Setup Menu Menu Title Description Available Option Date / Time Set Date and Time Set time Auto Power Off Auto Power Off Time Delay, Off / 3min / 5 min / set number of minutes the 10 min camera stays ON after power is cut. Screen Saver LCD Shutoff after X time. Off (always on) / 30 (camera will continue to Sec / 1 min record) Beep Sound Beep Confirmation Sound On / Off Language Select menu Language Select your language Frequency Light Frequency (anti 60Hz (USA Standard) flickering) 50Hz (European Standard) Format Delete ALL data on memory Cancel / Ok card! (Protected files will also be deleted!) Driver Fatigue Warning sounds after 1h, 2h, Off / 1H / 2H / 3H... -
Page 16: Recording Operation (Zoom & Snapshot)
Recording Operation (Zoom & Snapshot) The camera is equipped with 2 features which can be used while the camera is recording. Zoom The camera is capable of digital zoom up to x4.0. (You can use zoom while the camera is recording without interrupting the recording. For example, if you want to zoom into someone’s license plate.) In the record mode press and hold “UP” button (#14) to zoom in (up to x4.0) and “DOWN” button (#15) to zoom out (down to x1.0). Zoom and Snapshot features can be used simultaneously. Snapshot You have the ability to take a “Snapshot” while the camera is recording without interruption. During the recording briefly press the “MENU” button for taking photo. (You will see a photo icon popup on the screen briefly to confirm photo was taken.) Photos will be stored in the folder “PHOTO” on the memory card. P a g e | 14... -
Page 17: Playback
Playback Press “DOWN” button in STOP POSITION (no red recording symbol on the display, to STOP recording press “OK” button) to video playlist opening. Press the “UP” and “DOWN” buttons to browse for the desired video file and press “OK” to confirm. Press “OK” to play the video, “OK” for pause, “MODE” button to stop playing and return to video list. -
Page 18: Delete Or Protect File
Delete or Protect File Press the “UP” and “DOWN” buttons to browse for the desired video file and press “OK” to confirm. Press and HOLD the “MODE” button to open file menu. Press the “UP” and “DOWN” buttons to choose right action and press “OK”. NOTE: The deleted files cannot be recovered. Please double check before you delete it. P a g e | 16... -
Page 19: Wireless Interface
Wireless Interface When the camera is ON, press and HOLD “OK” button to enter into Wireless Mode You will see the SSID and Password to connect to with your smartphone. http://www.wheelwitness.com/app Please browse to to find more information about how to playback and control this camera from your smartphone. GPS Viewer Playback The best and easiest way to watch your dash cam videos alongside a map is using RegistratorViewer (this is a 3 party application, you can choose a different one). The GPS Data is embedded into the metadata of your video files. www.wheelwitness.com/viewer P a g e | 17... -
Page 20: Connecting The Camera To Your Computer / Transferring Files
Connecting the Camera to your Computer / Transferring Files Connect the supplied USB cable to the USB port of the camera on the side (#2) and connect the other end of the cable to the USB port in your PC / Mac. Turn on the camera manually using power button (#9). The screen on the camera will turn blue. The computer will now show a removable drive that you can browse, just like a flash drive. (We recommend inserting the microSD card directly into your computer if possible) P a g e | 18... -
Page 21: Hardwiring (Stealth Installation)
Hardwiring (Stealth Installation) Depending on your vehicle and where your cigarette lighter is located, you can choose to use the included power adapter, or opt for our “hardwire” stealth kit. Some vehicles have a switched cigarette lighter output, so if you connect it here, the camera always turns on and off with the cars. Other vehicles, such as older German cars have an always-on outlet, so you either have to manually connect/disconnect the camera or you can hardwire it. The included power adapter is approximately 12 feet and can be routed around your windshield and down the pillar, under you glove box and to the cigarette lighter outlet for a clean install. Stealth Hardwiring If you would like a stealth install that you never have to worry about, we sell a hardwire kit. You can use it to tap into your “Accessory” wire and the camera turns on and off with the vehicle. You never have to remember to turn it on. Using a hardwire kit requires some basic technical skills. Depending on your vehicle, you can route the wires to the back of your cigarette lighter or fuse panel. If wiring to a fuse panel, please use a multi-meter or a test light to find a fuse that is ON when vehicle is in Accessory/Ignition and is off when vehicle is off. http://www.amazon.com/dp/B00TGQ1Y3Q/ Amazon: WheelWitness Hardwire Kit P a g e | 19... -
Page 22: Troubleshooting (Common Issues)
Troubleshooting (Common Issues) Issue Solution Suction Cup Make sure to clean the glass with rubbing alcohol, Does not Stick to mount it on a clean (non dotted) surface, and put a windshield few drops of water before mounting. Camera does not Check to make sure the car charger is plugged in turn on when correctly and firmly and that is receives power. car is running Camera turns ON, only when it receives power to the DC IN port. It shuts off when power is cut. Camera Check to make sure your SD card is compatible. Must Freezes/Not be Class 10. Format SD card and Reset camera to always recording default settings in the menu. GPS Not Please allow the camera some time, at least a few Working blocks to catch the GPS signal. GPS data is embedded into the metadata of the file. Problems with Please use VLC Player (available for Free at playback on www.videolan.org or Registrator Viewer on our PC/Mac website; www.wheelwitness.com/viewer ) Playback video is Most likely this is due to the hardware you are using choppy / slow or missing codecs. The HD video requires high resources for playback. Please try it on different computer/device. P a g e | 20... -
Page 23: Warranty
Warranty We provide free warranty service for parts and labor within ONE YEAR from the date of purchase. The warranty does not cover: Damage caused by accident, misuse, tampering with or failure to follow the care • Water damage • Damage and/or scratches to the finish of the case, lens, or LCD display • Broken bracket and damaged power cable • Memory card • Damage caused by repairs or alterations by anyone other than our Service Center • Contact Us If you have any questions or comments, please feel free to contact us! www.wheelwitness.com/support Please Drive Safely! - WheelWitness Inc. P a g e | 21...
Need help?
Do you have a question about the HD PRO Plus and is the answer not in the manual?
Questions and answers