Table of Contents
Advertisement
Advertisement
Table of Contents

Related Manuals for Acon ON CALL VIVID


Summary of Contents for Acon ON CALL VIVID
-
Page 2: Blood Glucose Monitoring System
Self monitoring of blood glucose (SMBG) is an integral part of diabetes care, but the high cost of testing can make this impossible. At ACON, our goal is to provide high quality glucose monitoring at a price that allows you to test as often as necessary. -
Page 3: Table Of Contents
Table of Contents Getting Started ....................1 Component Descriptions ................2 ® On Call Vivid Blood Glucose Meter ............3 Meter Display ..................... 5 ® On Call Vivid Blood Glucose Test Strips ........... 7 ® On Call Vivid Glucose Control Solution ............ 9 Installing the Battery .................. -
Page 4: Getting Started
Getting Started Before testing, read the instructions carefully and learn about all the components of ® ® your On Call Vivid Blood Glucose Monitoring System. Depending on the On Call Vivid product you purchased, some of the components may need to be purchased separately. -
Page 5: Component Descriptions
Component Descriptions Blood Glucose Meter: Reads the test strips and displays the blood glucose concentration. Test Strips: Strips with a chemical reagent system used with the meter to measure glucose concentration in blood. Lancing Device: Used with sterile lancets to prick the fingertip, palm (at the base of the thumb) or forearm for blood sample collection. -
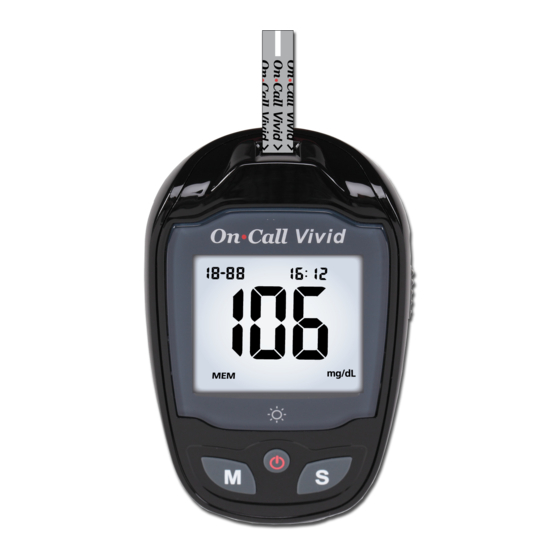
Page 6: On Call ® Vivid Blood Glucose Meter
® On Call Vivid Blood Glucose Meter The meter reads the test strips and displays the blood glucose concentration. Use these diagrams to become familiar with all the parts of your meter. Strip Port Strip Ejector Liquid Crystal Display (LCD) Power Button M Button S Button... - Page 7 Liquid Crystal Display (LCD): Shows your test results, and helps you through the testing process. M Button: Recalls previous test results from the meter memory and performs other menu selection functions. S Button: Selects meter settings and performs other menu selection functions. Strip Port: Test strips are inserted into this area to perform a test.
-
Page 8: Meter Display
Meter Display Month Day Hour Minutes Battery Symbol Pound Sign (#) Blood Drop / Strip Symbol Control Solution Symbol Test Remind Symbol Test Result Area Before Meal Symbol After Meal Symbol Ketone Measurement Unit Hypo Symbol Hyper Symbol Battery Symbol: Warns when you should replace the battery. Blood Drop / Strip Symbol: Wait for the Blood Drop / Strip Symbol to appear before applying the sample.These two symbols appear at the same time. - Page 9 Meter Use and Precautions • Wait for the Blood Drop / Strip Symbol to appear before applying the sample. • The meter is pre-set to display blood glucose concentration in either millimoles per liter (mmol/L) or milligrams per deciliter (mg/dL) depending on which unit of measure is standard in your country.
-
Page 10: On Call ® Vivid Blood Glucose Test Strips
® On Call Vivid Blood Glucose Test Strips ® The On Call Vivid Blood Glucose Test Strips are thin strips with a chemical ® reagent which work with the On Call Vivid Blood Glucose Meter to measure the glucose concentration in whole blood. After the strip is inserted into the meter, blood is applied to the sample tip of the test strip. - Page 11 Storage and Handling Please review the following storage and handling instructions: • Store test strips in a cool, dry place at room temperature, 2-30ºC (36-86°F). Store them away from heat and direct sunlight. • Do not freeze or refrigerate. • Do not store or use test strips in a humid place such as a bathroom.
-
Page 12: On Call ® Vivid Glucose Control Solution
Test Strip Precautions • For in vitro diagnostic use. Test strips are to be used only outside the body for testing purposes. • Do not use test strips that are torn, bent, or damaged in any way. Do not reuse test strips. - Page 13 Storage and Handling Please review the following storage and handling instructions: • Store the control solution at room temperature, 2-30°C (36-86°F). • Do not refrigerate or freeze. • If the control solution is cold, do not use until it has warmed to room temperature.
-
Page 14: Installing The Battery
Installing the Battery Batteries may not be preinstalled in the meter. Two CR 2032 3.0V coin cell batteries are required. Please find the batteries in your carrying case and install them according to the following steps: 1. Turn over the meter to locate the battery cover. Press the battery cover tab on the top and lift the cover to open it. -
Page 15: Meter Setup Before Testing
Meter Setup Before Testing Before using your meter for the first time, you will need to adjust the settings that are listed in detail below. 1. Meter Setup Mode: Press the S button for 2 seconds to enter the meter setup mode. - Page 16 correct minute. Press the Power button to save your choice and move to set the meal marker feature. Hour Hour Minute Minute 5. Meal Marker: The meter comes with the meal marker feature disabled. The meter shall allow the user to enable or disable the meal marker option. The words “On”...
- Page 17 Press the M or S button to switch between turning the meter beep “On” and “Off”. Press the Power button to confirm your selection. 7. Ketone Indicator: meter comes with Ketone indicator feature disabled. Press the M or S button to switch between turning the Ketone indicator “On”...
- Page 18 9. Hypo Indicator: The meter comes with the Hypo indicator feature disabled. Press the M or S button to switch between turning the Hypo indicator “On” and “Off”. Press Power button confirm your selection. When the Hypo indicator is “Off,” pressing the Power button will go to the Test Reminder set up. When the Hypo indicator is “On”, pressing the Power button will go to the Hypo indicator level set up.
- Page 19 If one or more test reminders have been set, the reminder symbol will always appear on the LCD screen when the meter is turned on. The display sample is shown below. The meter beeps 5 times at the time you set, again two minutes later, and two minutes after that unless you insert a test strip or press any button.
- Page 20 turn on the test strip port light. After applying a blood sample to the test strip, once the meter detects the sample application, the test strip port light is turned off automatically. If needed, press and hold the Power button for 2 seconds to turn on the meter display backlight.
-
Page 21: Performing A Quality Control Test
Performing a Quality Control Test The quality control test confirms that the test strips and meter are working together properly, and that you are performing the test correctly. It is important to perform this test: • Before you first use your meter. •... - Page 22 surface. Touch the sample tip of the test strip to the control solution drop. If the audio option is turned on, the meter will beep to indicate a sufficient sample has been applied. Notes: • Do not apply control solution to the test strip directly from the bottle.
- Page 23 more than 6 months. Discard any test strips or control solution that has expired. • Confirm the temperature in which you are testing is between 10 and 40 °C (50-104°F). • Make sure that the test strip vial and control solution bottle have been tightly capped.
-
Page 24: Testing Your Blood
Testing Your Blood The following steps will show how to use the meter, test strips, lancing device and sterile lancets together to measure your blood glucose concentration. Step 1 - Getting a Drop of Blood ® The On Call Vivid Blood Glucose Monitoring System requires a very small drop of blood which may be obtained from the fingertip, palm (at base of the thumb) or forearm. - Page 25 Fingertip Testing For fingertip sampling, adjust the depth penetration to reduce the discomfort. You do not need the clear cap for fingertip sampling. 1. Unscrew the lancing device cover from the body of the lancing device. Insert a sterile lancet into the lancet holder and push it until the lancet comes to a complete stop in the lancing device.
- Page 26 Adjustment: 1 and 2 for delicate skin 3 and 4 for normal skin 5 and 6 for calloused or thick skin Note: Greater pressure of the lancing device against the finger will also increase the puncture depth. 5. Pull the cocking barrel back to set the lancing device. You may hear a click. The device is now loaded and ready for obtaining a drop of blood.
- Page 27 Avoid smearing the drop of blood. For the greatest reduction in pain, lance on the sides of the fingertips. Rotation of sites is recommended. Repeated punctures in the same spot can make your fingers sore and callused. Forearm and Palm Testing The forearm and palm areas have less nerve endings than the fingertip, so you may find that obtaining blood from these sites is less painful than from the fingertip.
- Page 28 2. Choose a puncture site on the forearm or palm. Select a soft, fleshy area of the forearm that is clean and dry, away from bone, and free of visible veins and hair. To bring fresh blood to the surface of the puncture site, massage the puncture site vigorously for a few seconds until you feel it getting warm.
-
Page 29: Step 2 - Testing Blood Glucose
2. Press the release button to make sure that the lancet is in the extended position. Slide the ejection button forward to discard the used lancet. Place the lancing device cover back on the lancing device. Lancet Precautions • Do not use the lancet if the safety tab is missing or loose when you take the lancet out of the bag. - Page 30 meter will beep, signaling the meter is turned on. The display will turn on briefly with all the icons and segments turned on. Check the display to confirm that all the display segments turn on with no missing components. The display will then show only the date and time, with a dash moving across the display.
- Page 31 Then your blood glucose level will display on the screen, along with the unit measurement, date, and time of the test. Blood Glucose results are automatically stored in the memory. To mark invalid results and to prevent them from being included in the 7, 14, 30, 60 and 90-day averages, press the M and S buttons together.
-
Page 32: Hi" And "Lo" Messages
After deciding the selection, press the Power button to confirm the selection for either “before meal marker”, “after meal marker”, “invalid result pound sign” or none of these three symbols. If an invalid result is marked, run the test again with a new test strip. -
Page 33: Hypo" And "Hyper" Messages
may indicate severe hypoglycemia (low blood glucose). You should treat yourself for hypoglycemia immediately as recommended by your healthcare professional. “Hypo” and “Hyper” Messages If “Hypo” appears on the display, measured concentration value is below the “Hypo” (low blood sugar) target level that you have set. -
Page 34: Using The Meter Memory
Using the Meter Memory The meter automatically stores up to 500 test records. Each record includes the test result, time and date. If there are already 500 records in memory, the oldest record will be erased to make room for a new one. The meter will also calculate the average values of records from the last 7, 14, 30, 60 and 90 days. - Page 35 button to view the stored results. 5. While in data average mode: If the meal marker feature is off, press the S button to switch between the general 7, 14, 30, 60 and 90-day averages. If the meal marker feature is on, press the S button to switch between the general, pre-meal and post-meal 7, 14, 30, 60 and 90-day averages.
-
Page 36: Clearing The Memory
(PC) using an optional data transfer cable and software package. To make use of ® this feature, you need the On Call Diabetes Management Software and a data transfer cable from ACON. 1. Install the software to your personal computer (PC) according to the ® instructions from the On Call Diabetes Management Software Kit. - Page 37 ® 3. Run the On Call Diabetes Management Software, and refer to the instructions from the software kit for how to transfer the records. 4. During the data transfer, the meter will display “to” and “PC”. This indicates the data is being transferred from the meter to the PC.
-
Page 38: Maintenance
Maintenance Proper maintenance is recommended for best results. Replacing the Battery ® Your On Call Vivid Meter uses two 3.0 Volt CR 2032 lithium batteries. One battery (Meter Battery) powers the meter only. The other battery (Backlight & Strip Port Light Battery) powers the meter display backlight and test strip port light only. -
Page 39: Caring For Your On Call ® Vivid Blood Glucose Monitoring System
® Caring for Your On Call Vivid Blood Glucose Monitoring System Blood Glucose Meter ® Your On Call Vivid Blood Glucose Meter does not require special maintenance or cleaning. A cloth dampened with water and a mild detergent solution can be used to wipe the outside of the meter. -
Page 40: Suggested Testing Times And Target Goals
Suggested Testing Times and Target Goals Tracking your blood glucose concentration through frequent testing is an important part of proper diabetes care. Your diabetes healthcare professional will help you to decide the normal target range for your glucose levels. They will also help you to determine when and how often you should test your blood glucose. - Page 41 Use the logbook to record your blood glucose measurements and related information. Bring the logbook with you when you visit your healthcare professional so that you can determine how well your blood glucose is being controlled. This can help you and your healthcare professional make the best decisions about your glucose control plan.
-
Page 42: Comparing Meter And Laboratory Results
Comparing Meter and Laboratory Results ® Your On Call Vivid Blood Glucose System and laboratory results both report the glucose concentration in the serum or plasma component of your blood. However, the results may differ somewhat due to normal variation. Meter results can be affected by factors and conditions that do not affect laboratory results in the same ®... -
Page 43: Troubleshooting Guide
Troubleshooting Guide The meter has built-in messages to alert you of problems. When error messages appear, note the error number, turn off the meter and then follow these instructions. Display Causes Solution Battery may be damaged or Replace battery. not be charged Meter fails If meter has been exposed to or stored in to turn on... - Page 44 Display Causes Solution Temperature is below the Move to a warmer environment and operating temperature of the repeat the test. system Battery is discharged but has Test results will still be accurate, but enough power to run 10 more replace the battery as soon as possible. tests.
-
Page 45: Specifications
Specifications Feature Specification Measurement Range 0.6 – 33.3 mmol/L (10 – 600mg/dL) Plasma-equivalent, calibrated by using YSI (Model 2300 STAT PLUS) Glucose Analyzer reference Result Calibration instrument, which is traceable to NIST reference standard. Sample Adult and neonatal capillary whole blood Minimum Sample Size 0.8 μL Test Time... -
Page 46: Warranty
Warranty Please complete the warranty card that came with this product and mail it to your local distributor to register your purchase. If the meter fails to work for any reason other than obvious abuse within the first five (5) years from purchase, we will replace it with a new meter free of charge. For your records, also write the purchase date of your product here. -
Page 47: Index Of Symbols
Index of Symbols Consult instructions for use For in vitro diagnostic use only Store between 2 – 30 C (36 – 86 Contains sufficient for <n> tests Use by Lot Number Manufacturer Authorized Representative Sterilized using irradiation Control Range Catalog # MODEL Model Number Do not dispose along with household waste... -
Page 48: Index
Index Set the Clock ..…...……..12 Averaging Results ......31 Specifications .....…..42 Battery, Replacing the ....35 Strip ejector .....……..3, 29 Carrying Case ......... 1 Procedure Clearing the Memory ....33 Precautions and Limitations ..30 Data Port ........3, 33 Testing Your Blood ………..
Need help?
Do you have a question about the ON CALL VIVID and is the answer not in the manual?
Questions and answers
The machine screen no show anything even I on the machine, but did heard the sound when turn on/off
If the Acon ON CALL VIVID machine screen is blank but it makes sounds when turned on or off, check the backlight and strip port light battery. Replace the battery if the light is dimming, as the meter does not give a warning for low backlight.
This answer is automatically generated