Table of Contents
Advertisement
Available languages
Available languages
Blood Glucose Monitoring System
Self monitoring of blood glucose (SMBG) is an integral part of diabetes care,
but the high cost of testing can make this impossible. At ACON, our goal is to
provide high quality glucose monitoring at a price that allows you to test as
often as necessary. Together, we can better manage your diabetes and help
you live a longer and healthier life.
Welcome, and thank you for choosing the On Call
Glucose Monitoring System. The On Call
Monitoring System will give you accurate blood glucose results, from adult and
neonatal capillary whole blood samples, in just a few simple steps.
WARNING:
To ensure accurate results from your On Call
Monitoring System, please follow these warning instructions:
•
Read instructions before use.
•
Use only On Call
Pal Blood Glucose Meter.
•
For in vitro diagnostic use only. Your blood glucose monitoring system is
to be used only outside the body for monitoring the effectiveness of
diabetes control. It should not be used for the diagnosis of diabetes.
•
For self testing and professional use.
•
Test only whole blood samples with the On Call
Strips and On Call
•
For
self-testers, consult
professional before making any adjustments to your medication, diet or
activity routines.
•
Keep out of reach of children.
•
Keep this User's Manual properly, do not discard it.
By following the instructions outlined in this User's Manual, you will be able to
use your On Call
blood glucose and better manage your diabetes.
®
Vivid Blood Glucose Test Strips with the On Call
®
Vivid Pal meter.
®
Vivid Pal Blood Glucose Monitoring System to monitor your
®
your
physician
i
®
Vivid Pal Blood
Vivid Pal Blood Glucose
®
Vivid Pal Blood Glucose
®
Vivid Blood Glucose Test
or diabetes healthcare
®
Vivid
Advertisement
Chapters
Table of Contents

Related Manuals for Acon on call vivid pal


Summary of Contents for Acon on call vivid pal
-
Page 1: Blood Glucose Monitoring System
Self monitoring of blood glucose (SMBG) is an integral part of diabetes care, but the high cost of testing can make this impossible. At ACON, our goal is to provide high quality glucose monitoring at a price that allows you to test as often as necessary. -
Page 2: Table Of Contents
Table of Contents Getting Started ......................1 Component Descriptions................2 ® On Call Vivid Pal Blood Glucose Meter ............3 Meter Display ....................5 ® On Call Vivid Blood Glucose Test Strips ............7 ® On Call Vivid Glucose Control Solution ............10 Installing the Battery ..................... -
Page 3: Getting Started
Getting Started Before testing, read the instructions carefully and learn about all the ® components of your On Call Vivid Pal Blood Glucose Monitoring System. ® Depending on the On Call Vivid Pal product you purchase, some of the components may need to be purchased separately. Please check the list of contents on the outer box for details on which components are included with your purchase. -
Page 4: Component Descriptions
Component Descriptions Blood Glucose Meter: Reads the test strips and displays the blood glucose concentration. Test Strips: Strips with a chemical reagent system used with the meter to measure glucose concentration in blood. Lancing Device: Used with sterile lancets to prick the fingertip, palm (at the base of the thumb) or forearm for blood sample collection. -
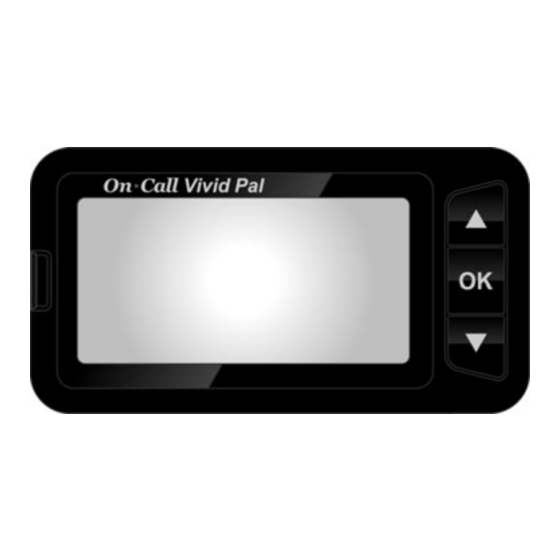
Page 5: On Call ® Vivid Pal Blood Glucose Meter
® On Call Vivid Pal Blood Glucose Meter The meter reads the test strips and displays the blood glucose concentration. Use these diagrams to become familiar with all the parts of your meter. Strip Port <▲> Button <OK> Button <▼> Button Liquid Crystal Display (LCD) Battery Cover... - Page 6 Liquid Crystal Display (LCD): Shows your test results, and helps you through the testing process. <▲> Button: Recalls previous test results from the meter memory, selects meter settings and performs other menu selection functions. <▼> Button: Recalls previous test results from the meter memory, selects meter settings and performs other menu selection functions.
-
Page 7: Meter Display
Meter Display Month Day Hour Minutes Test Result Area Test Remind Symbol Before Meal Symbol Measurement Unit After Meal Symbol Pound Sign (#) Battery Symbol Control Solution Symbol Blood Drop /Strip Symbol Battery Symbol: Warns you when you should replace the battery. Blood Drop / Strip Symbol: Wait for the Blood Drop / Strip Symbol to appear before applying the sample. - Page 8 Meter Use and Precautions • Wait for the Blood Drop / Strip Symbol to appear before applying the sample. • The meter is preset to display blood glucose concentration in either millimoles per liter (mmol/L) or milligrams per deciliter (mg/dL) depending on which unit of measure is standard in your country.
-
Page 9: On Call ® Vivid Blood Glucose Test Strips
® On Call Vivid Blood Glucose Test Strips ® The On Call Vivid Blood Glucose Test Strips are thin strips with a chemical ® reagent which work with the On Call Vivid Pal Blood Glucose Meter to measure the glucose concentration in whole blood. After the strip is inserted into the meter, blood is applied to the sample tip of the test strip. - Page 10 Hold the blood drop to the sample tip of the test strip until the check window is completely full and until the meter begins to count down. If you applied blood but do not see the starting of the count down, you may reapply a second drop of blood within 3 seconds.
- Page 11 Special Instructions for Test strip in the Vial • Test strips must be stored in the original vial with the cap tightly closed. This keeps them in good working condition. • Do not transfer test strips to a new vial or any other container. •...
-
Page 12: On Call ® Vivid Glucose Control Solution
® On Call Vivid Glucose Control Solution ® The On Call Vivid Glucose Control Solution contains a known ® concentration of glucose. It is used to confirm that your On Call Vivid Pal Blood Glucose Meter and test strips are working together properly and that you are performing the test correctly. - Page 13 Storage and Handling Please review the following storage and handling instructions: • Store the control solution at room temperature, 2-30°C (36-86°F). • Do not refrigerate or freeze. • If the control solution is cold, do not use until it has warmed to room temperature.
-
Page 14: Installing The Battery
Installing the Battery Battery may not be preinstalled in the meter. One CR 2032 3.0V coin cell battery is required. Please find the battery in your carrying case and install it according to the following steps: 1. Turn over the meter and slide the battery cover off the top of the meter. 2. -
Page 15: Meter Setup Before Testing
Meter Setup Before Testing Before using your meter for the first time, you will need to adjust the settings that are listed in detail below. 1. Meter Setup Mode: Press the <OK> button for 2 seconds to enter the meter setup mode. The meter will automatically enter the setup mode when turned on for the first time by any method. - Page 16 4. Time: The hour will appear at the top of the display. Adjust the hour with the <▲> or <▼> button until the correct hour is displayed. Press the <OK> button to save your choice and set the minutes. Press the <▲> or <▼>...
- Page 17 Press the <▲> or <▼> button to switch between turning the meter beep “On” and “Off”. Press the <OK> button to confirm your selection. 7. Test Reminder: Test reminders are a useful way to remind you when to test. You can set 1 to 5 reminders per day. Your meter is preset with the test reminder disabled.
- Page 18 shown below. The meter beeps 5 times at the time you set, again two minutes later, and two minutes after that unless you insert a test strip or press any button. This function will still work with Audio feature turned off. When the meter beeps at the time set by the Test Reminder feature, the date, time and strip symbol will be displayed.
-
Page 19: Performing A Quality Control Test
Performing a Quality Control Test The quality control test confirms that the test strips and meter are working together properly, and that you are performing the test correctly. It is important to perform this test: • Before you first use your meter. •... - Page 20 4. Shake the control solution bottle well, then squeeze it gently and discard the first drop. If the tip clogs, tap the tip gently on a clean, hard surface. Then shake again and use. Squeeze out a second small drop on a clean nonabsorbent surface. Touch the sample tip of the test strip to the control solution drop.
- Page 21 • Confirm you are matching the correct range. Control Solution 1 results should be matched to the CTRL 1 range printed on the test strip vial (or on the foil pouch). • Check the expiration date of the test strip and control solution. Make sure that the test strip vial and control solution bottle have not been opened for more than 6 months.
-
Page 22: Testing Your Blood
Testing Your Blood The following steps will show you how to use the meter, test strips, lancing device and sterile lancets together to measure your blood glucose concentration. Step 1 - Getting a Drop of Blood ® The On Call Vivid Pal Blood Glucose Monitoring System requires a very small drop of blood which may be obtained from the fingertip, palm (at base of the thumb) or forearm. - Page 23 Fingertip Testing For fingertip sampling, adjust the depth penetration to reduce the discomfort. You do not need the clear cap for fingertip sampling. 1. Unscrew the lancing device cover from the body of the lancing device. Insert a sterile lancet into the lancet holder and push it until the lancet comes to a complete stop in the lancing device.
- Page 24 4. Adjust the puncture depth by rotating the lancing device cover. There are a total of 6 puncture depth settings. To reduce the discomfort, use the lowest setting that still produces an adequate drop of blood. Adjustment: 1 and 2 for delicate skin 3 and 4 for normal skin...
- Page 25 cover resting on the finger. Push the release button to prick your fingertip. You should hear a click as the lancing device activates. Gently massage from the base of the finger to the tip of the finger to obtain the required blood volume.
- Page 26 • Fingertips should be used if testing is within 2 hours of a meal, insulin dose or exercise and any time you feel glucose levels are changing rapidly. • You should test with the fingertips anytime there is a concern for hypoglycemia or you suffer from hypoglycemia unawareness.
- Page 27 Disposal of the Lancet 1. Unscrew the lancing device cover. Place the safety tab of the lancet on a hard surface and carefully insert the lancet needle into the safety tab. 2. Press the release button to make sure that the lancet is in the extended position.
- Page 28 • Use caution whenever the lancet needle is exposed. • Never share lancets or the lancing device with other people. • In order to reduce the risk of infection from prior use of the instrument, always use a new, sterile lancet. Do not reuse lancets. •...
-
Page 29: Step 2 - Testing Blood Glucose
Step 2 – Testing Blood Glucose Note: Insertion of a new test strip at any time, except while in the data transfer mode (detailed on page 34) will cause the meter to automatically enter the test mode. 1. Insert a test strip into the strip port, contact bars end first and facing up, to turn on the meter and display all the display segments. - Page 30 3. Touch the blood sample to the sample tip at the end of the test strip. If the audio option is turned on, the meter will also beep to indicate the sample is sufficient and the measurement has started. If you applied a drop of blood, but do not see the starting of the count down, you may reapply a second drop of blood within 3 seconds.
- Page 31 When the meal marker feature is turned on, the test result is displayed together with the suggested default meal marker based upon current time. The “before meal” or “after meal” symbol is flashing until confirmed by pressing the <OK> button. The meter allows the user to change the meal maker.
-
Page 32: Hi" And "Lo" Messages
Note: Dispose of blood samples and materials carefully. Treat all blood samples as if they are infectious materials. Follow proper precautions and obey all local regulations when disposing of blood samples and materials. “HI” and “LO” Messages The meter can accurately measure blood glucose concentrations between 0.6 to 33.3 mmol/L (10 to 600 mg/dL). -
Page 33: Using The Meter Memory
Using the Meter Memory The meter automatically stores up to 500 test records. Each record includes the test result, time and date. If there are already 500 records in memory, the oldest record will be erased to make room for a new one. The meter will also calculate the average values of records from the last 7, 14, 30, 60 and 90 days. - Page 34 5. While in data average mode: If the meal marker feature is off, press the <▲> or <▼> button to switch between the general 7, 14, 30, 60 and 90-day averages. If the meal marker feature is on, press the <▲> or <▼> button to switch between the 7, 14, 30, 60 and 90-day general, pre-meal and post-meal averages.
-
Page 35: Clearing The Memory
(PC) using an optional data transfer cable and software package. To ® make use of this feature, you need the On Call Diabetes Management Software and a data transfer cable from ACON. 1. Install the software to your personal computer (PC) according to the ® instructions from the On Call Diabetes Management Software Kit. - Page 36 plugged into meter data port then meter gives E-12 error message and does not automatically turn to “PC” mode. ● When meter is in “PC” mode, meter does not turn to waiting for sample application mode after strip is inserted into meter. ®...
-
Page 37: Maintenance
Maintenance Proper maintenance is recommended for best results. Replacing the Battery ® Your On Call Vivid Pal Meter uses one 3.0 Volt CR 2032 lithium battery. When the battery icon ( ) is blinking, it means the battery is running low. You should replace the battery as soon as possible. - Page 38 4. Pull out and discard the old battery. Insert one new CR 2032 3.0V coin cell battery. Make sure the minus (-) side facing up. 5. Close the battery cover and make sure that it snaps shut. 6. Recheck and reset the clock setting after battery replacement, if necessary. To set the meter clock, see Meter Setup Before Testing on page 13.
-
Page 39: Caring For Your On Call Vivid Pal Blood Glucose Monitoring System
® Caring for Your On Call Vivid Pal Blood Glucose Monitoring System Blood Glucose Meter ® Your On Call Vivid Pal Blood Glucose Meter does not require special maintenance or cleaning. A cloth dampened with water and a mild detergent solution can be used to wipe the outside of the meter. -
Page 40: Suggested Testing Times And Target Goals
Suggested Testing Times and Target Goals Tracking your blood glucose concentration through frequent testing is an important part of proper diabetes care. Your diabetes healthcare professional will help you to decide the normal target range for your glucose levels. They will also help you to determine when and how often you should test your blood glucose. - Page 41 Time of Day Your Target Range Waking up (Fasting level) Before meals 2 hours after meals Bedtime 2 AM to 3 AM Other (Note: 1 mmol/L = 18 mg/dL) Use the logbook to record your blood glucose measurements and related information.
-
Page 42: Comparing Meter And Laboratory Results
Comparing Meter and Laboratory Results ® Your On Call Vivid Pal Blood Glucose System and laboratory results both report the glucose concentration in the serum or plasma component of your blood. However, the results may differ somewhat due to normal variation. Meter results can be affected by factors and conditions that do not affect ®... -
Page 43: Troubleshooting Guide
Troubleshooting Guide The meter has built-in messages to alert you of problems. When error messages appear, note the error number, turn off the meter and then follow these instructions. Display Causes Solution Battery may be damaged or empty Replace battery. Meter fails If meter has been exposed to or stored in cold to turn on... - Page 44 Display Causes Solution Temperature exceeded Move to a cooler environment and repeat the test. operating temperature of the system. Temperature is below the operating Move to a warmer environment and repeat the test. temperature of the system Battery is low but has enough power Test results will still be accurate, but replace the to run 20 more tests.
-
Page 45: Specifications
Specifications Feature Specification Measurement Range 0.6 – 33.3 mmol/L (10 – 600mg/dL) Plasma-equivalent, calibrated by using YSI (Model 2300 Result Calibration STAT PLUS) Glucose Analyzer reference instrument, which is traceable to NIST reference standard. Sample Adult and neonatal capillary whole blood Minimum Sample Size 0.8 μL Test Time... -
Page 46: Warranty
Warranty Please complete the warranty card that came with this product and mail it to your local distributor to register your purchase. If the meter fails to work for any reason other than obvious abuse within the first five (5) years from purchase, we will replace it with a new meter free of charge. -
Page 47: Index Of Symbols
Index of Symbols Consult instructions for use For in vitro diagnostic use only Store between 2 – 30 (36 – 86 ºC Contains sufficient for <n> tests Use by Lot Number Manufacturer Authorized Representative Sterilized using irradiation Control Range Catalog # Model Number MODEL Do not dispose along with household waste... -
Page 48: Index
Index Averaging Results ......32 Specifications ..……....43 Battery, Replacing the ...... 35 Procedure Carrying Case ........1 Precautions and Limitations ..30 Clearing the Memory ......34 Testing Your Blood ..…..20 Data Port ........4, 34 Quality Control Test ......17 Date Format ........ - Page 49 El autocontrol de la glucosa en sangre es una parte fundamental para el tratamiento de la diabetes. Pero el alto costo de las pruebas hace que resulte imposible. En ACON, nuestro objetivo es ofrecer sistemas de monitoreo de glucosa de alta calidad a un precio que le permita realizar tantas pruebas como sea necesario.
- Page 50 Para garantizar resultados exactos en el sistema de monitoreo de glucosa ® en sangre On Call Vivid Pal, respete estas pautas: • Lea las instrucciones antes de usarlo. ® • Use tiras de examen para prueba de glucosa On Call Vivid solamente ®...
- Page 51 Tabla de contenido Primeros pasos ......................1 Descripciones de los componentes ............... 2 ® Medidor de glucosa en sangre On Call Vivid Pal ......... 4 Pantalla del medidor ..................6 ® Tiras de examen para prueba de glucosa en sangre On Call Vivid ....
-
Page 52: Primeros Pasos
Primeros pasos Antes de comenzar la prueba, lea las instrucciones detenidamente. Obtenga más información sobre los componentes de su sistema de monitoreo de ® ® glucosa en sangre On Call Vivid Pal. Según el producto de On Call Vivid Pal que compre, posiblemente deba comprar otros accesorios por separado. -
Page 53: Descripciones De Los Componentes
Descripciones de los componentes ® Medidor de glucosa en sangre On Call Vivid Pal: Lee las tiras de examen y muestra el nivel de glucosa en sangre. ® Tiras de examen On Call Vivid: Están equipadas con un sistema reactivo químico. Miden la concentración de glucosa en sangre cuando se insertan en el medidor. - Page 54 ® Guía de referencia rápida On Call Vivid Pal: Ofrece una descripción general breve del sistema de monitoreo de glucosa en sangre y de los procedimientos de prueba. Esta pequeña guía se puede llevar dentro del estuche. 10. Diario: Permite a los usuarios registrar sus datos de glucosa en sangre. Se utiliza para identificar tendencias.
-
Page 55: Medidor De Glucosa En Sangre On Call ® Vivid Pal
® Medidor de glucosa en sangre On Call Vivid Pal El medidor lee las tiras de examen y muestra la concentración de glucosa en sangre. Utilice estos diagramas para familiarizarse con todas las partes del medidor. Puerto de Tiras Botón <▲> Botón <OK>... - Page 56 Pantalla de cristal líquido (LCD): Muestra los resultados de la prueba. Lo ayuda durante el proceso de prueba. Botón <▲>: Permite visualizar los resultados de pruebas de la memoria del medidor. Selecciona las configuraciones del medidor y realiza otras funciones de selección de menú.
-
Page 57: Pantalla Del Medidor
Pantalla del medidor Día Hora Minutos Área de resultado de prueba Memoria del medidor Símbolo de recordatorio Símbolo antes de de prueba comer Símbolo Después de Unidad de Nedición Comer Símbolo de carga Símbolo de número Símbolo de gota de sangre/tira Símbolo de solución de control Símbolo de carga: Le indica cuando debe cambiar la batería Símbolo de gota de sangre/tira: Espere que la Gota de Sangre / Símbolo de... - Page 58 Uso del medidor y precauciones • Espere que la Gota de Sangre / Símbolo de Tira aparezca antes de introducir la muestra. • El medidor está previamente configurado para mostrar la concentración de glucosa en sangre en millimoles por litro (mmol/L) o miligramos por decilitro (mg/dL).
-
Page 59: Tiras De Examen Para Prueba De Glucosa En Sangre On Call Vivid
Tiras de examen para prueba de glucosa en sangre On ® Call Vivid ® Las tiras de examen para prueba de glucosa en sangre On Call Vivid son tiras delgadas. Las tiras cuentan con un sistema reactivo químico. Funcionan ® con el medidor de glucosa en sangre On Call Vivid Pal para medir la concentración de glucosa en sangre completa. - Page 60 Mantenga la gota de sangre en el extremo de muestra de la tira hasta que la ventana de verificación esté completamente rellena. El medidor comenzará una cuenta regresiva. Si aplicó la sangre, pero la cuenta regresiva no comienza, puede aplicar una segunda gota de sangre luego de 3 segundos. Si la ventana de verificación no está...
- Page 61 Instrucciones especiales para las tiras de examen del frasco • Las tiras deben almacenarse en su frasco original con la tapa bien cerrada. Esto las mantiene en buen estado. • No transfiera las tiras a otro frasco o recipiente. • Vuelva a colocar la tapa del frasco de tiras de examen inmediatamente después de retirar una tira.
-
Page 62: Solución De Control De Glucosa On Call ® Vivid
® Solución de control de glucosa On Call Vivid ® La solución de control de glucosa On Call Vivid contiene una concentración conocida de glucosa. Se utiliza para confirmar que el medidor de glucosa en sangre y las tiras de examen On ®... - Page 63 • Utilice las tiras antes de su fecha de vencimiento del producto no abierto que aparece en la botella. Nota: La fecha de vencimiento está impresa en el formato año/mes. 2014/01 indica enero de 2014. • Cada botella de solución de control se puede utilizar hasta 6 meses después de ser abierta por primera vez.
-
Page 64: Instalación De Las Baterías
Instalación de las baterías Si las baterías estan preinstalada en el medidor, una pestaña de plástico sobresaldrá del soporte de la batería. Basta con tirar la pestaña para quitar la tira de plastic. Es posible que la batería no esté instalada previamente en el medidor. El medidor necesita una batería de botón CR 2032 de 3,0 voltios. -
Page 65: Configuración Del Medidor Antes De La Prueba
Configuración del medidor antes de la prueba Antes de utilizar el medidor por primera vez, deberá realizar la configuración que se describe a continuación. 1. Modo de configuración del medidor: Presione el botón <OK> durante 2 segundos para ingresar al modo de configuración del medidor. El medidor ingresará... - Page 66 4. Hora: La hora aparecerá en la parte superior de la pantalla. Presione el botón <▲> o <▼> para colocar la hora correcta. Presione el botón <OK> para guardar la opción seleccionada y configurar los minutos. Presione el botón <▲> o <▼> para colocar los minutos correctos. Presione el botón <OK>...
- Page 67 6. Función de audio: El medidor viene con la función de audio habilitada. Se escuchará un pitido corto cuando se encienda, después de que se detecte la muestra y cuando el resultado esté listo. El medidor hará tres pitidos cortos para indicar que se produjo un error. Verifique el número de error en la pantalla y determine qué...
- Page 68 presione el botón <OK> para ir a la configuración de la hora del segundo recordatorio de prueba. Presione el botón <▲> o <▼> para ajustar la hora del segundo recordatorio de prueba. Presione el botón <OK> para confirmar la hora del segundo recordatorio de prueba y después vaya a la configuración del tercer recordatorio de prueba.
-
Page 69: Cómo Realizar Una Prueba De Control De Calidad
Cómo realizar una prueba de control de calidad La prueba de control de calidad confirma que las tiras de examen y el medidor funcionan correctamente en conjunto. También confirma que está realizando la prueba correctamente. Es importante realizar esta prueba: •... - Page 70 3. El medidor está listo para probar cuando el símbolo de la gota de sangre parpadeando y el símbolo de la tira aparece. La pantalla mostrará la fecha, hora y el icono de la tira con el icono de la muestra de sangre LISTO PARA PROBAR parpadeando para indicar que la tira de prueba se ha insertado correctamente.
- Page 71 Los resultados se muestran en mmol/L o mg/dL, según la unidad de medición más común de su país. El medidor se configurará en mg/dL de manera predeterminada cuando se venda en los Estados Unidos. Nota: El rango de la solución de control es el rango esperado para los resultados de la solución de control.
- Page 72 Después de verificar todas las condiciones enumeradas anteriormente, repita la prueba con la solución de control y una tira nueva. Si los resultados continúan fuera del rango indicado en el frasco de tiras de examen (o en el envase de aluminio), es posible que el medidor no esté funcionando correctamente.
-
Page 73: Cómo Realizar Una Prueba De Sangre
Cómo realizar una prueba de sangre Los siguientes pasos le indicarán cómo utilizar el medidor, las tiras de examen, el dispositivo de punción y las lancetas estériles en conjunto para medir el nivel de glucosa en sangre. Paso 1 - Obtención de una gota de sangre ®... - Page 74 Nota: Nunca comparta las lancetas o el dispositivo de punción con otras personas. Siempre utilice una lanceta estéril nueva. Las lancetas sirven para un solo uso. Lave bien sus manos con jabón y agua después de manipular el medidor, el dispositivo de punción o las tiras de examen para realizar una prueba.
- Page 75 3. Cuidadosamente enrosque la tapa nuevamente en el dispositivo de punción. Evite el contacto con la aguja expuesta. Asegúrese de que la tapa esté completamente sellada en el dispositivo de punción. 4. Ajuste la profundidad del pinchazo rotando la tapa del dispositivo de punción.
- Page 76 6. Antes de realizar la prueba, limpie su mano con un hisopo con alcohol o lave las manos con jabón. Si es necesario, utilice agua tibia para incrementar el flujo de la sangre. Luego, séquese bien las manos. Masajee la mano desde la muñeca hacia arriba hasta la punta del dedo varias veces para estimular el flujo de la sangre.
- Page 77 Prueba en el antebrazo y la palma Las áreas del antebrazo y la palma tienen menos terminaciones nerviosas que la punta de los dedos. Por esto, puede sentir que tomar la muestra de sangre de estos lugares es menos doloroso que de la punta del dedo. El procedimiento para tomar muestras del antebrazo y la palma es diferente.
- Page 78 1. Enrosque la tapa transparente en el dispositivo de punción. 2. Elija un lugar de punción en el antebrazo o la palma. Seleccione un área suave y carnosa en el antebrazo que esté limpia y seca, lejos del hueso y donde no haya venas o vellos visibles.
- Page 79 Cómo desechar la lanceta 1. Desenrosque la tapa del dispositivo de punción. Coloque la tapa de seguridad de la lanceta sobre una superficie firme. Inserte la aguja de la lanceta cuidadosamente dentro de la tapa de seguridad. 2. Presione el botón de liberación para asegurarse de que la lanceta esté...
-
Page 80: Paso 2 - Análisis De La Glucosa En Sangre
Paso 2 - Análisis de la glucosa en sangre Nota: La inserción de una nueva tira de examen en cualquier momento, excepto cuando el medidor se encuentra en el modo de transferencia de datos (ver página 36), hará que el medidor cambie al modo de prueba. 1. - Page 81 3. Toque la gota de sangre en el extremo de la tira de examen. Si la opción de audio está activada, el medidor también hará un pitido para indicar que la muestra es suficiente y que comenzó la medición. Si aplicó la gota de sangre pero no comienza la cuenta regresiva, puede aplicar una segunda gota de sangre antes de los 3 segundos posteriores.
- Page 82 Cuando la función del indicador de comidas está activada, el resultado de la prueba aparecerá en la pantalla junto con el indicador de comidas de acuerdo con el horario actual. El símbolo de “antes de comer” o “después de comer” se iluminará hasta que confirme presionando <OK>. El medidor le permite cambiar el indicador de comidas.
-
Page 83: Mensajes "Hi" Y "Lo
Mensajes “HI” y “LO” El medidor puede medir con exactitud las concentraciones de glucosa en sangre entre 20 y 600 mg/dL. Los mensajes “HI” y “LO” indican que los resultados están fuera de este rango. Si aparece “HI” en la pantalla, el valor de la concentración medido está... - Page 84 diseñado para usuarios que realizan autocontroles para analizar sangre de capilar fresca. Para la venta en mostrador. • Los niveles de hematocrito demasiado altos (más de 70 %) o demasiado bajos (menos de 20 %) pueden generar resultados erróneos. Hable con su médico para descubrir cuál es su nivel de hematocrito.
-
Page 85: Uso De La Memoria Del Medidor
Uso de la memoria del medidor El medidor almacena hasta 500 registros de pruebas. Cada registro incluye el resultado de la prueba, la hora y la fecha. Si la memoria está llena, se borrará el registro más antiguo para crear espacio para el nuevo registro. El medidor también calculará... - Page 86 5. Mientras está en el modo de promedios: Si la función de indicador de comidas está desactivada, presione el botón <▲> o <▼> para cambiar entre los promedios generales de 7, 14, 30, 60 y 90 días. Si la función de indicador de comidas está activada, presione el botón <▲>...
-
Page 87: Borrado De La Memoria
® software para la administración de diabetes On Call y un cable de transferencia de datos de ACON. 1. Instale el software en su computadora personal (PC) según las instrucciones del paquete del software para la administración de diabetes ®... - Page 88 automáticamente e irá al modo “PC”. Notas: ● Cuando haya una tira insertada en el medidor antes de conectarlo a la PC, el medidor mostrará un mensaje de error E-12. El medidor está esperando una muestra de sangre y no cambiará al modo “PC”. ●...
-
Page 89: Mantenimiento
Mantenimiento Se recomienda un mantenimiento adecuado para obtener mejores resultados. Reemplazo de las baterías ® Su medidor On Call Vivid Pal utiliza una batería de litio de 3,0 voltios CR 2032. Cuando el icono de la batería ( ) parpadea, significa que se está agotando la batería. - Page 90 4. Retire y descarte la batería vieja. Inserte una nueva batería de botón CR 2032 de 3,0 voltios sobre la cinta de plástico. Asegúrese de que el signo más (+) esté hacia abajo. 5. Cierre la tapa del compartimento de la batería . 6.
-
Page 91: Cuidados Básicos Del Sistema De Monitoreo De Glucosa En Sangre On Call Vivid Pal
Cuidados básicos del sistema de monitoreo de glucosa en ® sangre On Call Vivid Pal Medidor de Glucosa en Sangre y Dispositivo de Punción Desinfección y limpieza previa del medidor y dispositivo de punción Antes de desinfectar el medidor y el dispositvo de puncion, utilice paños ultra desinfectantes DisCide (Registro N. - Page 92 ® Consulte el diagrama del medidor sangre On Call Vivid Pal y el dispositivo de punción en la sección Primeros Pasos para ver una ilustración de la superficie del medidor y el dispositivo de punción. Consulte las secciones de este manual (paginas 26 a 27) Desecho de Lancetas y Precauciones con Lancetas para el manejo adecuado de una lanceta usada.
- Page 93 desinfectantes DisCide también están disponibles por otras páginas de Internet como www.amazon.com. Frecuencia de limpieza previa y desinfección Si usted hace sus propios controles, asegúrese de desinfectar el medidor y el dispositivo de punción al menos una vez a la semana, o cuando sienta que es necesario limpiarlos.
- Page 94 quebradura, hinchazón, disolución, ablandamiento o fragilidad luego del procedimiento de limpieza y desinfección durante la validación del fabricante, debe buscar cualquier signo de deterioro que pueda llegar a tener el medidor y el dispositivo de punción después del procedimiento de limpieza y desinfección.
-
Page 95: Horarios De Prueba Recomendados Y Objetivos
Horarios de prueba recomendados y objetivos Como diabético, es importante controlar su nivel de glucosa en sangre frecuentemente. Su médico lo ayudará a decidir el rango objetivo normal para sus niveles de glucosa. También lo ayudará a determinar cuándo y con qué frecuencia debe realizar las pruebas de glucosa en sangre. - Page 96 Hable con su médico para establecer sus propios rangos objetivos diarios. Momento del día Su rango objetivo Al despertarse (nivel en ayuno) Antes de las comidas 2 horas después de comer Antes de ir a dormir 2 o 3 de la mañana Otro Use el diario para registrar sus resultados y la información relacionada con las resultados de glucosa en sangre.
-
Page 97: Comparación De Los Resultados Del Medidor Y Resultados De Laboratorio
Comparación de los resultados del medidor y resultados de laboratorio ® El medidor de glucosa en sangre On Call Vivid Pal y los resultados de laboratorio brindan un informe de la concentración de glucosa en el segmento de suero o plasma de la sangre. Sin embargo, los resultados pueden variar. Eso es lo que se espera. -
Page 98: Guía De Identificación Y Solución De Problemas
Guía de identificación y solución de problemas El medidor tiene mensajes incorporados que avisan cuando hay un problema. Cuando aparezca un mensaje de error, anote el número de error. Apague el medidor y luego siga estas instrucciones. Pantalla Causas Solución Es posible que la batería esté... - Page 99 Pantalla Causas Solución Repita la prueba. Aplique una muestra Muestra insuficiente. suficiente que llene la ventana de verificación de la tira de examen. Error de aplicación de muestra Repita la prueba. Aplique una muestra debido a una tardanza en la suficiente que llene la ventana de verificación aplicación de la nueva dosis de la tira dentro de 3 segundos.
- Page 100 Pantalla Causas Solución Repita la prueba. Aplique sangre suficiente para llenar la ventana de verificación de la tira dentro de 3 segundos. No toque la tira durante la cuenta regresiva del medidor. Asegúrese de usar una muestra de sangre fresca con el nivel Error de la prueba con tira.
-
Page 101: Especificaciones
Especificaciones Característica Especificación Rango de medición 20 - 600 mg/dL Equivalente al plasma. Calibrado con el instrumento de referencia Analizador de glucosa YSI (Modelo 2300 Calibración de resultado STAT PLUS), que se puede encontrar en el estándar de referencia del NIST. Muestra Sangre completa fresca capilar. -
Page 102: Garantía
Garantía Complete la tarjeta de garantía incluida con este producto y envíela a la siguiente dirección: ® Centro de garantía On Call Vivid Pal 10125 Mesa Rim Road San Diego, CA 92121-2915 Si el medidor no funciona por alguna razón que no sea un maltrato obvio dentro de los 5 años en que se realizó... - Page 103 Índice de Símbolos Atención, ver instrucciones de uso Solo para uso de diagnóstico in vitro Almacenar entre 36 – 86 F (2 – 30 ° ° Contenido suficiente para <n> ensayos Caducidad Número de lote Fabricante Representante autorizado Estéril Rango de Control Nº...
-
Page 104: Índice
Índice Configuración del medidor..14 Promedios de resultados.... 33 Configuración del reloj.……... 14 Baterías, Reemplazo de ..... 37 Especificaciones.…….... 49 Estuche ......... 1 Borrado de la memoria....35 Procedimiento Puerto de datos....... 4, 35 Precauciones y Limitaciones.. 32 Formato de datos....14 Cómo realizar la prueba…..
Need help?
Do you have a question about the on call vivid pal and is the answer not in the manual?
Questions and answers