Table of Contents
Advertisement
Available languages
Available languages
Quick Links
Advertisement
Table of Contents

Subscribe to Our Youtube Channel
Related Manuals for Bimar VSM11


Summary of Contents for Bimar VSM11
- Page 1 LIBRETTO ISTRUZIONI INSTRUCTION BOOKLET BEDIENUNGSANLEITUNG NOTICE D'INSTRUCTIONS FOLLETO DE INSTRUCCIONES VENTILATORE DA SOFFITTO CEILING FAN DECKENVENTILATOR VENTILATEUR DE PLAFOND VENTILADORES DE TECHO type VSM11 (mod. K48005-XY-1L) type VSM10 (mod. NK48-3)
-
Page 2: Avvertenze Generali
Questo simbolo vi invita a leggere attentamente queste istruzioni prima dell’uso dell’apparecchio, eventualmente informare terzi, necessario. Conservare il libretto per ulteriori consultazioni e per l’intera durata di vita dell’apparecchio. Se nella lettura di queste istruzioni d’uso alcune parti risultassero difficili nella comprensione o se sorgessero dubbi, prima di utilizzare il prodotto contattare l’azienda all’indirizzo scritto in ultima pagina. - Page 3 ambito domestico, che possono essere utilizzati per tipiche funzioni domestiche anche da persone non esperte: - in negozi, uffici e altri luoghi di lavoro similari; - in aziende agricole o similari; - da clienti di alberghi, motel e altri ambienti di tipo residenziale;...
- Page 4 esperienza o della necessaria conoscenza, purchè sotto sorveglianza oppure dopo che le stesse abbiano ricevuto istruzioni relative all’uso sicuro dell’apparecchio e alla comprensione dei pericoli ad esso inerenti. I bambini non devono giocare con l’apparecchio. La pulizia e la manutenzione destinata ad essere effettuata dall’utilizzatore non deve essere effettuata da bambini senza sorveglianza.
- Page 5 Non usare l’apparecchio funziona correttamente o se sembra danneggiato; in caso di dubbio rivolgersi a personale professionalmente qualificato. Verificare periodicamente l'integrità dell'apparecchio. In caso d'imperfezioni o nel dubbio rivolgersi a personale professionalmente qualificato. Non usare l’apparecchio in presenza di sostanze o vapori infiammabili (alcool, insetticidi, benzine) o in ambienti particolarmente polverosi.
-
Page 6: Installazione
Non allacciare l’apparecchio a sistemi di controllo termico o programmatore o timer o ad altro dispositivo che possa accendere l’apparecchio automaticamente, evitando così rischi di danni a persone, animali o cose. In caso di guasto o cattivo funzionamento spegnere l’apparecchio e farlo controllare da personale professionalmente qualificato;... - Page 7 Installare l'apparecchio ad una distanza adeguata da pareti, oggetti, fonte di calore, tessuti (tende, ecc.) o materiale volatile, e ad almeno 2,3m dal piano di calpestio. Installare l'apparecchio ad un soffitto/soletta in muratura o in metallo e/o in materiale che dia garanzia di sostegno di un peso pari ad almeno 8 volte il peso dell'apparecchio.
- Page 8 4. Inserire la rosetta sul perno e fissare il perno tramite la coppiglia (7) che deve essere completamente inserita e poi piegata in modo da impedire che sia perno che coppiglia possano sfilarsi. 5. Assicurare ulteriormente il suppurto motore all'asta stringendo la /le vite/i di sicurezza.
- Page 9 BLU “NEUTRAL”: Neutro comune motore e luci filo ROSSO “LIGHT”: fase per luce filo GIALLO/VERDE: Messa a Terra, corrispondente al simbolo type VSM10 (mod. K48-3), type VSM11 (mod.K48005- senza lampada XY-1L) con lampada Collegare i fili del ventilatore e quelli provenienti dal soffitto con la...
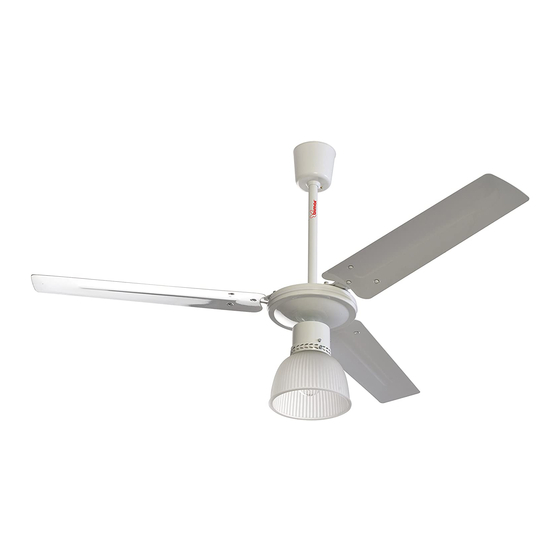
- Page 10 Fig.1 Fig.2 1) Morsettiera 2) Piastra di sostegno 3) Cavi elettrici 4) Asta di sostegno 5) Vite fissare calotta superiore alla piastra supporto 6) Calotta superiore 7) Coppiglia 8) Perno 9) Viti e rondelle per il fissaggio sostegno reggipala al motore 10) Paralume in vetro 11) Motore 12) Sostegno reggipala...
- Page 11 - interruttore per accendere e spegnere la luce (nei modelli con questo optional) e si agisce premendo interruttore 0/I nei modelli con comando a parete PULIZIA E MANUTENZIONE Attenzione: prima di eseguire le normali operazioni di pulizia, spegnere il ventilatore, spegnere la luce del ventilatore (se presente), e togliere l'alimentazione della rete elettrica spegnendo l'interruttore onnipolare (pos.
- Page 12 PROBLEMA CAUSA RIMEDIO POSSIBILE Apparecchio Mancanza Controllare completamente corrente l’interruttore generale spento dell’impianto collegamento elettrico sbagliato. L’apparecchio Motore guasto Rivolgersi ad un Centro funziona Assistenza Tecnico regolarmente autorizzato. Il ventialtore oscilla Pale montate non Serrare eccessivamente correttamente adeguatamente tutte le serrate.
-
Page 13: General Notices
Please read these instructions carefully before using the appliance, and instruct other persons using it, too, if necessary. Keep the manual handy for future use. If when reading this instructions manual certain parts should be difficult to understand, or if there is any confusion, contact the company indicated on the last page before using the product. - Page 14 be used for typical domestic tasks even by non- experts: - in shops, offices and other such places of work; - in agricultural businesses or similar; - by clients in hotels, motels and other residential type environments - bed and breakfast type environments ...
- Page 15 hazards involved. Children shall not play with the appliance. Cleaning and user maintenance shall not be made by children without supervision. This appliance can be used by children aged 8 and older and by persons with reduced physical, sensory or mental capabilities or lack of experience and knowledge if they are properly supervised or if they have received instructions regarding the safe use of the appliance and have understood the...
-
Page 16: Installation
Periodically check the integrity of the appliance. In case of imperfections or if in doubt contact a qualified technician. Do not use the appliance in the presence of flammable vapors substances (alcohol, insecticides, gasoline) or in dusty environments. ... - Page 17 accordance with regulations in the appropriate containers for recycling.Attention: any stickers or advertising material applied to the grid removed before using the appliance. Before connecting the appliance, check: a) that the voltage values shown on the data plate (220-240V~ 50Hz) correspond to those of the electricity supply network b) the electrical system to which the appliance will be connected must:...
- Page 18 Attention: the fan can be used only when completely and correctly assembled. If in doubt, have the appliance checked or assembled by a qualified professional person. For the assembly , use the folowing figures as a reference (as a reference of the structural parts), which is should be read before assembly.
-
Page 19: Electrical Connections
BROWN wire “LIVE”: motor phase BLUE wire “NEUTRAL”: common neutral for motor and lamps RED wire “LIGHT”: lamp phase GREEN / YELLOW wire: Grounding, corresponding to the symbol type VSM10 (mod.K48-3), type VSM11 (mod. K48005- without lamp XY-1L) with lamp... - Page 20 +è Fig.1 Fig.2 1) Terminal block 2) Support plate 3) Electrical wiring 4) Support rod 5) Screw to secure top cap to support plate 6) Top cap 7) Cotter pin 8) Pin 9) Screws and washers for fixing blade support to motor 10) Glass shade 11) Motor...
-
Page 21: Cleaning And Maintenance
- Switch for the motor rotation in a clockwise or anti-clockwise direction in order to have a direct air flow from the centre to the outside or vice versa (this feature is only present on some models) - Switch to turn the lamp on and off (on models with this option) and it works by pressing the 0 / I switch on models with wall control CLEANING AND MAINTENANCE Attention: before normal cleaning operations, turn the fan off, turn... - Page 22 PROBLEM POSSIBLE SOLUTION CAUSE Appliance No power Check master completely off switch incorrect wiring. The appliance Motor fault Contact an does not operate authorized Technical normally Assistance Centre. The fan is Blades not Tighten all screws oscillating tightened properly excessively properly.
- Page 23 Bitte lesen Sie vor der Benutzung des Gerätes sorgfältig diese Anleitungen und setzen Sie gegebenenfalls Dritte darüber in Kenntnis. Gebrauchsanleitung zum weitren nachschlagen nachscklagen aufbewahren. Sollten während des Lesens dieser Bedienungsanleitung Fragen aufkommen oder irgendwelche Stellen schwer verständlich sein, dann kontaktieren Sie vor dem Gebrauch des Geräts den Hersteller unter der Adresse, die auf der letzten Seite...
- Page 24 und gefährlich angesehen. Der Hersteller kann nicht für eventuelle Schäden bei unsachgemäßer, falscher und unverantwortlicher Verwendung und/oder bei von unqualifiziertem Personen durchgeführten Reparaturen haftbar gemacht werden. Das Gerät soll in den Haushalt und ähnliche Anwendungen verwendet werden, wie: - Personalküche in Geschäften, Büros und anderen Arbeitsumgebungen;...
- Page 25 eine Beaufsichtigung Anweisungen für die Verwendung des Gerätes erhalten haben. Kinder müssen immer beaufsichtigt werden, um sicherzustellen, dass sie nicht mit dem Gerät spielen. Das Gerät darf nicht von Kindern unter 8 Jahren oder von Personen mit verminderten körperlichen, sensoriellen oder geistigen Fähigkeiten oder von Personen, denen...
- Page 26 werden, außer wenn sie über 8 Jahre alt sind und dabei beaufsichtigt werden. Den Hauptschalter der Anlage ausschalten: - Vor Stromanschluss des Geräts, vor dem Zusammenbau, dem Ausbau und vor Säuberung des Geräts. - Beim Auftreten von Funktionsstörungen. - Wenn das Gerät für kurze oder lange Zeit nicht benutzt wird.
-
Page 27: Montage
m über dem Boden befindet, so wie es in der Abbildung gezeigt wird. Achtung: Vor Zugriff auf die Klemmen müssen alle Speisekreise unterbrochen werden. Wenn das Stromkabel beschädigt ist, muss es vom Hersteller oder seinem technischen Kundendienst ausgetauscht werden bzw. immer von einer Person mit ähnlicher Qualifizierung, damit jegliches Risiko vermieden wird. - Page 28 - über eine effiziente Erdung verfügt und den gültigen Normen zur elektrischen Sicherheit entspricht. Zweifelsfall eine sorgfältige Kontrolle durch qualifizierte Fachleute vornehmen lassen. Für die Montage muss ein omnipolarer Schalter mit einem Öffnungsabstand der Kontakte von über oder gleich 3 mm vorgesehen werden.
- Page 29 Zum Zusammenbauen die Abbildungen (als Bezugspunkte der Strukturteile) zur Hilfe nehmen. Die Abbildungen sollten vor dem Zusammenbau angesehen werden. Zum Zusammenbauen wie folgt vorgehen: 1. Die Halteplatte (2) an der Decke befestigen: Beim Bohren darauf achten keine Leitungen in der Mauer zu beschädigen (vorher prüfen, ob sich in der Wand Wasser-, Gas- oder Elektroleitungen usw.
- Page 30 9. Die Flügel am Motor anbauen. Sie richtig positionieren (auf die Flügelseite achten) und den Flügelhalter mit den mitgelieferten Schrauben mit Unterlegscheiben befestigen. Prüfen, ob alle Schrauben fest angezogen sind, sowohl aus Sicherheitsgründen, aber auch um zu vermeiden, dass der Ventilator während des Betriebs zu stark pendelt.
- Page 31 VSM10 (mod. K48-3), ohne type VSM11 (mod. K48005- Leuchte XY-1L) mit Leuchte Die Kabel des Ventilators und die von der Decke kommenden Kabel an dem mitgelieferten Klemmenbrett anschließen, unter Beachtung des nachfolgenden Schaltplans: Der Ventilator und die Leuchte werden durch einen Umschalter gesteuert.
- Page 32 1) Klemmenbrett 2) Halteplatte 3) Kabel 4) Haltestange 5) Schraube Befestigung der oberen Kappe an der Halteplatte 6) Obere Kappe 7) Splint 8) Bolzen 9) Schrauben Unterlegscheiben Befestigung Flügelhalterung Motor 10) Lampenschirm aus Glas 11) Motor 12) Flügelhalterung 13) Flügel Benutzung Der Ventilator verfügt über die folgenden Steuerelemente: - Wählschalter mit Steuerung an der Wand.
- Page 33 Zum Säubern einen weichen, etwas feuchten Lappen benutzen. Keine reibenden oder korrosiven Mittel benutzen. Darauf achten das Gerät, Flügel elektrischen Anschlüsse oder die Befestigungen nicht zu beschädigen. Die Teile des Ventilators niemals in Wasser oder eine andere Flüssigkeit eintauchen. Falls es passieren sollte, als erstes prüfen, ob die Stromspeisung unterbrochen wurde.
- Page 34 PROBLEM MÖGLICHE URSACHE BESEITIGUNG Gerät Der Strom fehlt. Den Hauptschalter der vollständig Anlage oder ausgeschaltet. elektrischen Anschluss (der falsch sein kann) kontrollieren. Gerät Der Motor ist defekt Sich funktioniert nicht technischen ordnungsgemäß. Vertragskundendienst wenden. Ventilator Die angebauten Flügel Alle Schrauben fest pendelt zu stark.
-
Page 35: Avertissements Généraux
Nous vous prions de lire attentivement ces instructions avant d’utiliser l'appareil et de les divulguer à toutes les personnes qui pourraient en avoir besoin. Gardez-lez a portée de main. Si à la lecture de ce manuel d'instruction certaines parties étaient difficiles à comprendre ou si vous aviez des doutes, veuillez contacter la société... - Page 36 les fermes ; l’utilisation par les clients des hôtels, motels et autres environnements à caractère résidentiel; les environnements de type chambres d’hôtes. L’utilisation de tout appareil électrique comporte le respect de certaines règles fondamentales, notamment a) ne pas toucher l’appareil avec les mains mouillés ou humides b) ne doit pas être touché...
- Page 37 avec un manque d’expérience ou de connaissance si une surveillance de ces personnes a été mise en place ou s’ils ont reçu des instructions au sujet de l’utilisation en toute sécurité de l’appareil et s’ils ont compris les risques liés. Les enfants ne doivent pas jouer avec l’appareil.
- Page 38 N’utilisez pas l’appareil à une température ambiante supérieure à 40°C. N’exposez pas l’appareil aux agents atmosphériques (soleil, pluie. etc.). Attention : le ventilateur doit être installé de sorte que les lames soient placées à plus de 2,3 m au-dessus du niveau du sol, comme c’est indiqué...
- Page 39 - avoir une prise de terre efficace et qui devra être conforme aux normes de sécurité électrique en vigueur : en cas de doute, demander un contrôle précis par du personnel qualifié. Pour installer un interrupteur, il faudra prévoir un interrupteur omnipolaire avec une distance d'ouverture des contacts égale ou supérieure à...
- Page 40 1) Fixez la plaque de soutien au plafond (2) : faire les trous, en prenant soin de ne pas endommager les tuyaux dans le mur (vérifier tout d’abord s’il y a des tuyaux d’eau et de gaz, etc... ou des câbles électriques intégrés dans le mur), au moyen de chevilles de fixation à...
- Page 41 MARRON “LIVE” : phase pour moteur fil BLEU “NEUTRAL”: Neutre et commun au moteur et aux lumières fil ROUGE “LIGHT”: phase pour lumière fil JAUNE/VERT : Prise de terre, qui correspond au symbole type VSM10 (mod. K48-3), sans type VSM11 (mod.K48005-XY- lampe 1L) avec lampe...
- Page 42 Fig.1 Fig.2 1. Bornier 2. Plaque de support 3. Câbles électriques 4. Tige de soutien 5. Vis pour fixer la calotte supérieure à la plaque de soutien 6. Calotte supérieure 7. Goupille 8. Axe 9. Vis et rondelles pour fixer le support qui règle les lames au moteur 10.
- Page 43 interrupteur pour allumer et éteindre la lumière (pour les modèles qui ont cette option) et il fonctionne quand on sélectionne 0 ou 1 sur l’interrupteur pour les modèles avec commande murale NETTOYAGE ET ENTRETIEN Attention: avant d'exécuter les opérations de nettoyage ordinaires éteindre le ventilateur, éteindre la lumière du ventilateur (s’il y en a une) et couper l'alimentation du réseau électrique en éteignant l’interrupteur omnipolaire (position 0/OFF).
- Page 44 PROBLEME CAUSE POSSIBLE QUE FAIRE : Appareil entièrement Coupure de courant Vérifier l’interrupteur éteint principal du système ou le raccordement électrique erroné. L’appareil ne fonctionne Moteur en panne S’adresser à Centre pas normalement d’Assistance Technique agrée. Le ventilateur fluctue trop Les lames montées ne Bien serrer toutes les vis sont serrées...
-
Page 45: Advertencias Generales
Este símbolo le invita a leer atentamente las instrucciones antes de utilizar el aparato y a comunicarlas a terceros si es necesario. Guarde este folleto para referencias futuras y durante toda la vida del aparato. Si cualquier parte de estas instrucciones de uso es difícil de comprender o si tiene dudas, contacte con la empresa a la dirección que aparece en la última página antes de utilizar el producto. - Page 46 - en empresas agropecuarias u otras similares; - por huéspedes de hoteles, moteles y otros entornos de tipo residencial; - en entornos del tipo bed and breakfast. El uso de cualquier aparato eléctrico implica la observancia de algunas reglas fundamentales, tales como: a) no debe ser tocado con las manos húmedas o mojadas...
- Page 47 físicas, sensoriales o mentales o desprovistas de experiencia y conocimientos siempre que cuenten con una vigilancia adecuada o que hayan recibido instrucciones sobre cómo utilizar el aparato en condiciones de seguridad comprendiendo los peligros que comporta. Los niños no deben jugar con el aparato.
-
Page 48: Instalación
No dejar el aparato expuesto a los agentes atmosféricos (sol, lluvia, etc.) Atención: el ventilador debe ser instalado en modo que las paletas se encuentren a más de 2,3m sobre el nivel del suelo, como se muestra en la figura. ... - Page 49 - cuente con una eficaz puesta a tierra de acuerdo con las normativas vigentes de seguridad eléctrica: en caso de dudas, solicitar un preciso control por parte de personal técnico profesionalmente capacitado. Para la instalación es necesario proveer un interruptor seccionador unipolar con distancia de abertura de los contactos igual o superior a 3 mm.
- Page 50 la mampostería (primero verificar si caños de agua y gas, etc. o cables eléctricos están incorporadas en la pared); mediante los tacos de fijación a expansión, y los tornillos roscados fijar la placa. Comprobar la solides de la fijación, luego aplicar a la placa un peso 4 veces superior a aquel del ventilador y verificar que la placa permanezca perfectamente fijada a la losa.
- Page 51 MARRÓN “LIVE”: fase para motor cable AZUL “NEUTRAL”: Neutro común al motor y luz cable ROJO “LIGHT”: fase para luz cable AMARILLO/VERDE: Puesta a Tierra, correspondiente al símbolo type VSM10 (mod. NK48-3), sin type VSM11 (mod.K48005-XY- lámpara 1L), sin lámpara...
- Page 52 Conectar los cables del ventilador y aquellos provenientes del techo con la caja de conexiones suministrada según el siguiente esquema eléctrico: el ventilador y la luz están comandados por un conmutador. Fig.1 Fig.2 1) Caja de conexiones 2) Placa de soporte 3) Cables eléctricos 4) Barra de soporte 5) Tornillos para fijar el...
-
Page 53: Limpieza Y Mantenimiento
- interruptor para encender o apagar la luz (en los modelos con este opcional) y se actúa presionando el interruptor O/I en los modelos con mando de pared. LIMPIEZA Y MANTENIMIENTO Atención: antes de efectuar las normales operaciones de limpieza, apagar el ventilador, apagar la luz del ventilador (si presente) y cortar la alimentación de la red eléctrica apagando el interruptor unipolar (pos O/OFF). - Page 54 PROBLEMA CAUSA POSIBLE SOLUCIÓN Aparato Falta de corriente Controlar el interruptor completamente eléctrica general apagado instalación o que la conexión eléctrica sea correcta aparato Motor averiado Dirigirse a un Centro funciona de Asistencia Técnica regularmente autorizado. El ventilador oscila Paletas montadas Apretar excesivamente...
- Page 55 Símbolo Símbo Portata massima d’aria/Maximum 166.05 m³/min flow rate/ Puissance (type ventilation maximale/ Maximaler VSM10) Luftdurchsatz Lüfters/ 165.65 Capacidad máxima de aire (type VSM11) Potenza assorbita 56.2 (type ventilatore/Fan power input/ VSM10) Puissance d’entrée ventilateur/ 56.4 (type Eingangsleistung Lüfters/ VSM11)
- Page 56 Livello di potenza sonora del 60.1 (type dB(A) ventilatore/Fan sound power VSM10) level/ Niveau sonore ventilateur/ 59.5 (type Geräuschpegel des Lüfters/ Nivel VSM11) potencia acústica ventilador Velocità massima 2.97 (type m/sec dell’aria/Maximum velocity/ VSM10) Vitesse maximale l’air/ 2.98 (type Maximale...
Need help?
Do you have a question about the VSM11 and is the answer not in the manual?
Questions and answers